
Run TypeScript Mocha Tests in Visual Studio Code
I’m spending my July 4th getting back to basics and learning some data structures and algorithms. I’ve decided to do my stuff in TypeScript since it’s been a while since I’ve played with TypeScript and I wanted to see what has changed at the same time.
This is not a blog post about how to do data structures and algorithms in TypeScript, JavaScript or any other language. If you are studying for an interview or classes, there are plenty of places on the Internet you can go to do that. Personally, I like hackerrank.com.
Rather, this is a blog post to help you practice. It answers two questions:
- If I write my code in TypeScript, how can I write and run tests in TypeScript as well?
- If there is a problem in my code, how can I use the debugger within Visual Studio Code to debug my code?
Writing tests in TypeScript
I’ve created a directory on my computer called ts-algorithms. In a terminal window:
mkdir ts-algorithms
cd ts-algorithms
npm init -y
This gives me a basic structure. Feel free to edit and save the package.json file according to your wishes at this point. I generally change the license, then add author, description and keywords to mine.
Next, write some code. I place my code in the src directory and the tests in the test directory, so create those directories. I write my source files in TypeScript as a module. For instance, here is my Stack.ts file:
/**
 * Implementation of a classic stack.
 */
export class Stack<T> {
    // Internal storage for the stack

    private _items: T[] = [];

    /**
     * Creates a pre-populated stack.
     *
     * @param {T[]} initialData the initial contents of the stack
     */
    constructor(initialData: Array<T> = []) {
        this._items.push(...initialData)
    }

    /**
     * Adds an item to the top of the stack.
     *
     * @param {T} item the item to be added to the stack
     */
    push(item: T): void {
        this._items.push(item);
    }

    /**
     * Removes an item from the top of the stack, returning it.
     *
     * @returns {T} the item at the top of the stack.
     */
    pop(): T {
        return this._items.pop();
    }

    /**
     * Take a peek at the top of the stack, returning the top-most item,
     * without removing it.
     *
     * @returns {T} the item at the top of the stack.
     */
    peek(): T {
        if (this.isEmpty())
            return undefined;
        else
            return this._items[this._items.length - 1];

    }

    /**
     * @returns {boolean} true if the stack is empty.
     */
    isEmpty(): boolean {
        return this._items.length === 0;
    }

    /**
     * @returns {number} the number of items in the stack.
     */
    size(): number {
        return this._items.length;
    }
}
I’ve also got an src/index.ts that combines all my modules. It’s got a single line right now:
export { Stack } from './Stack';Of course, I have some tests to go along with it. For unit testing, I use a combination of mocha and chai. Let’s start by installing these in the project:
npm install --save-dev mocha chai
However, mocha does not run TypeScript tests all by itself. It needs help:
npm install --save-dev ts-node typescript
In addition, I am using Visual Studio Code and it will be really good if the editor understood the typings so that I can get Intellisense when writing tests:
npm install --save-dev @types/chai @types/mocha
Now, let’s add a script entry into our package.json file so that we can run the tests:
"scripts": {
  "tests": "mocha --require ts-node/register test/**/*.ts"
},
The --require ts-node/register is the important bit here. It registers TypeScript as an interpreter so we can write the tests in TypeScript.
Let’s write some tests in test/stack.ts:
import { expect } from 'chai';
import { Stack } from '../src';

describe('Stack', () => {
    it('can be initialized without an initializer', () => {
        const s = new Stack<number>();
        expect(s.size()).to.equal(0);
    });
    it('can be initialized with an initializer', () => {
        const s = new Stack<number>([ 1, 2, 3, 4 ]);
        expect(s.size()).to.equal(4);
    });
    it('can be pushed upon', () => {
        const s = new Stack<number>([ 1, 2, 3, 4 ]);
        s.push(5);
        expect(s.size()).to.equal(5);
        expect(s.peek()).to.equal(5);
    });
    it('can be popped', () => {
        const s = new Stack<number>([ 1, 2, 3, 4 ]);
        expect(s.pop()).to.equal(4);
        expect(s.size()).to.equal(3);
    });
    it('can be peeked', () => {
        const s = new Stack<number>([ 1, 2, 3, 4 ]);
        expect(s.peek()).to.equal(4);
        expect(s.size()).to.equal(4);
    });
    it('isEmpty() returns true when empty', () => {
        const s = new Stack<number>();
        expect(s.isEmpty()).to.be.true;
    });
    it('isEmpty() is false when not empty', () => {
        const s = new Stack<number>([1, 2, 3, 41]);
        expect(s.isEmpty()).to.be.false;
    });
    it('cannot pop when no elements', () => {
        const s = new Stack<number>();
        expect(s.pop()).to.be.undefined;
    });
    it('cannot peek when empty', () => {
        const s = new Stack<number>();
        expect(s.peek()).to.be.undefined;
    });
});
Finally, let’s run the tests:
npm run tests
You can run this in the integrated terminal window of Visual Studio Code (just use View > Integrated Terminal to bring it up). You should be rewarded with nine successful tests:
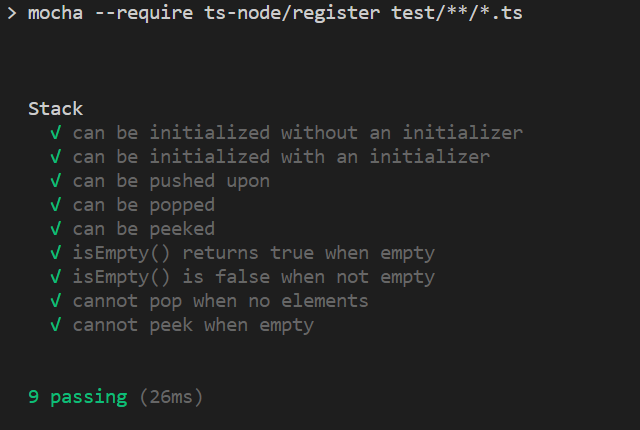
Note that all the code, including the tests, is written in TypeScript. You get compile time type checking, generics, and a whole host of other enhancements to JavaScript.
Debugging tests in the Visual Studio Code debugger
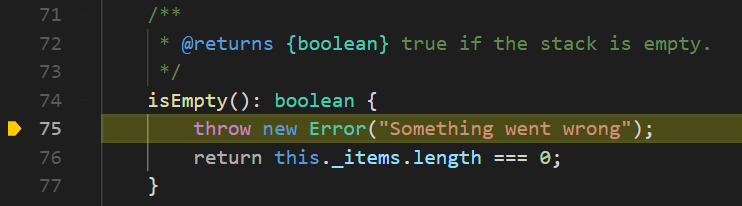
Running tests is good, but we can actually do better. What happens when one of the tests goes wrong? For example, let’s add a single line to our src/Stack.ts to make the isEmpty() method always fail:
isEmpty(): boolean {
    throw new Error("Something went wrong");
    return this._items.length === 0;
}
Re-run the tests and the first test that fails is the third one — “can be pushed upon”. I’d really like to find out what is happening now! Enter the Visual Studio Code debugger:
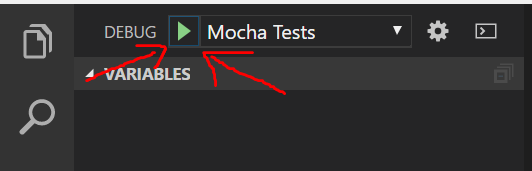
The debugger window changes the left hand area:
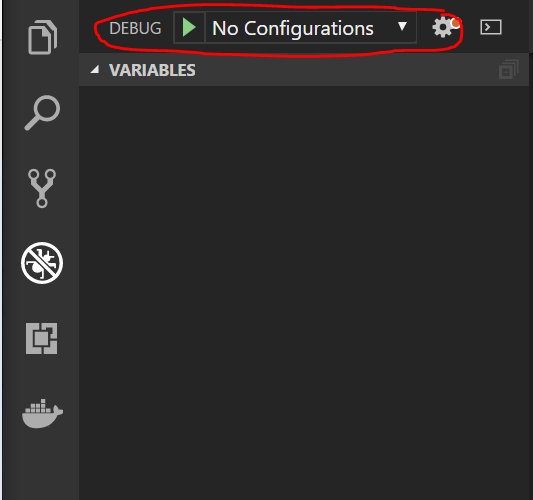
Before I can debug, I need to tell Visual Studio Code how to run my tests within the debugger. To do this, I add a configuration. Click the drop-down next to No Configurations and select Add Configuration…, then select the Node.js environment. This will add a further drop-down for selecting a configuration. Select the {} Node.js: Mocha Tests configuration. This gets a basic pattern for running mocha tests. However, just as we had to add arguments to the mocha command in the package.json file, we need to do so in the configuration. Here is my configuration file:
{
    "version": "0.2.0",
    "configurations": [
        {
            "type": "node",
            "request": "launch",
            "name": "Mocha Tests",
            "program": "${workspaceFolder}/node_modules/mocha/bin/_mocha",
            "args": [
                "--require", "ts-node/register",
                "-u", "tdd",
                "--timeout", "999999",
                "--colors", "--recursive",
                "${workspaceFolder}/test/**/*.ts"
            ],
            "internalConsoleOptions": "openOnSessionStart"
        }
    ]
}
Note the args field here. It contains some “extra” stuff, but the important piece — the registration of ts-node to ensure TypeScript is used — is right at the beginning. This is stored in .vscode/launch.json so you can check this into your source code control for future runs.
On to debugging. I can set a breakpoint in the test/stack.ts file right on the it() call for the failing test by clicking in the left margin next to it. A little red ball will appear:
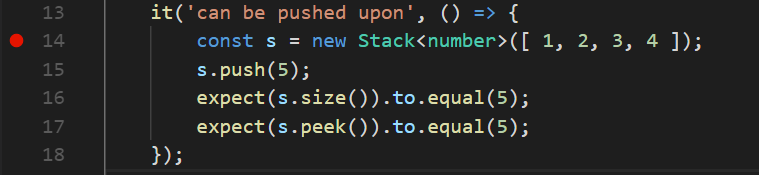
Note that I set the breakpoint on the first line of the test, not the it() call. Now, go into the debugger screen and click the run button:
Once the breakpoint is hit, execution is paused and you can step through the code:

This set of controls appears at the top. From left to right, they are:
- Continue until the next breakpoint.
- Step over the next statement.
- Step into the next statement.
- Step out of the next statement.
- Restart the process.
- Stop the process.
There are also a few windows on the left hand side with information about the variables (probably the most useful), watched variables, call stack, and where the breakpoints are.
So, let’s debug this. We’ve already had two successful tests that create a stack and that show the size. Since I’ve already tested those, I don’t need to step into those. In this test, there are two new methods that have yet to be tested — the push() and peek() calls. I’m going to do the following:
- Step over the stack creation.
- Step into the
push()call. - Step over
push()call on the stack array (insrc/Stack.js).
The cursor is now at the end of the push() method. I can take a look at the variables — in particular this._items, which holds the stack items. Everything seems to be in order. Let’s continue:
- Step over the return from the
push()call. - Based on prior information, step over the
size()test. - Step into the
peek()test. - Step into the
this.isEmpty()call (insrc/Stack.jsnow). - We are throwing an error.
I could also have found this by checking the box next to All Exceptions in the breakpoints window, but it would not have given me the flow through the code, so I would have been left without the context of why this method was called in the first place (although the call stack window gives me some of the context).
Other debugging exercises are returning the wrong value. In that case, you would operate using the step-into/step-over mechanism, but analyze the variables at each step of the code. Are they what you expect them to be? You know your algorithm. Walk through it on paper before implementing. At what point does it diverge from your understanding?
Note that when we were debugging, we were seeing the TypeScript code — not the transpiled JavaScript code.
Now I can get on with some more coding examples.
Leave a comment