
Using dependency injection with Koin
In a recent post, I described how I can do app analytics by using the AWS Mobile SDK and an AWS Mobile Hub project. This is a great way to get usage analytics for your app, but it requires a tight coupling between the provider (the AWS Provider and AnalyticsClient) and the app. You need to initialize the provider early on (preferably in the Application wrapper or the first activity). That causes a tight linkage between the activities where it is used and the client object.
This has several important downsides. Firstly, you can’t test the various components of a real app in isolation. Whenever you do a bit of analytics recording in a class under test, the test will crash because the context isn’t initialized. That means that the pinpointManager isn’t initialized either which means recordEvent() is operating on a null value and you get the dreaded Null Pointer Exception (NPE). Second, you have to know explicitly about the specifics of the implementation.
There is a better way and it comes in the form of dependency injection (DI). This is a tool that you can use to separate the implementation and initialization of a service from its usage. In tests, you can write a mock analytics service, for instance, that just logs (or does nothing). When you build the real app, you can inject the appropriate Amazon Pinpoint version and analytics events are recorded as you would expect.
There are a number of options for dependency injection in Android:
You could also use a simple service locator pattern and bypass dependency injection altogether. There’s no need to go to the trouble of dependency injection if you don’t need it. As your app becomes more complex, you will find dependency injection more helpful.
In this article, I’m going to be using Koin. I found Dagger-2 to be complex and has too much boilerplate. It took a while to understand and get right. Toothpick and Kodein were much nicer from that perspective. I found Koin to be the easiest to understand after I had gone through a simple example. So let’s get coding!
Step 1: Create an interface for the service
Before you get too deep into the mechanics for dependency injection, you’re going to need to create an interface for a service, and then create a concrete implementation for that interface. By creating an interface (and using it everywhere), you can swap out the implementation when you want. In tests, youcan swap in a mock implementation. In production, you can swap in an Amazon Pinpoint version. If, later on, you want to write to Amazon Kinesis or some other analytics provider instead, you can do that easily without changing the rest of the code. Just create the new implementation and then provide it via the dependency injection system. Here’s my AnalyticsService interface:
package com.shellmonger.apps.familyphotos.services

interface AnalyticsService {
    fun startSession()
    fun stopSession()
    fun recordEvent(type: String)
}
Note that I’m not specifying the application context anywhere. I’m not initializing the object. I’m just specifying the methods that my components will use.
Step 2: Create a concrete implementation for the service
Actually, create two implementations. The first is the MockAnalyticsService:
package com.shellmonger.apps.familyphotos.services

import android.util.Log

class MockAnalyticsService : AnalyticsService {
    val TAG = this::class.java.simpleName

    override fun startSession() {
        Log.d(TAG, "startSession")
    }

    override fun stopSession() {
        Log.d(TAG, "stopSession")
    }

    override fun recordEvent(type: String) {
        Log.d(TAG, "recordEvent($type)")
    }
}
And the second is for the AWSAnalyticsService:
1
2
3
4
5
6
7
8
9
10
11
12
13
14
15
16
17
18
19
20
21
22
23
24
25
26
27
28
29
30
31
32
33
34
35
36
37
38
39
40
41
42
43
package com.shellmonger.apps.familyphotos.services

import android.content.Context
import android.util.Log
import com.amazonaws.auth.CognitoCachingCredentialsProvider
import com.amazonaws.mobile.config.AWSConfiguration
import com.amazonaws.mobileconnectors.pinpoint.PinpointConfiguration
import com.amazonaws.mobileconnectors.pinpoint.PinpointManager

class AWSAnalyticsService(context: Context) : AnalyticsService {
    private val TAG = this::class.java.simpleName
    private val pinpointManager: PinpointManager

    override fun startSession() {
        with (pinpointManager) {
            sessionClient.startSession()
            analyticsClient.submitEvents()
        }
    }

    override fun stopSession() {
        with (pinpointManager) {
            sessionClient.stopSession()
            analyticsClient.submitEvents()
        }
    }

    override fun recordEvent(type: String) {
        with (pinpointManager.analyticsClient) {
            val event = createEvent(type)
            recordEvent(event)
            submitEvents()
        }
    }

    init {
        Log.d(TAG, "constructor - context = ${context}")
        val awsConfiguration = AWSConfiguration(context)
        val credentialsProvider = CognitoCachingCredentialsProvider(context, awsConfiguration)
        val pinpointConfiguration = PinpointConfiguration(context, credentialsProvider, awsConfiguration)
        pinpointManager = PinpointManager(pinpointConfiguration)
    }
}
They both implement the AnalyticsService interface, so they can be used interchangeably by any object that has a reference to an object defined (for example) like this:
package com.shellmonger.apps.familyphotos.lifecycle

import android.app.Application
import com.shellmonger.apps.familyphotos.services.AWSAnalyticsService
import com.shellmonger.apps.familyphotos.services.AnalyticsService

class ApplicationWrapper : Application() {
    companion object {
        var analyticsService: AnalyticsService? = null
    }

    override fun onCreate() {
        super.onCreate()
        analyticsService = AWSAnalyticsService(applicationContext)
    }
}
Now you can use AnalyticsService anywhere you need. The application wrapper lives for the life of the app, so it’s always available. However, this is unscalable in complex apps. You end up placing all these service locators in their own class as singletons and it gets messy pretty quickly.
Step 3: Add the Koin libraries
Now we get to integrate Koin. Here’s the addition to the dependencies section of the app build.gradle:
// Dependency Injection

implementation "org.koin:koin-android:$koin_version"
The latest Koin version is 0.9.2.
Step 4: Create a DI module
You need to declare a module to let Koin know what things can be injected. Here’s my module:
val appModule : Module = applicationContext {
    bean { AWSAnalyticsService(get()) as AnalyticsService }
}
I place this in the top of the ApplicationWrapper class for convenience. This way, my ApplicationWrapper defines the entire context of the dependency injection system within the companion object. However, you can also put the module in another file (and probably should). You can also split your dependency injection graph into multiple modules.
Use bean if your service should be a singleton. Most cloud services and data services fall into this category. You only want one database connection, for example. You want cloud services to take advantage of bandwidth optimization by caching. They do that by using a singleton pattern. If you don’t want a singleton, use factory instead of bean.
Note the use of get() — this allows you to use recursive dependency injection. The get() will be resolved prior to injection based on what is required.
Step 5: Initialize Koin
Your application wrapper should resemble this:
class ApplicationWrapper : Application() {
  companion object {
    private val appModule : Module = applicationContext {
      bean { AWSAnalyticsService(get()) as AnalyticsService }
    }
  }

  override fun onCreate() {
    super.onCreate()
    // Initialize Koin dependency injection

    startKoin(this, listOf(appModule))
  }
}
Remove the static reference to the analytics client (if you added it). It will be injected when needed now.
If you have multiple modules, just add them as a comma-delimited list inside the listOf() operator. Note that this is an improvement over the previous use of the singleton instance variable. Less boiler plate code is a good thing.
Step 6: Inject into your classes
Finally, you need to adjust your components so that they use the injected version of the AnalyticsService. Here’s my SplashActivity as an example:
1
2
3
4
5
6
7
8
9
10
11
12
13
14
15
16
17
18
package com.shellmonger.apps.familyphotos.ui

import android.support.v7.app.AppCompatActivity
import android.os.Bundle
import com.shellmonger.apps.familyphotos.R
import com.shellmonger.apps.familyphotos.services.AnalyticsService
import org.koin.android.ext.android.inject

class SplashActivity : AppCompatActivity() {
    val analyticsService: AnalyticsService by inject()

    override fun onCreate(savedInstanceState: Bundle?) {
        super.onCreate(savedInstanceState)
        setContentView(R.layout.activity_splash)

        analyticsService.startSession()
    }
}
The injection is at line 10. Once injected, I can use it anywhere. You can now run your app and you’ll see the same analytics as you previously had. If you look at the debugging, you might see the following:
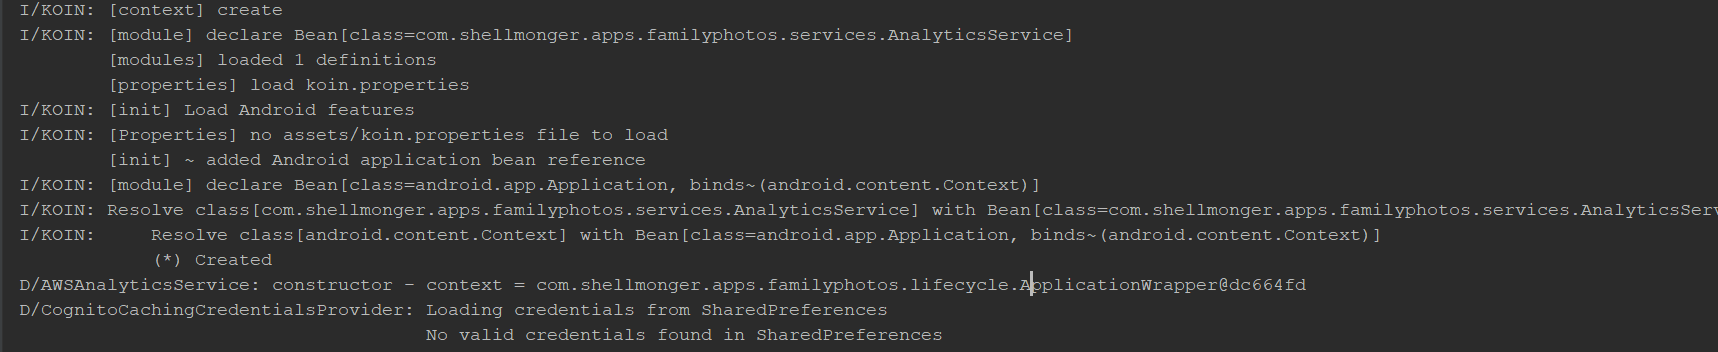
You can clearly see here that the AnalyticsService was resolved, but that caused an additional resolution for the context. The context that was provided was the application context.
Wrap up
If you’re producing a production app, you should consider structuring your app to use either dependency injection or a simple service locator. The more complicated the app is(defined as more services / data models), then the more likely it is that dependency injection will be an improvement.
Both a service locator and dependency injection will improve your testing capabilities if you organize your code into uniquely testable units. You can take a look at the Android Architecture Components for a method on how to do this.
Leave a comment