
Let your analytics drive engagement: Endpoint profiles with AWS Amplify and Android
In my last article, I showed the current best way of integrating analytics into your Android app using Kotlin. The events are only half the story for engagement. You need to be able to segment your users so that you can send them appropriate signals to draw them back to your app. That means understanding your users — where they are, whether they have authenticated (and how), and what they are interested in.
Amazon Pinpoint and the AWS Mobile SDK for Android provides some demographic information about the device the user is using out of the box. You can target all iOS users separately from all Android users, target a specific phone manufacturer or Android version, or a particular app version. Everything else needs to be provided by changing the endpoint profile. The endpoint profile is a blob of information about the user. It is session specific and can be easily adjusted.
If you followed the last article, your project is already set up for analytics — you have the service set up and you have integrated the Amazon Pinpoint SDK into your app.
Adding authenticated user information
The most basic change we can do is to add user information into the endpoint profile. When a user authenticates, you want to start recording this fact. Firstly, there is a graph within the Analytics section of Amazon Pinpoint that directly deals with active users. This graph is driven by the user information you record in the endpoint profile. Secondly, we can segment users based on whether they are authenticated or not.
To update the profile, we get a copy of the current endpoint profile, copy relevant information into it, then update the endpoint profile with the new information. Finally, we record an event to send the updated endpoint profile:
To effect this change, I added two additional methods to my definition of an analytics service with the following implementation:
/**
  * Record a successful authentication
  *
  * @param username the username of the user that was authenticated
  */
override fun recordSuccessfulLogin(username: String) {
    // Update the endpoint profile to include the username

    val profile = pinpoint.targetingClient.currentEndpoint()
    profile.user.userId = username
    pinpoint.targetingClient.updateEndpointProfile(profile)

    // Record the sign in

    recordEvent("_userauth.sign_in")
}

/**
  * Record a failed authentication
  */
override fun recordFailedLogin() {
    recordEvent("_userauth.authfail")
}
When I do authentication, I can use recordSuccessfulLogin() to record this. The endpoint will get updated and the appropriate signal will be sent to Amazon Pinpoint. The _userauth.sign_in is a special event in Amazon Pinpoint for recording a successful authentication. Adding an update to the endpoint profile will enable you to count active users:
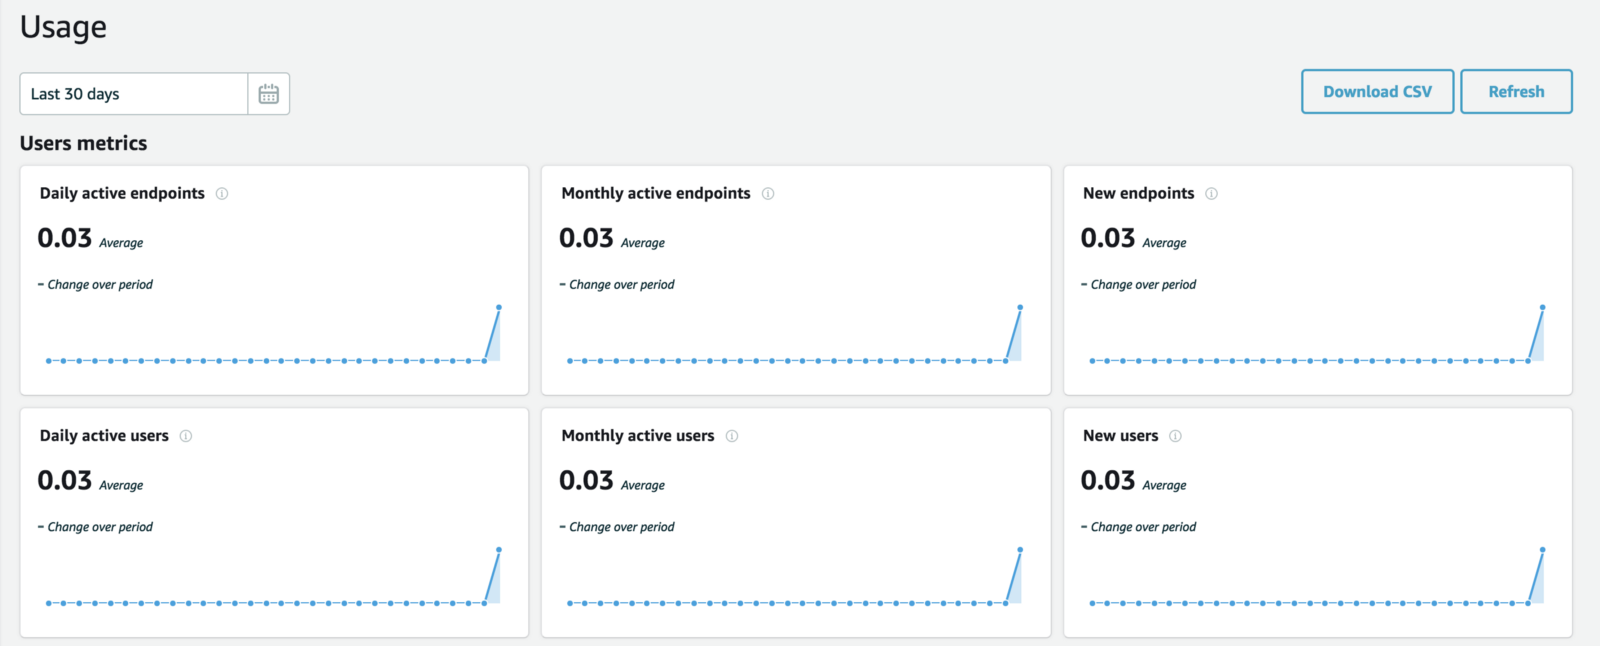
The graphs themselves may be uninteresting. From a developer perspective, though, the daily active users and monthly active users graphs have upticks. That is caused by setting the user ID within the endpoint profile.
Adding category information
A common requirement is to record “interests”. If you have a news app, you may want to opt in to news, sports, breaking news, politics, or any other number of categories. You can use a custom attribute called “categories” to store these.
The way I like to do this is to store the categories in a shared preferences store. You can use AWS AppSync to store shared preferences in the cloud so that the preferences are shared among all devices, or just use the shared preferences built into Android, which is what I will do here.
First, add a new method definition into the AnalyticsService interface:
/**
 * Update the categories custom attribute within Analytics
 */
fun updateCategories(categories: List<String>)
Now, let’s add to the implementation in AWSAnalyticsService:
/**
  * Where the preferences are stored on the system
  */
private val preferencesFile: String
    get() = "${this::class.java.simpleName}.prefs"

/**
  * The name of the custom attribute
  */
private val categoriesAttributeName = "categories"

/**
  * The shared preferences area object
  */
private var prefs: SharedPreferences = context.getSharedPreferences(preferencesFile, 0)

init {
    // Read the current categories list, if present

    val categories = prefs.getStringSet(categoriesAttributeName, emptySet())
    if (categories.size > 0) {
        val endpoint = pinpoint.targetingClient.currentEndpoint()
        endpoint.addAttribute(categoriesAttributeName, categories.toList())
        pinpoint.targetingClient.updateEndpointProfile(endpoint)
    }

    pinpoint.sessionClient.startSession()
    pinpoint.analyticsClient.submitEvents()
}

/**
  * Update the categories within the endpoint profile
  */
override fun updateCategories(categories: List<String>) {
    prefs.edit().putStringSet(categoriesAttributeName, categories.toSet()).apply()
    val endpoint = pinpoint.targetingClient.currentEndpoint()
    endpoint.addAttribute(categoriesAttributeName, categories)
    pinpoint.targetingClient.updateEndpointProfile(endpoint)
    recordEvent("_endpoint.updateCategories")
}
Whether we update the categories through a UI action or because we loaded the categories via shared preferences, we always record an event so that the endpoint profile is transmitted to the other side.
You can have up to 20 custom attributes, each of which can be a set of strings, single string, integer or double type.
Adding location information
The final thing you may want to do is to tag each event with some location information. Step 1 is to create a location service. I separate out the location service into it’s own class that is injected via dependency injection. First, add the appropriate permissions into the app:
<uses-permission android:name="android.permission.ACCESS_COARSE_LOCATION" />
<uses-permission android:name="android.permission.ACCESS_FINE_LOCATION" />
You can use either coarse or fine grained location. For analytics, it’s generally good enough to be “close”, but you can use either level of granularity. The location service looks like this:
package com.amazonaws.mobile.samples.picturefeed.services.aws

import android.content.Context
import android.content.Context.LOCATION_SERVICE
import android.location.Location
import android.location.LocationListener
import android.location.LocationManager
import android.os.Bundle
import android.util.Log
import com.amazonaws.mobile.samples.picturefeed.TAG

class LocationService(context: Context) : LocationListener {
    private val locationManager : LocationManager = context.getSystemService(LOCATION_SERVICE) as LocationManager
    private var location: Location? = null

    init {
        try {
            locationManager.requestLocationUpdates(LocationManager.NETWORK_PROVIDER, 0L, 0f, this);
            location = locationManager.getLastKnownLocation(LocationManager.NETWORK_PROVIDER)
        } catch (ex: SecurityException) {
            Log.e(TAG, "Security Exception: ${ex.localizedMessage}")
        }
    }

    val latitude : Double = location?.latitude ?: 0.00
    val longitude : Double = location?.longitude ?: 0.00

    override fun onLocationChanged(location: Location?) {
        this.location = location
    }

    override fun onStatusChanged(provider: String?, status: Int, extras: Bundle?) {
        Log.d(TAG, "onStatusChanged($provider, $status)")
    }

    override fun onProviderEnabled(provider: String?) {
        Log.d(TAG, "onProviderEnabled($provider)")
    }

    override fun onProviderDisabled(provider: String?) {
        Log.d(TAG, "onProviderDisabled($provider)")
    }
}
Reality check: This is the wrong way to do this, but is illustrative of the technique. In a real application, you would be checking permissions, asking for permission to access location, recording the preference, and doing appropriate changes to the analytics.
Now, let’s take a look at the AWSAnalyticsService class updates:
class AWSAnalyticsService(context: Context, service: AWSService, private val locationService: LocationService) : AnalyticsService {
    /**
     * Record a custom event into the analytics stream
     *
     * @param name the custom event name
     * @param [attributes] a list of key-value pairs for recording string attributes
     * @param [metrics] a list of key-value pairs for recording numeric metrics
     */
    override fun recordEvent(name: String, attributes: Map<String, String>?, metrics: Map<String, Double>?) {
        // Add location to the endpoint

        val endpoint = pinpoint.targetingClient.currentEndpoint()
        endpoint.location.latitude = locationService.latitude
        endpoint.location.longitude = locationService.longitude
        pinpoint.targetingClient.updateEndpointProfile(endpoint)

        // Work out what the preference

        val event = pinpoint.analyticsClient.createEvent(name)
        for ((k, v) in attributes.orEmpty()) {
            event.addAttribute(k, v)
        }
        for ((k, v) in metrics.orEmpty()) {
            event.addMetric(k, v)
        }
        pinpoint.analyticsClient.recordEvent(event)
        pinpoint.analyticsClient.submitEvents()
    }
}
The endpoint.location object allows you to also set the city, country, postalCode and region — all can be specified as strings. You can use the Geocoder methods within the Google Maps API for this if needed. You can also use an alternate location provider, such as the currently recommended FusedLocationProviderClient.
Basic segmentation
Why would we want to do all this work? As I mentioned at the beginning of the article, we want to be able to engage our users by sending them messages that may be relevant to them. Part of this is user segmentation.
Let’s go back to the Amazon Pinpoint console:
amplify analytics consoleNow, go to Segments > New Segment to create a segment. Start building your segment by selecting Custom Attributes, then categories, then one of your categories:
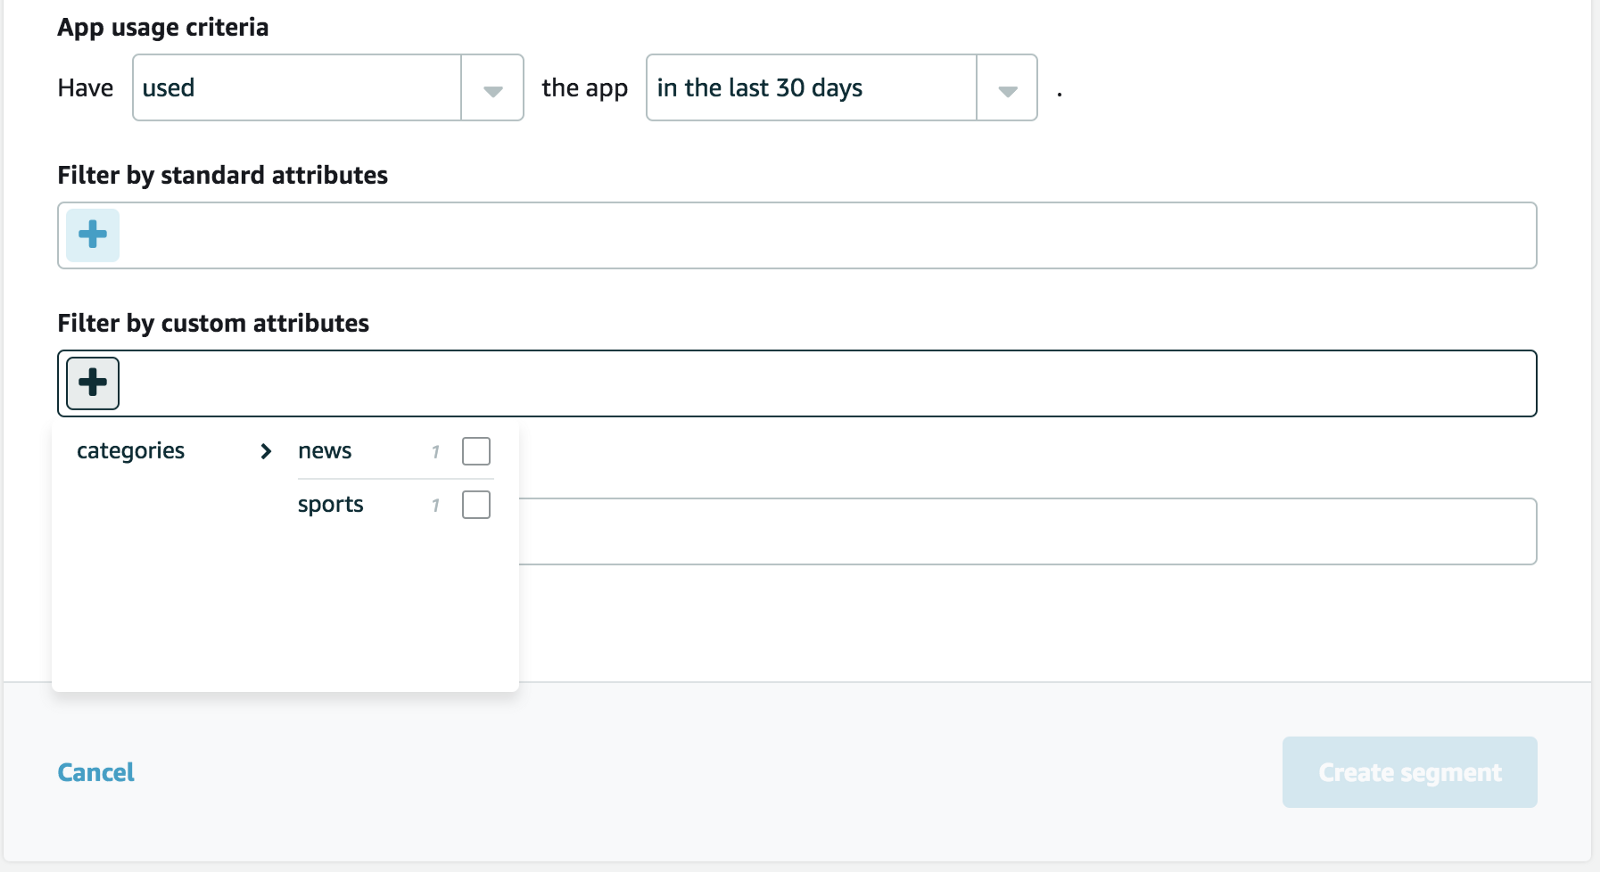
Your standard attributes are the phone type, manufacturer, app version, and so on. The custom attributes are the ones that you programmatically enable via the endpoint profile.
Now that you have a segment, use Settings to enable a channel, then create a campaign with the segment you have defined. The SMS and Email channels are relatively easily configured. Push notifications requires more set up (and I’ll be covering that in a future article).
Leave a comment