
Authentication with AWS Amplify and Android: The Basics
This will be an in-depth series on authentication with AWS Amplify. Here are the topics I am going to cover, and I will update each blog with the links as I complete the articles.
- The basics - a username/password system.
- Customizing the UI.
- Authenticating with Facebook.
- Authenticating with Google.
- Using third-party authentication providers.
- Using Time-based One-time passwords (TOTP).
- Using Biometric authentication.
- Doing fraud protection and analytics.
I’m not going to cover integrating with Active Directory in this series as there is an excellent walk through of the process on the AWS Mobile Blog. If you want to see a topic covered that I haven’t suggested, send me a message on Twitter.
So, the basics?
Authentication and authorization scares most people. From a pure product perspective, you are putting a barrier between your app and the user. In return, you get to track the user as a user instead of a device. The user gets portability of data — the ability to see their data on multiple devices. So, as a user, we see authentication as a necessary evil.
As developers, we can still make it easier for our users by following some pretty basic patterns.
- Use a service. There is practically no reason to be implementing an authentication provider yourself.
- Use social authentication whenever you can. If you need username and password, ask yourself why you need it.
- Don’t rely on one social authentication provider. Let your user choose how to authenticate.
- Keep it simple — minimal information requests.
- If you are using username / password authentication, ensure you secure the information adequately.
- Cache the user credentials and re-use them whenever possible to reduce the number of times the user is asked for authentication.
There are reasons why you should not use social authentication. Banks and shopping apps comes to mind. However, most apps don’t fall into that category, so you should be able to use social authentication.
So, how does authentication work within AWS? This is the diagram from the AWS documentation:
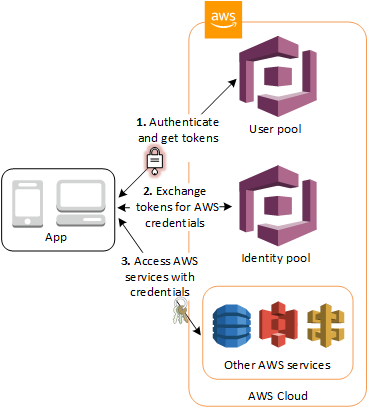
Let’s replace “User pool” with “Authentication provider”. The process is fairly simple. You get a token from an OpenID Connect (OIDC) authentication provider. With a couple of AWS services, this is enough — just start passing that token to AWS AppSync or Amazon API Gateway to get access to the resources. Amazon Cognito user pools is an OIDC compatible service that you can use for username and password authentication.
If you want to access any other service (aside from AWS AppSync and Amazon API Gateway), then you need to sign your requests to the AWS service. That requires an access key and secret key so that you can be associated with an IAM policy. Amazon Cognito Federated Identities (also known as an Identity pool) provides short-lived identities for this purpose. The app sends the token you received from the OIDC authentication provider to the Identity pool and it will send the app appropriate credentials back that you can use for up to an hour. The AWS Mobile SDK takes care of most of this for you, so this is behind the scenes.
When do you authenticate your users?
There are basically three times you may want to authenticate your users:
- When the user initiates an authentication request.
- When the user requests to enter a protected screen in the app.
- When the user requests access to protected data in the app.
Most demonstration apps wrap the entire app in an authentication request. While this is easy to implement, it’s not friendly to the user, and I discourage its use. However, you may find it useful to check authentication and redirect users to the authentication screen when needed. For example, you might have a catalog of “stuff” (say videos) and provide the list to unauthenticated users, but details (e.g. the video itself) to authenticated users.
I normally like to write apps where authentication is not required, but the user gets additional features when authentication is provided. For example, I may write a notes app that stores data locally. However, when the user logs in, the data is stored in the cloud and can be accessed from other devices or on the web. As a result, I generally provide a navigation drawer with a Sign In / Sign Out link.
The final technique is when users request access to protected data. Let’s take that video app example again. If you had some videos that were available unauthenticated, then you might check the authentication state of the user prior to presenting the video and make a decision on whether to ask for authentication there.
In all cases, the authentication is done by a new Activity that does the work of authenticating the users. This activity is provided by the AWS Mobile SDK.
Setting up username/password authentication
Before we get started, we are going to be using the AWS Amplify Toolchain for this purpose. If you have seen my other blogs, you will know this is incredibly easy to get started:
npm install @aws-amplify/cli
amplify configure
This is a one-time install. You will need to configure the AWS CLI or create an access key and secret key for usage. Check out the Get Started tutorial for more details on this (there is a video walking you through the process).
Next, let’s initialize a project. Pick any Android project. I’m using a Kotlin-based project for this, but you can use whatever project you want. The information translates between Java and Kotlin really easily.
amplify initYou will be guided through the process of setting up the project. Make sure android is selected at the appropriate time. Next, let’s add authentication:
amplify add authIf you have added other services, this would be amplify update auth instead. That’s because you will have set up a “guest” authentication service (which comprises an Amazon Cognito identity pool and an unauthenticated role in AWS IAM).
The first question is whether you want to use the default settings or not. The default settings are authentication via Amazon Cognito user pools with username and password. Sign-ups will be protected by a multi-factor authentication token sent via phone or email. If this describes you scenario, then use the default settings. However, let’s take a look at our own configuration:
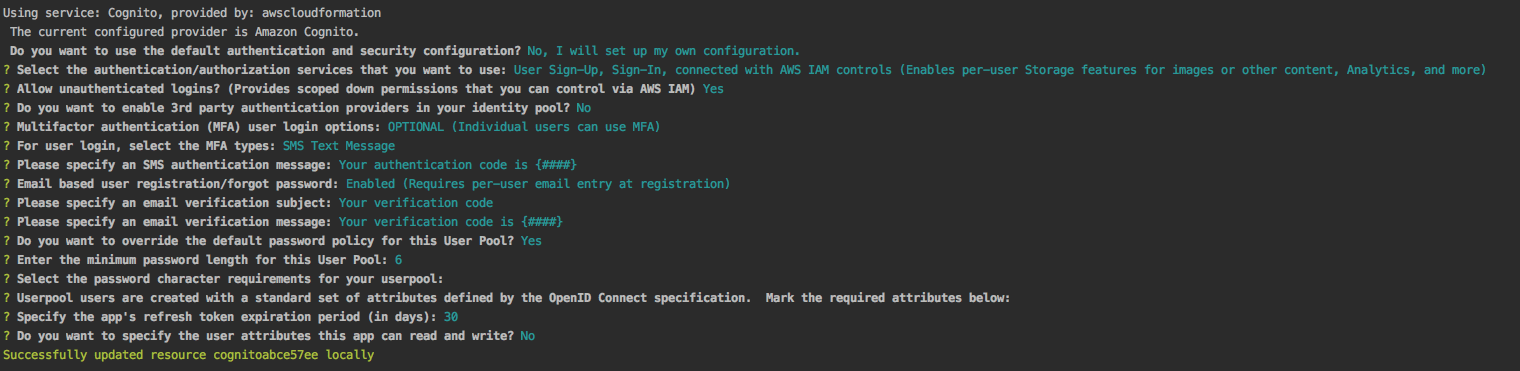
That is a lot of settings, and they are intimidating. However, most of them are straight forward and they allow you to configure your authentication service very specifically. If you want to change anything, you can run amplify update auth at any time in the future.
Behind the scenes, there is a CloudFormation template that is generated to create all the resources that are required here. Now, let’s deploy this!
amplify pushThere is an approval (say yes) and then the resources will be deployed to the AWS cloud for you. In addition, a new awsconfiguration.json file will be generated within your apps res/raw directory for you to use.
Add some dependencies
Here is the Gradle dependencies for implementing authentication:
dependencies {
    // AWS Dependencies

    implementation "com.amazonaws:aws-android-sdk-core:$versions.aws"
    implementation "com.amazonaws:aws-android-sdk-auth-core:$versions.aws"
    implementation("com.amazonaws:aws-android-sdk-auth-userpools:$versions.aws@aar") { transitive = true }
    implementation("com.amazonaws:aws-android-sdk-auth-ui:$versions.aws") { transitive = true }
}
The auth-core dependency is required for just about everything. The auth-ui dependency provides the in-built UI, and the auth-userpools dependency provides the Amazon Cognito user pools access. Most of the AWS Mobile SDK works with lower API levels (e.g. API level 15), but the Auth UI requires API level 23. If you are targeting API levels lower than 23, you will have to write your own UI. (That’s going to be covered in a later article).
Make sure you also add the INTERNET permission to the app.
Show me the code!
The code for the basics is simple. First, I find it normal to create an AWSService class that provides access to the configuration and credentials provider:
package com.amazonaws.mobile.samples.picturefeed.services.aws

import android.content.Context
import com.amazonaws.auth.AWSCredentialsProvider
import com.amazonaws.mobile.auth.core.IdentityManager
import com.amazonaws.mobile.auth.userpools.CognitoUserPoolsSignInProvider
import com.amazonaws.mobile.config.AWSConfiguration

class AWSService(context: Context) {
    val configuration = AWSConfiguration(context)
    val identityManager : IdentityManager
    val credentialsProvider : AWSCredentialsProvider

    init {
        identityManager = IdentityManager(context, configuration)
        identityManager.addSignInProvider(CognitoUserPoolsSignInProvider::class.java)
        IdentityManager.setDefaultIdentityManager(identityManager)
        credentialsProvider = identityManager.credentialsProvider
    }
}
The important line here is the .addSignInProvider() call. This registers Amazon Cognito User Pools as a sign-in provider and links the identity pool with the user pool within the AWS Mobile SDK.
This provides three elements:
configurationis the internal representation of the awsconfiguration.json fileidentityManageris an internally federated authentication mechanism that submits tokens to the credentials provider as required.credentialsProvideris the identity pool linkage, asking for IAM identities on your behalf based on the authentication state.
The good news is really this — once set up, you don’t have to think about these.
This class should be a Singleton. I use the Koin dependency injection framework to enforce this, and inject it whenever I am accessing AWS resources.
Now, let’s go back to the specific cases of authentication. When you wrap an entire section of your app, you will redirect to an AuthenticatorActivity that you create that initializes the authentication screen, then moves on to the next screen when successful:
class AuthenticatorActivity(private val service: AWSService) : AppCompatActivity() {

    override fun onCreate(savedInstanceState: Bundle?) {
        super.onCreate(savedInstanceState)
        setContentView(R.layout.activity_authenticator)

        // Set up the callbacks to handle the authentication response

        service.identityManager.login(this, object : DefaultSignInResultHandler() {
            override fun onSuccess(activity: Activity, identityProvider: IdentityProvider) {
                Toast.makeText(this@AuthenticatorActivity,
                        String.format("Logged in as %s", service.identityManager.getCachedUserID()),
                        Toast.LENGTH_LONG).show()
                // Go to the main activity

                val intent = Intent(activity, MainActivity::class.java)
                        .setFlags(Intent.FLAG_ACTIVITY_CLEAR_TOP)
                activity.startActivity(intent)
                activity.finish()
            }

            override fun onCancel(activity: Activity): Boolean {
                return false
            }
        })

        // Start the authentication UI

        val config = AuthUIConfiguration.Builder()
                .userPools(true)
                .build()
        SignInActivity.startSignInActivity(this, config)
        this@AuthenticatorActivity.finish()
    }
}
This AuthenticatorActivity is just passing control to the provided SignInActivity (which is part of the AWS Mobile SDK). When it returns, the onSuccess callback is called. This then transfers control to the next activity (in this case, MainActivity). Now all you have to do is to switch to the AuthenticatorActivity whenever you want. In most tutorials, this becomes the entry point of the app.
What about setting up a sign-in link within a navigation drawer? You can use this same logic. First up, add a navigation drawer to the MainActivity. In the navigation drawer menu, add a link for the sign-in:
<!-- activity_nav_drawer.xml -->
<?xml version="1.0" encoding="utf-8"?>
<menu xmlns:android="http://schemas.android.com/apk/res/android"
    xmlns:tools="http://schemas.android.com/tools"
    tools:showIn="navigation_view">

    <group android:checkableBehavior="single">
        <item
            android:id="@+id/main_drawer_login"
            android:icon="@drawable/ic_password_black_24dp"
            android:title="@string/nav_signin" />
    </group>
</menu>
I want the link to switch between Sign In and Sign Out depending on the authentication state. Start by putting some code in the onCreate() method of the MainActivity:
override fun onCreate(savedInstanceState: Bundle?) {
    super.onCreate(savedInstanceState)
    setContentView(R.layout.activity_main)

    /* Configure the action bar */
    setSupportActionBar(main_toolbar)

    /* Configure the navigation drawer */
    val toggle = ActionBarDrawerToggle(this, drawer_layout, main_toolbar, R.string.navigation_drawer_open, R.string.navigation_drawer_close)
    drawer_layout.addDrawerListener(toggle)
    toggle.syncState()
    nav_view.setNavigationItemSelectedListener(this)

    /* Resume the authentication session, if available */
    service.identityManager.resumeSession(this@MainActivity) { result ->
        updateNavigationDrawer(result.isUserSignedIn)
    }
}
Most of this is just the normal code for implementing a navigation drawer. In fact, I got it from the template activity that includes the navigation drawer. However, the final piece is important. The AWS Mobile SDK stores the authentication token until its expiry. The resumeSession() method will load that authentication token if available. We then update the navigation drawer according to the auth state:
/**
  * Update the menu for signed in/out status
  */
private fun updateNavigationDrawer(isSignedIn: Boolean = false) {
    val loginItem = nav_view.menu.findItem(R.id.main_drawer_login)
    if (!isSignedIn) {
        loginItem.title = resources.getString(R.string.nav_signin)
    } else {
        loginItem.title = resources.getString(R.string.nav_signout)
    }
}
The final piece we need to do is to listen for the click on the Sign In or Sign Out link. This is done in the onNavigationItemSelected() method:
override fun onNavigationItemSelected(item: MenuItem): Boolean {
    when (item.itemId) {
        R.id.main_drawer_login -> {
            if (service.identityManager.isUserSignedIn) {
                service.identityManager.signOut()
                updateNavigationDrawer(service.identityManager.isUserSignedIn)
            } else {
                service.identityManager.login(this@MainActivity, object : DefaultSignInResultHandler() {
                    /**
                      * Called when the user has obtained an identity by signing in with a provider.
                      *
                      * @param callingActivity the calling activity that should be finished.
                      * @param provider the provider or null if succeeded with an unauthenticated identity.
                      */
                    override fun onSuccess(callingActivity: Activity?, provider: IdentityProvider?) {
                        if (service.identityManager.isUserSignedIn) {
                            analyticsService.recordSuccessfulLogin(service.identityManager.cachedUserID)
                            updateNavigationDrawer(true)
                        } else {
                            analyticsService.recordFailedLogin()
                            updateNavigationDrawer(false)
                        }
                    }

                    /**
                      * User pressed back from the sign-in Activity.
                      *
                      * @return true if the activity should be finished, otherwise false.
                      */
                    override fun onCancel(callingActivity: Activity?): Boolean = true
                })

                val authConfig = AuthUIConfiguration.Builder()
                        .userPools(true)
                        .build()
                SignInActivity.startSignInActivity(this@MainActivity, authConfig)
            }
        }
    }
    drawer_layout.closeDrawer(GravityCompat.START)
    return true
}
If the user is logged in, they are signed out. If they are already logged out, we run the exact same code that we used in the AuthenticatorActivity. However, instead of switching to a new activity, we are just updating the navigation drawer. If you need to refresh data or update the UI in some other way, this is the place to do it.
Cancelling the authentication
If you have an optional authentication step, you are likely to want to enable cancellation. You can do this by adjusting the authConfig object:
val authConfig = AuthUIConfiguration.Builder()
    .userPools(true)
    .canCancel(true)
    .build()
This add a normal cancellation process (click on the back button or the close icon on screen). In this case, the onCancel() method is called instead of onSuccess(). This allows you to add analytics about authentication cancellations.
Basic customization
You can change several things about the authentication UI by altering the authConfig object:
val authConfig = AuthUIConfiguration.Builder()
        .userPools(true)
        .canCancel(true)
        .backgroundColor(Color.BLUE)
        .isBackgroundColorFullScreen(true)
        .logoResId(R.drawable.app_logo)
        .fontFamily("sans-serif-medium")
        .build()
The background color, logo and font-family can be changed. If you are changing the font-family, it must a built-in font. You can’t use a custom font.
If you want to do any customization of the screens beyond these simple changes, then a fully customized UI is needed. That is the topic for my next article.
Leave a comment