
Authentication with AWS Amplify and Android: Customizing the UI
This will be an in-depth series on authentication with AWS Amplify. Here are the topics I am going to cover, and I will update each blog with the links as I complete the articles.
- The basics - a username/password system.
- Customizing the UI.
- Authenticating with Facebook.
- Authenticating with Google.
- Using third-party authentication providers.
- Using Time-based One-time passwords (TOTP).
- Using Biometric authentication.
- Doing fraud protection and analytics.
This is part 2 - customizing the UI. It was originally published as a standalone article in April 2018, and has been updated to use Android Architecture Components, a part of Android Jetpack.
In the previous article, I introduced you to the basics of setting up an authentication UI with username and password by integrating a simple (provided) UI with a component called IdentityManager from the AWS Mobile SDK to provide the authentication screens. It’s nice and simple.
It’s also a very generic UI. Sure, you can change the colors, fonts, and logo. However, you will want to change out the UI for your own pretty quickly. In addition, it doesn’t play well with dependency injection. That means you can’t swap out the Amazon Cognito version for a mock version very easily for development and testing.
The authentication flows
Authentication is a series of flows. Each stage in the flow requires some information that is submitted to the backend. The backend will then return a request for more information or a success/failure indicator. When you are dealing with a username/password set of flows (such as provided by Amazon Cognito user pools), the list is extensive:
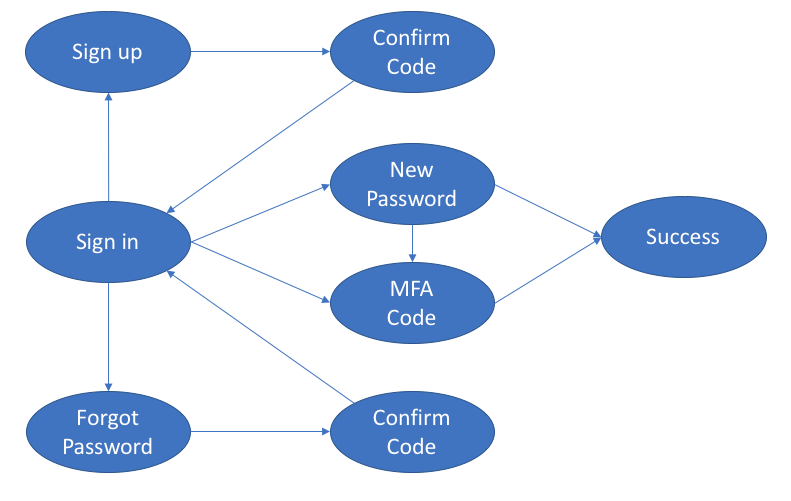
In general, each flow is made up of one or more activities. You initiate the flow by calling a method within Amazon Cognito with a callback. The callback is called when more information is needed to fulfill the request. Eventually you are deposited into a success/failure callback, depending on the result of the authentication.
The default screens provided by IdentityManager and the suite of associated classes within the AWS Mobile SDK use separate activities for each bubble in the authentication flows. However, that isn’t actually required. You can use pop-up dialogs to gather information as well.
The Android Architecture Components stack
Of course, you can’t go haring off to write some custom layouts these days. Android has settled on MVVM as an architecture, and Android Architecture Components as the method for implementing that. That means I need to set up a stack of services, repositories and view models before I can work on the activities.
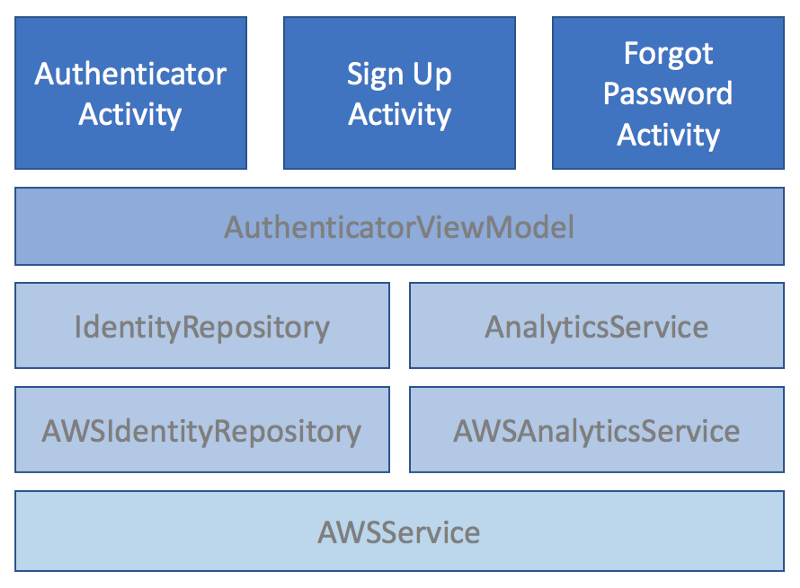
I already have the AWSService and the analytics side of things. However, I need to cover the IdentityRepository and the AWS implementation of that before I can begin on the activities and view models.
In the previous article, I set up a backend with the Amplify CLI and will be using the same backend in this implementation. However, I now have to do all the front end work myself. That means I don’t get to use any of the screens, layouts, or code from the AWS Mobile SDK except for the low-level interface to Amazon Cognito. I can remove the auth-ui library from the build.gradle file.
The IdentityRepository is an interface. In Kotlin, it looks like this:
import android.arch.lifecycle.LiveData

enum class IdentityRequest {
    NEED_SIGNUP,
    NEED_CREDENTIALS,
    NEED_NEWPASSWORD,
    NEED_MULTIFACTORCODE,
    SUCCESS,
    FAILURE
}

typealias IdentityResponse = (Map<String, String>?) -> Unit
typealias IdentityHandler = (IdentityRequest, Map<String,String>?, IdentityResponse) -> Unit

interface IdentityRepository {
    /**
     * Property for the current user record (null if not signed in)
     */
    val currentUser: LiveData<User?>

    /**
     * Stored username
     */
    val storedUsername: LiveData<String?>

    /**
     * Initiate a sign-in flow
     */
    fun initiateSignin(handler: IdentityHandler)

    /**
     * Initiate a sign-out flow
     */
    fun initiateSignout(handler: IdentityHandler)

    /**
     * Initiate a forgot password flow
     */
    fun initiateForgotPassword(handler: IdentityHandler)

    /**
     * Initiate sign-up flow
     */
    fun initiateSignup(handler: IdentityHandler)

    /**
     * Update the stored username
     */
    fun updateStoredUsername(username: String?)
}
Each flow is initiated via an initiate method and there is one for each flow. It takes a handler, which is a callback. Each handler gets sent a request (which is the enum) and a map of the parameters needed to fulfill that request. When the request is fulfilled, the handler calls the callback so we can move to the next step in the flow.
In addition, the interface sports a currentUser which is an observable for whether we are signed in or not, and a storedUsername which is a peek into the shared preferences for storing the username. That way we can “remember” the username for later.
The AWS Implementation for this is rather long, but let’s take a look at one of the flows - the important sign-in flow:
override fun initiateSignin(handler: IdentityHandler) {
  try {
      userPool.currentUser.getSessionInBackground(object : AuthenticationHandler {
          override fun onSuccess(nSession: CognitoUserSession?, newDevice: CognitoDevice?) {
              val userSession = checkNotNull(nSession) { "user session is null" }
              storeUserSession(handler, userSession)
              runOnUiThread { handler(IdentityRequest.SUCCESS, null, DO_NOTHING) }
          }

          override fun onFailure(exception: Exception?) = handleFailure(handler, exception?.message)

          override fun getAuthenticationDetails(authenticationContinuation: AuthenticationContinuation?, userId: String?) {
              val continuation = checkNotNull(authenticationContinuation) { "Invalid continuation handler" }
              runOnUiThread {
                  handler(IdentityRequest.NEED_CREDENTIALS, null) { r -> run {
                      val response = checkNotNull(r) { "Invalid identity response" }
                      val username = toUsername((response["username"] ?: ""))
                      val password = response["password"] ?: ""
                      check(username.isNotEmpty()) { "username is empty" }
                      check(password.isNotEmpty()) { "password is empty" }

                      continuation.setAuthenticationDetails(AuthenticationDetails(username, password, null))
                      continuation.continueTask()
                  }}
              }
          }

          override fun authenticationChallenge(challengeContinuation: ChallengeContinuation?) {
              val continuation = checkNotNull(challengeContinuation) { "Invalid challenge continuation" }
              when (continuation.challengeName) {
                  "NEW_PASSWORD_REQUIRED" -> {
                      runOnUiThread {
                          handler(IdentityRequest.NEED_NEWPASSWORD, null) { r -> run {
                              val response = checkNotNull(r) { "Invalid new password response" }
                              continuation.parameters["NEW_PASSWORD"] = response["password"] ?: ""
                              continuation.continueTask()
                          }}
                      }
                  }
              }
          }

          override fun getMFACode(mfaContinuation: MultiFactorAuthenticationContinuation?) {
              val continuation = checkNotNull(mfaContinuation) { "Invalid MFA continuation" }
              runOnUiThread {
                  handler(IdentityRequest.NEED_MULTIFACTORCODE, null) { r -> run {
                      val response = checkNotNull(r) { "Invalid MFA response" }
                      continuation.setMfaCode(response["mfaCode"] ?: "")
                      continuation.continueTask()
                  }}
              }
          }
      })
  } catch (exception: Exception) {
      handleFailure(handler, "Validation error")
  }
}
When we want to authenticate a user, we start by trying to authenticate the user. That will fail because it hasn’t happened yet. What happens next is interesting. The callback will be called and what is called depends on what is needed. There are five possibilities:
- The authentication system needs credentials
- The authentication system needs a secondary (multi-factor) code
- The authentication system needs some other check (e.g. it’s set up to ask for a new password because the old one has expired)
- The authentication succeeded
- The authentication failed
In each case, the repository sends the request on to the handler which then fills in the right information and we go through the process again.
One of the important things to note here is what thread is used for operations. When I call the handler, it always happens on the UI thread. When I call the network, that always happens on a background thread. That means my UI doesn’t need to worry about threading. Fortunately, the AWS Mobile SDK has methods that takes care of the background thread switch for me.
I use a common view model for all authentication requirements:
class AuthenticatorViewModel(private val identityRepository: IdentityRepository) : ViewModel() {
    /**
     * Current user record, or null if the user is not logged in
     */
    val currentUser: LiveData<User?> = identityRepository.currentUser

    /**
     * Stored user name, or null if the user has never logged in
     */
    val storedUsername: LiveData<String?> = identityRepository.storedUsername

    /**
     * Initiate each flow in the authentication process
     */
    fun initiateSignin(handler: IdentityHandler) = identityRepository.initiateSignin(handler)
    fun initiateSignup(handler: IdentityHandler) = identityRepository.initiateSignup(handler)
    fun initiateForgotPassword(handler: IdentityHandler) = identityRepository.initiateForgotPassword(handler)

    /**
     * The sign-out process doesn't need to do anything other than complete as the
     * process should either fail or be successful, in which case the currentUser
     * will either update or not.
     */
    fun signOut() = identityRepository.initiateSignout { _, _, _ -> run { /* Do Nothing */ }}

    /**
     * Update the stored username
     */
    fun updateStoredUsername(username: String?) = identityRepository.updateStoredUsername(username)
}
As you can see, I’m not doing much except passing the request through to the repository.
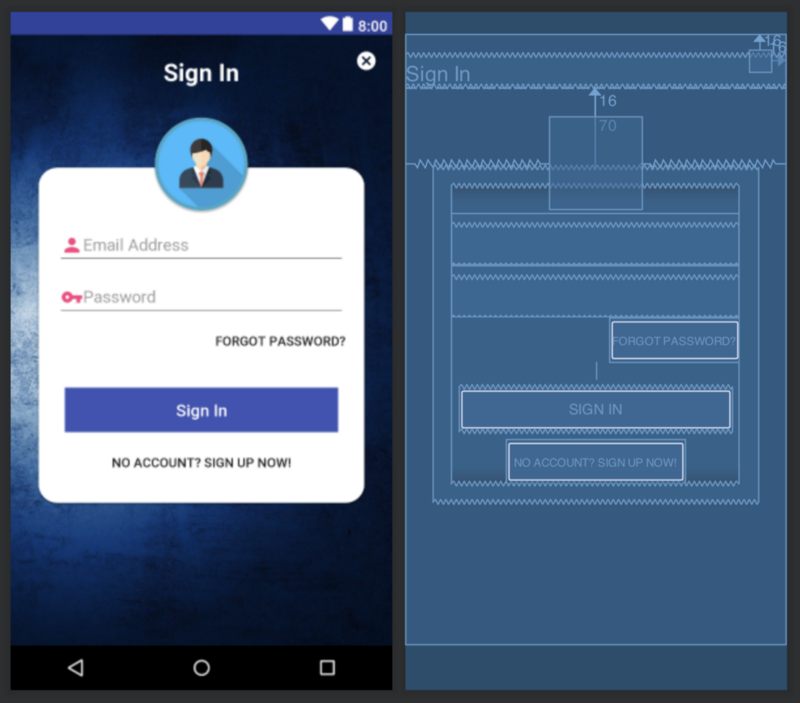
Write some layouts
All the flows are available on my GitHub repository. Let’s take a look at one of those flows - the sign-in flow. This is probably the most complex flow of the three. Sign-in requires a username and password. Amazon Cognito can require the user to set a new password (known as administrator forced password change, generally when the account is first used after being created by an administrator). You can also get the backend to send the user a multi-factor authentication request via SMS or email.
Given the flows, I know I’ll need three layouts:
- The main sign-in screen
- The “new password” dialog
- The multi-factor authentication dialog
I’m going to implement the forced new password prompt and the multi-factor authentication prompt as dialogs so I can keep the flow all in one place. However, feel free to design them as separate screens instead. The important factors here in terms of design of the UI include the following:
- A method of cancelling the authentication
- A method of initiating the forgot password and sign-up flows
- A username and password
Let’s take a look at the pieces for the actual Authenticator. The important piece is the event handler for the submit button (which is called when you click on Sign In):
@SuppressLint("InflateParams")
private fun handleLogin() {
    model.initiateSignin { identityRequest, params, callback ->
        when(identityRequest) {
            IdentityRequest.NEED_CREDENTIALS -> {
                callback(mapOf(
                        "username" to loginFormUsernameField.text.toString(),
                        "password" to loginFormPasswordField.text.toString()
                ))
            }

            IdentityRequest.NEED_MULTIFACTORCODE -> {
                val mfaDialog = layoutInflater.inflate(R.layout.dialog_multifactor_auth, null)
                val mfaCodeInput = mfaDialog.find(R.id.dialog_mfa_code) as EditText
                val mfaInstructions = mfaDialog.find(R.id.dialog_mfa_instructions) as TextView
                params?.let {
                    val deliveryTo = it.getOrDefault("deliveryTo", "UNKNOWN")
                    mfaInstructions.text = getString(R.string.specific_mfa_instructions, deliveryTo)
                }
                alert {
                    title = "Enter Secondary Code"
                    customView = mfaDialog
                    positiveButton("OK") { callback(mapOf("mfaCode" to mfaCodeInput.text.toString())) }
                }.show()
            }

            IdentityRequest.NEED_NEWPASSWORD -> {
                val newPasswordDialog = layoutInflater.inflate(R.layout.dialog_new_password, null)
                val passwordInput = newPasswordDialog.find(R.id.new_password_form_password) as EditText
                alert {
                    title = "Enter New Password"
                    customView = newPasswordDialog
                    positiveButton("OK") { callback(mapOf("password" to passwordInput.text.toString())) }
                }.show()
            }

            IdentityRequest.SUCCESS -> {
                analyticsService.recordSuccessfulLogin(loginFormUsernameField.text.toString())
                this@AuthenticatorActivity.finish()
            }

            IdentityRequest.FAILURE -> {
                analyticsService.recordFailedLogin()
                alert(params?.get("message") ?: "Error submitting credentials") {
                    title = "Login Denied"
                    positiveButton("Close") { /* Do Nothing */ }
                }.show()
            }

            else -> {
                analyticsService.recordEvent("ERROR", mapOf("error" to "unexpected identity request"))
                alert("Unknown or unexpected identity request") {
                    title = "Something went wrong!"
                    positiveButton("Close") { /* Do Nothing */ }
                }.show()
            }
        }
    }
}
When I click on the submit button, it initiates the sign-in flow. I need to specify a handler. The handler is called whenever the backend needs some information or to report success/failure. If the backend needs my username and password, I supply it from the form. If it needs something else, I pop up a dialog to get the information, and then submit it.
Update the MainActivity
Since I’ve updated to a custom authenticator that knows about Android Architecture Components, I can do the same with MainActivity. First, remove all the AWS specific stuff, then bring in the AuthenticatorViewModel:
private val authModel by viewModel<AuthenticatorViewModel>()Then update the onCreate() method to use the currentUser field to update the navigation drawer:
authModel.currentUser.observer(this, Observer {
  updateNavigationDrawer(it != null)
})
Finally, the onNavigationItemSelected() method becomes much simpler:
override fun onNavigationItemSelected(item: MenuItem): Boolean {
    when (item.itemId) {
        R.id.main_drawer_login -> {
            if (authModel.currentUser.value != null) {
                authModel.signOut()
                toast("Successfully signed out")
            } else {
                startActivity<AuthenticatorActivity>()
            }
        }
    }
    drawer_layout.closeDrawer(GravityCompat.START)
    return true
}
I’m using the Anko library for starting activities. I used the same library extensively in writing the activities for authentication as well. The Anko library makes producing pop-up dialog boxes really easy.
Conclusion
The basic UI that the AWS Mobile SDK provides gets you started very quickly. However, you will want to implement your own custom UI. With these techniques, you can get your authentication UI working rapidly as well. the AWS Amplify CLI will get the backend set up in no time, allowing you to spend your time on the front end code.
Leave a comment