
Authentication with AWS Amplify and Android: Google Login
This will be an in-depth series on authentication with [AWS Amplify]. Here are the topics I am going to cover, and I will update each blog with the links as I complete the articles.
- The basics - a username/password system.
- Customizing the UI.
- Authenticating with Facebook.
- Authenticating with Google.
- Using third-party authentication providers.
- Using Time-based One-time passwords (TOTP).
- Using Biometric authentication.
- Doing fraud protection and analytics.
This is part 4 — authenticating with Google. It builds on what we have done in parts 1 and 2. If you haven’t looked at the identity repository and how to build a custom UI, you should definitely go do that first.
So far, we’ve covered implementing a username and password authentication scheme with Amazon Cognito user pools. We’ve looked at how to get the basics going, connecting the sign in action to a button, and customizing all the flows — sign-in, sign-up and self-service password reset. We’ve also added the ability to authenticate with Facebook since most users don’t want to remember yet another password, however. Giving the user the option to use Facebook, Google, or some other authentication provider is a good practice. Today, we are going to use Google authentication.
The process is fairly simple, but it is a multi-step process:
- Create a Google Developers project.
- Add an Android Client ID to the project.
- Configure the Amazon Cognito identity pool to federate using the client ID you just received.
- Integrate the Google authentication provider into your app.
- Send the Google authentication token you receive from signing in with Facebook to the Amazon Cognito identity pool for federation.
You will notice that this is very similar to the Facebook authentication example. Indeed, just about every single authentication provider that Amazon Cognito identity pools supports can be integrated in the same manner.
Step 1: Create a Google Developers project
The first step in this process is always to set up the third party authentication provider. This is, unfortunately, a multi-part step done mostly on a web console. As with Facebook, I’m going to try and avoid the screen shots except where things get confusing. This is because web consoles change over time.
- Log on to the Google Developers Console with a google ID. If this is your first time through, you may need to agree to additional licenses.
- Go to the project list page. Depending on your situation, this may be available directly on the top page, or you may need to go to IAM & Admin > Manage Resources in the left-hand (hamburger) menu. It may also appear under Select a project in the top-level menu.
- Click Create Project.
- Enter a good name, then click Create.
- You should be taken directly to the Google API page for the new app. However, when I did this, I wasn’t — I had to select the new project from the list of apps in the top-level banner.
- Click Enable APIs and Services.
- Enable the Google+ API. This can be found in the big list by searching for it, or scrolling down until you see it. Once found, click the box.
- On the next page, click the Enable button.
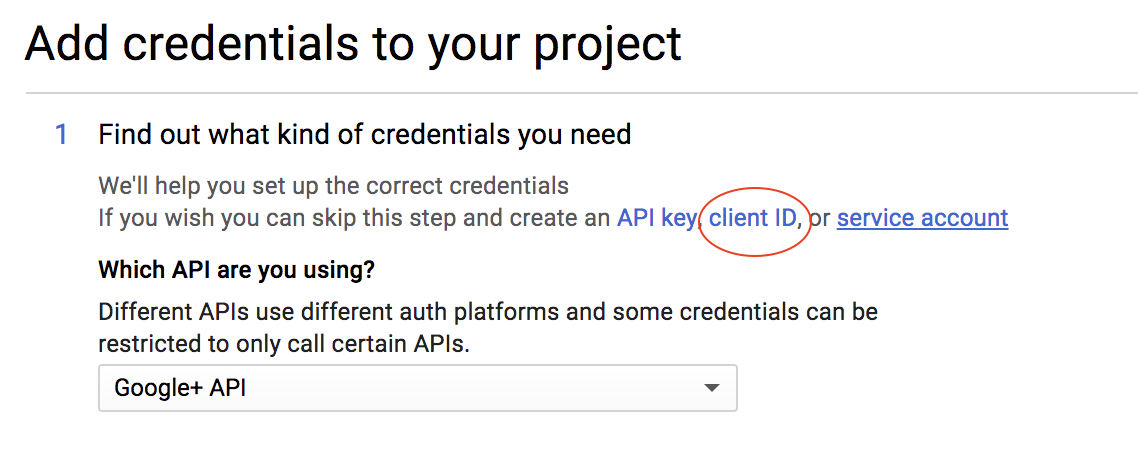
- On the next page, click the Create Credentials button.
- You want to create a Client ID for the identity pool next. This is a choice in the menu:
- Click the Configure Consent Screen button.
- Enter the name of your app in the Product name to be shown to users box, then click Save.
- Choose Web application.
Even though we are integrating with an Android app, we still need a web application client ID so that the identity pool can check the tokens.
- Enter a name for the client (I chose PictureFeed identity pool), then click Create. Copy the client ID and secret somewhere safe — you will need them later. Click OK.
Step 2: Create an Android Client ID
Carrying on from our previous step, you should be at the Credentials page on the Google developers console for your project. We will now create a client ID for the Android app. Before you get started, you need to obtain the SHA1 fingerprint for your app. When you created the Facebook login, you created a key store for your app. Obtain the SHA1 fingerprint from the key store with the following command:
keytool -exportcert -keystore ~/.android/debug.keystore -list -v
The output will be similar to the following:
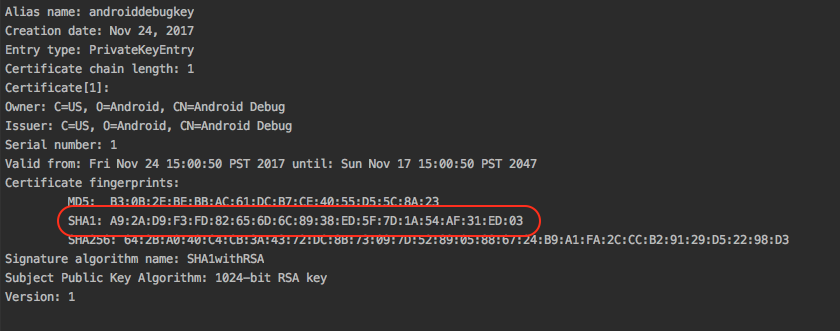
Note the highlighted area. You should copy this as you will soon need it.
- Choose Create credentials > OAuth Client ID.
- Choose Android client.
- Enter a name in the appropriate box.
- Paste the SHA1 fingerprint into the appropriate box.
- Enter the package name in the appropriate box. This is the top level of your
packagestructure for your app and is listed as the package field on themanifestnode within theAndroidManifest.xmlfile. - Click Create.
As before, you will get a Client ID (but no client secret this time as your key store is used as the secret) before you click OK. Make sure you record the Client ID before progressing.
Step 3: Configure Amazon Cognito identity pool
Since we are using [AWS Amplify] CLI for our backend configuration, this becomes easily accomplished:
amplify update auth
The answers to the questions are the same, except for this one:
? Do you want to enable 3rd party authentication providers in your identity pool (Use arrow keys)
Answer Yes here. Then select Google. AWS Amplify CLI will ask you for both client IDs. You can copy/paste these into the form. The rest of the configuration remains the same, so just press Enter to move past the question.
Once complete, push the configuration to deploy the resources:
amplify push
Step 4: Integrate Google authentication
You should always follow the Google documentation for the latest instructions. However, here is how I integrated it into my app. Start by adding the SDK into your app dependencies within build.gradle:
implementation "com.google.android.gms:play-services-auth:15.0.1"Ensure you click Sync Now to download the new SDK before continuing.
Add the Google Sign-in button in the appropriate spot in your layout. I am placing mine in the activity_authenticator.xml file since that is where all sign-in is done:
<com.google.android.gms.common.SignInButton
    android:id="@+id/loginFormGoogleLoginButton"
    android:layout_width="wrap_content"
    android:layout_height="wrap_content"
    android:layout_gravity="end" />
Now, let’s turn our attention to the AuthenticatorActivity class. Based on the documentation, here is what I added to the onCreate() method:
// Configure the Google Sign in requirements

val googleSignInOptions = GoogleSignInOptions.Builder(GoogleSignInOptions.DEFAULT_SIGN_IN)
        .requestIdToken(resources.getString(R.string.google_client))
        .requestEmail()
        .build()
val googleSignInClient = GoogleSignIn.getClient(this, googleSignInOptions)
loginFormGoogleLoginButton.onClick {
    startActivityForResult(googleSignInClient.signInIntent, GOOGLE_SIGN_IN)
}
You will need to add the WEB Client ID to your strings.xml file:
<!-- Google SDK -->
<string name="google_client">ID.apps.googleusercontent.com</string>
The .requestIdToken() method ensures you get an idToken, which is required to federate with Amazon Cognito identity pools. If you do not include this, the .idToken on the account (used later on) will be null.
Since we are starting the sign-in client as an activity, we need to deal with its response in onActivityResult(). This is the code for the entire function (which incorporates both Facebook and Google responses):
override fun onActivityResult(requestCode: Int, resultCode: Int, data: Intent?) {
    super.onActivityResult(requestCode, resultCode, data)

    when (requestCode) {
        GOOGLE_SIGN_IN -> {
            val task = GoogleSignIn.getSignedInAccountFromIntent(data)
            try {
                val account = task.getResult(ApiException::class.java)
                Log.d(TAG, "Authenticated with Google: token = ${account.idToken}")
                model.federateWithGoogle(account)
                this@AuthenticatorActivity.finish()
            } catch (error: ApiException) {
                toast("Google Authentication failed: ${error.message}")
            }
        }

        else -> {
            callbackManager.onActivityResult(requestCode, resultCode, data)
        }
    }
}
That model.federateWithGoogle() call is for the integration with Amazon Cognito, and we will handle that next.
Step 5: Integrate with Amazon Cognito identity pool
We have four layers of code: UI, ViewModel, interface, and repository. I’ve already shown the UI code, so let’s concentrate on the others. I’ve added the following to the AuthenticatorViewModel:
fun federateWithGoogle(account: GoogleSignInAccount) = identityRepository.federateWithGoogle(account)This is just a pass-through to the identity repository, which is defined in the IdentityRepository interface:
/**
 * Federate with Google
 */
fun federateWithGoogle(account: GoogleSignInAccount)
… and implemented in the AWSIdentityRepository:
/**
  * Federate with Google authentication
  */
override fun federateWithGoogle(account: GoogleSignInAccount) {
    if (account.idToken != null) {
        Log.d(TAG, "Federating with Google")
        thread(start = true) {
            with(service.identityManager.underlyingProvider) {
                clear()
                withLogins(mapOf("accounts.google.com" to account.idToken))
                refresh()
            }

            val user = User().apply {
                username = account.id!!
                tokens[TokenType.ACCESS_TOKEN] = account.idToken!!
                userAttributes["provider"] = "accounts.google.com"
                userAttributes["email"] = account.email!!
            }
            Log.d(TAG, "Federated result: ${service.identityManager.isUserSignedIn}")
            runOnUiThread { mCurrentUser.postValue(user) }
        }
    } else {
        Log.d(TAG, "Federating with Google (ID token is null, so nothing happening)")
    }
}
This looks eerily similar to the Facebook federation, and it is. The only real difference is the “magic string” that associates the token with the Google provider.
If you run now, you will be able to click on the Login with Google button in the UI. However, the authentication will not persist. As with Facebook, we need to add some code into the init section of the AWSIdentityRepository:
// Check to see if Google is authenticated - if it is, then federate with Google

val googleAccount = GoogleSignIn.getLastSignedInAccount(context)
if (googleAccount != null) {
    Log.d(TAG, "Google Signed In Account found - account=${googleAccount.toJson()} ")
    thread(start = true) {
        try {
            val googleOptions = GoogleSignInOptions.Builder(GoogleSignInOptions.DEFAULT_SIGN_IN)
                    .requestIdToken(context.getString(R.string.google_client))
                    .requestEmail()
                    .build()
            GoogleSignIn.getClient(context, googleOptions).silentSignIn().continueWith {
                val account = it.getResult(ApiException::class.java)
                federateWithGoogle(account)
            }
        } catch (error: ApiException) {
            // Silent ignore

        }
    }
}
Note that the code is practically the same as the code used for the active login. However, instead of using an intent, we use .silentSignin(). This authentication will be transparent to the user and will re-establish the federation on application start-up if the user authenticated with Google and the token is still valid.
Wrap up
Thus far, we have used supported authentication providers — Amazon Cognito user pools, Facebook and Google authentication. This will be suitable for probably 90+% of all consumer apps. However, there will be times when you want to federate with something else. We’ll cover that topic next time.
Leave a comment