
Authentication with AWS Amplify and Android: 3rd Party OIDC Providers
This will be an in-depth series on authentication with [AWS Amplify]. Here are the topics I am going to cover, and I will update each blog with the links as I complete the articles.
- The basics - a username/password system.
- Customizing the UI.
- Authenticating with Facebook.
- Authenticating with Google.
- Using third-party authentication providers.
- Using Time-based One-time passwords (TOTP).
- Using Biometric authentication.
- Doing fraud protection and analytics.
In the last two articles, I’ve covered Facebook and Google - probably the most important authentication providers that there are out there and for which there is specific support in Amazon Cognito. However, that is not always the case. You might want to authenticate against Salesforce, GitHub, or other OpenID Connect (OIDC) providers - providers that aren’t directly supported by Amazon Cognito. In fact, you could write your own OIDC provider, although I would not recommend it. Use a service!
So, what’s involved?
- Set up authentication with the provider of choice.
- Configure Amazon Cognito to federate with the provider.
- When you receive an authentication token from the provider, pass it to the Amazon Cognito identity pool for federation.
Sound familiar? It’s exactly the same as the process we used for Facebook and Google.
In this article, I’m going to set up Auth0 as an authentication source. Auth0 is an OIDC compliant authentication provider that aggregates other providers (like Google and Facebook). It’s main advantage for this purpose, however, is that it is very developer friendly.
Step 1: Set up authentication with the provider of choice
All authentication providers require you to register with them. This is the process:
- Go to auth0.com and click on the Login button to authenticate.
- If this is your first time, you’ll be asked to register through a simple and short process. Eventually, you will land on your dashboard.
- Click New Application.
- Give your application a name, select the Native button, then click Create.
- Click Settings. Make a note of the Domain and Client ID. You will need these later.
-
Add the following string to the Allowed Callback URLs, then click Save Changes:
https://DOMAIN.auth0.com/android/PACKAGE/callback
Here DOMAIN is the Domain of your application (you just made a note of it) and PACKAGE is the root package for your app. You can find PACKAGE as the android.applicationId within the app-level build.gradle or the package parameter on the application node within the AndroidManifest.xml file.
Yes, Auth0 is truly that quick and easy to set up. In many respects, it’s much easier to get started than Google or Facebook, since they’ve done most of the work for you. Now, let’s get started on the client side. Open up your project in Android Studio.
Add the following strings to your strings.xml file:
<!-- Auth0 SDK -->
<string name="com_auth0_client_id">CLIENT-ID</string>
<string name="com_auth0_domain">DOMAIN.auth0.com</string>
The Client ID and Domain are from the Settings page for your application from the Auth0 console.
Next, add the Auth0 SDK as a dependency in your app-level build.gradle file:
implementation "com.auth0.android:auth0:$versions.authzero"Right now, my $versions.authzero is set to 1.13.2. Ensure you add the INTERNET permission to your AndroidManifest.xml (it should really already be there!) Before you synchronize your project, add the following to the app level build.gradle in the android section as well:
defaultConfig {
    // Other settings here

    // Auth0 Requirement

    manifestPlaceholders = [
        auth0Domain: "@string/com_auth0_domain",
        auth0Scheme: "https"
    ]
}
You should now be able to sync the project and that will download the SDK.
Yes, I’m just following the official instructions for integrating their SDK. That is perfectly normal here since that is what we are doing.
Now, let’s take stock of the code. When we go to the AuthenticatorActivity, we want an icon to appear that will initiate the authentication process for Auth0. That will have an onClick handler to do the actual work. We also need some code to process the response from the authentication process. I’ve already added an ImageButton to my activity layout for the icon. Here is how I configure the button in the onCreate() method:
// Configure the Auth0 requirements

val auth0Settings = Auth0(this).apply {
    isOIDCConformant = true
}
val audience = String.format("https://%s/userinfo", resources.getString(R.string.com_auth0_domain))
loginFormAuth0LoginButton.onClick {
    WebAuthProvider.init(auth0Settings)
        .withAudience(audience)
        .start(this@AuthenticatorActivity, object : AuthCallback {
            override fun onSuccess(credentials: Credentials) {
                runOnUiThread { toast("Auth0 Authenticated Successfully") }
                Log.d(TAG, "ID Token = ${credentials.idToken}")
            }
            override fun onFailure(dialog: Dialog) {
                Log.d(TAG, "Auth0 Error displayed in dialog")
                runOnUiThread { dialog.show() }
            }
            override fun onFailure(exception: AuthenticationException?) {
                runOnUiThread { toast("Auth0 Authentication Failed") }
                Log.e(TAG, "Auth0 Error: ${exception?.localizedMessage}")
            }
        })
}
Note that the AuthCallback is called on a background thread - not the UI thread. Any further UI interaction has to take that into account.
At this point, you’ve completed the task of authenticating with Auth0. It’s important to note that you must use whatever process that the authentication provider suggests to get to this point. We have not touch AWS resources yet - only the authentication provider.
Run the app and authenticate with the new provider. I’ve deliberately printed out the idToken so we can take a look. Copy it into the form field at jwt.io to take a look at the decoded token:
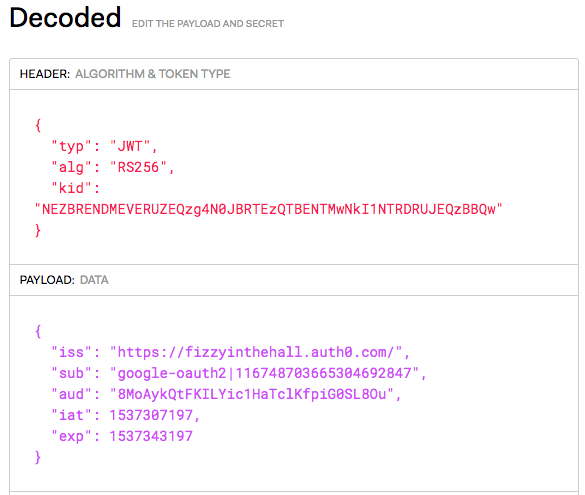
Note the iss field. This is the issuer and is required in order to configure Amazon Cognito identity pools, so we will be using this later on. Also note that the algorithm is RS256. This is also important, but it’s the default so there is no need to worry about it.
At this point, you should have two important pieces of information:
- The Client ID
- The Issuer
You will need these for the next steps.
Step 2: Configure Amazon Cognito identity pools
The AWS Amplify CLI provides a simplified process for configuring the back end if you are using one of the supported paths. Generic OIDC providers is definitely off the beaten path, so how do we configure Amazon Cognito to use an OIDC provider when it’s not supported?
You edit the CloudFormation template.
Admittedly, if you like the simplicity of the AWS Amplify CLI, this may not be your first choice. However, when you want to do something a little different, tweaking the CloudFormation templates may be just the thing to get you productive again. When you first start with raw CloudFormation, it can be intimidating. Fortunately, AWS Amplify splits up the work, so you are only editing the authentication and authorization section - not API, Storage, Analytics or anything else. This isolates your changes, making it less prone to mistakes.
Note: If you edit the CloudFormation templates, then run amplify update auth, then your changes will be over-written. Once you switch to editing the CloudFormation templates, you must continue on that route for configuration changes.
So, what do we do to effect this change? All the CloudFormation templates are stored in amplify/backend, with each category that AWS Amplify supports getting it’s own directory:
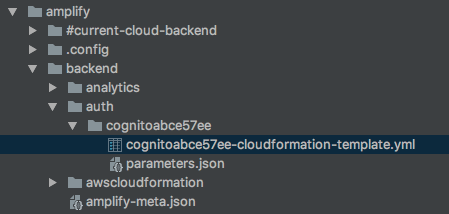
You want to edit the CloudFormation template. This can be done within Android Studio - just switch to the Project view, then expand the amplify directory until you find the file.
Since we have already added Google, there are three changes needed. First, edit the OpenIdLambdaIAMPolicy policy document to include the new issuer. This is what mine looks like:
1
2
3
4
5
6
7
8
9
10
11
12
13
14
15
16
17
18
19
20
21
22
23
24
25
26
27
28
29
30
31
32
33
34
35
OpenIdLambdaIAMPolicy:

  # Sets policy for the role that executes the OpenId Lambda

  # Depends on OpenIdLambda for Arn

  # Marked as depending on MFALambda for easier to understand CFN sequencing

    Type: 'AWS::IAM::Policy'

    Properties:

      PolicyName: !Ref openIdLambdaIAMPolicy

      Roles:

        - !Ref openIdLambdaRoleName

      PolicyDocument:

        Version: '2012-10-17'

        Statement:

          - Effect: Allow

            Action:

              - 'iam:CreateOpenIDConnectProvider'

              - 'iam:GetOpenIDConnectProvider'

              - 'iam:AddClientIDToOpenIDConnectProvider'

            Resource: !Sub

              - arn:aws:iam::${account}:oidc-provider/accounts.google.com

              - { account: !Ref "AWS::AccountId"}

          - Effect: Allow

            Action:

              - 'iam:CreateOpenIDConnectProvider'

              - 'iam:GetOpenIDConnectProvider'

              - 'iam:AddClientIDToOpenIDConnectProvider'

            Resource: !Sub

              - arn:aws:iam::${account}:oidc-provider/fizzyinthehall.auth0.com

              - { account: !Ref "AWS::AccountId"}

          - Effect: Allow

            Action:

              - 'iam:ListOpenIDConnectProviders'

            Resource: !Sub

              - arn:aws:iam::${account}:oidc-provider/${selector}

              - { account: !Ref "AWS::AccountId", selector: '*'}

    DependsOn: OpenIdLambda
The additional lines are lines 21–28. Just copy the Google version, replacing accounts.google.com with your issuer. Next, add a new inputs block:
1
2
3
4
5
6
7
AuthZeroLambdaInputs:

  Type: 'Custom::LambdaCallout'

  Properties:

    ServiceToken: !GetAtt OpenIdLambda.Arn

    clientIdList: CLIENT_ID

    url: 'https://fizzyinthehall.auth0.com'

  DependsOn: OpenIdLogPolicy
Replace the CLIENT_ID with your client ID, and make sure the url field matches your issuer. Give this section a unique name. You are going to use it again in the next step.
The final edit is to add the new OIDC provider to the identity pool:
1
2
3
4
5
6
7
8
9
10
11
12
13
14
15
16
17
18
19
20
21
22
23
24
25
  IdentityPool:

  # Always created

    Type: AWS::Cognito::IdentityPool

    Properties:

      IdentityPoolName: photos_identitypool_9551db82


      CognitoIdentityProviders:

        - ClientId:  !Ref UserPoolClient

          ProviderName: !Sub

            - cognito-idp.${region}.amazonaws.com/${client}

            - { region: !Ref "AWS::Region",  client: !Ref UserPool}

        - ClientId:  !Ref UserPoolClientWeb

          ProviderName: !Sub

            - cognito-idp.${region}.amazonaws.com/${client}

            - { region: !Ref "AWS::Region",  client: !Ref UserPool}


      SupportedLoginProviders:

          graph.facebook.com: '314325172480112'


      AllowUnauthenticatedIdentities: !Ref allowUnauthenticatedIdentities


      OpenIdConnectProviderARNs:

        - !GetAtt OpenIdLambdaInputs.providerArn

        - !GetAtt AuthZeroLambdaInputs.providerArn

    DependsOn: OpenIdLambdaInputs
The additional line is line 24, and references the section we added immediately prior. Now, deploy this backend:
amplify push
If you have not added Google (or another OIDC provider that is supported), you need to add a lot more boilerplate to the CloudFormation template. I’d recommend adding Google, Twitter or another provider, and then making the edits so you aren’t typing a lot of boiler plate.
AWS Amplify CLI is an amazing tool for getting started with best practices in developing the backend, but it isn’t the end point. The fact that you can edit the auth settings, but still use AWS Amplify for the other categories allows you to be as flexible as you need to be.
The final step that you probably will need to do is to add the HTTPS thumbprint to the Cognito settings. This is currently not supported by the AWS Amplify CLI, so we need to put it in the web console. AWS has written an article on obtaining the thumbprint, and you should follow that to obtain the thumbprint of your provider. If you are lucky, your provider will just give it to you (Auth0 does not do this).
Once you have the thumbprint:
- Log onto the AWS IAM Console.
- Select Identity providers in the left-hand menu.
- Select your identity provider from the list.
- Click Add a Thumbprint.
- Paste your thumbprint into the box, then click Save Changes.
You can also remove the existing thumbprint (which is all zeros). It isn’t required.
Step 3: Federate with the Identity Pool
Given that we are using the same process as for both the Facebook and Google authentication providers, this should be familiar now. First, add a federation method to the IndentityRepository interface:
/**
 * Federate with OIDC Providers
 */
fun federateWithOIDC(token: String, issuer: String)
Now, add a call to the AuthenticatorViewModel class:
fun federateWithOIDC(token: String, issuer: String)
  = identityRepository.federateWithOIDC(token, issuer)
Also, add a concrete implementation to the AWSIdentityRepository class:
/**
  * Federate with OIDC
  */
override fun federateWithOIDC(token: String, issuer: String) {
    Log.d(TAG, "Federating with $issuer")
    thread(start = true) {
        with(service.identityManager.underlyingProvider) {
            clear()
            withLogins(mapOf(issuer to token))
            refresh()
        }

        val user = User().apply {
            tokens[TokenType.ID_TOKEN] = token
            userAttributes["provider"] = issuer
        }
        Log.d(TAG, "Federated result: ${service.identityManager.isUserSignedIn}")
        runOnUiThread { mCurrentUser.postValue(user) }
    }
}
There is definitely more to do here, especially if you want to add in profile information to the user object. However, obtaining profile information is very provider dependent. Auth0 will place the profile information into the JWT that is returned if you need it.
To federate, you just need the access token.
Talking of which, let’s update the Auth0 callback to call the federation:
WebAuthProvider.init(auth0Settings)
    .withAudience(audience)
    .start(this@AuthenticatorActivity, object : AuthCallback {
        override fun onSuccess(credentials: Credentials) {
            model.federateWithOIDC(credentials.accessToken!!, resources.getString(R.string.com_auth0_domain))
            this@AuthenticatorActivity.finish()
        }
        override fun onFailure(dialog: Dialog) {
            Log.d(TAG, "Auth0 Error displayed in dialog")
            runOnUiThread { dialog.show() }
        }
        override fun onFailure(exception: AuthenticationException?) {
            runOnUiThread { toast("Auth0 Authentication Failed") }
            Log.e(TAG, "Auth0 Error: ${exception?.localizedMessage}")
        }
   })
Again, this change should be very familiar since we did the same thing in Facebook and Google.
The final thing to do is something that is not covered here. In the case of Facebook and Google, there were SDK methods to refresh the Facebook and Google tokens silently on start-up. We added code to the init block to access the refreshed token and federate with the identity pool.
With a generic OIDC provider, you need to do the same. However, the details are provider dependent. Just follow their instructions for storing and refreshing the token (perhaps using shared preferences for refresh token storage), and federate with the identity pool when needed.
Common Errors
There are two common errors:
- Submitting the wrong token. You must submit the idToken, not the accessToken. Ensure that you are submitting the right token to the back end.
- Invalid HTTPS Thumbprint. Amazon Cognito requires the signature of the remote end to match the recorded thumbprint. Federation will fail if this is not the case.
Wrap Up
This is the last of the primary authentication methods that we will cover. In the next article, I’m going to cover TOTP (Time-based one-time passwords) for Amazon Cognito user pools, including configuration and usage.
Leave a comment