
Authentication with AWS Amplify and Android: Fraud Protection and Analytics
This will be an in-depth series on authentication with AWS Amplify. Here are the topics I am going to cover, and I will update each blog with the links as I complete the articles.
- The basics - a username/password system.
- Customizing the UI.
- Authenticating with Facebook.
- Authenticating with Google.
- Using third-party authentication providers.
- Using Time-based One-time passwords (TOTP).
- Using Biometric authentication.
- Doing fraud protection and analytics.
Over the last seven articles, I’ve covered pretty much all the ways you can authenticate your users to Amazon Cognito and use those credentials to access AWS service. This article, the final one in the series, covers a fairly advanced topic, but one that is important: How do you protect your users from fraud?
The basic premise for this is that users credentials will get compromised. If the front page of the newspapers tell us anything, it’s that compromised credentials are common. Instead of waiting until someones credentials are hacked, we need to be proactive about protecting the accounts under our care.
Amazon Cognito user pools has several facilities that can assist in this endeavor. Unfortunately, you can’t set them up with CloudFormation or AWS Amplify. All the advanced security settings must be configured in the AWS console. This means that setting up fraud protection and analytics is best done as the very last thing you do before production.
So, what can you do?
- Check for compromised credentials and force a password reset.
- Check for risk and request additional factors based on risk.
- Send notifications to users of suspicious activity.
Enabling Advanced Security
Enabling advanced security is easy enough. Go to the Amazon Cognito console, select Manage User Pools, then select the user pool you want to configure. Finally, select Advanced security from the left hand menu.

You have three options - Yes, Audit only, and No. Select Yes, followed by Save changes. You can set up advanced security features globally (which is what I would always recommend) or on a per-app client basis.
Compromised Credentials
The first section you can fill in is about compromised credentials:

If the user who is logging in is listed in a breach report, then the access can be blocked or allowed. If you choose Block, the user will be prompted for a new password. If you choose Allow, the access will be granted but the access will be logged within CloudWatch. You can also configure when to check for compromised credentials - on sign in, sign up and/or password changes. (Hint: You want to leave the default there, which enables all three).
Adaptive Authentication
Let’s say you normally want your users to log in with username and password (or an OIDC provider), but sometimes - when the user logs in from an unrecognized or unusual location or from a new device - you want additional checks.
For instance, I am normally located within the United States of America. If I suddenly begin logging in from western Europe, that should trigger alarm bells.
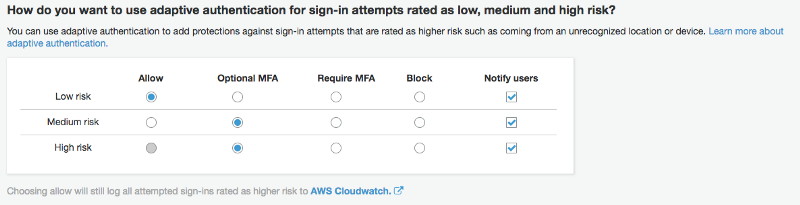
Adaptive authentication uses these triggers to classify the login attempt as low, medium or high-risk. You can decide what to do with each risk level. For example, if the login is from your “normal location” and is on a device that is recognized, then it can be assigned low-risk, and in this case the user can use just their username and password. If the user has a new device (that is, a device that hasn’t been seen before), it may be assigned medium-risk. If the user is on a new device located in a different location, it may be assigned high-risk. In these cases, you may want to require a multi-factor authentication technique such as a TOTP token or SMS code.
With mobile device, you should always “Require MFA”. Doing an “Optional MFA” doesn’t make a lot of sense.
You can also choose to notify your users. This is done via email configured via an Amazon SES (Simple Email Service) connection. Setting up SES is straight forward, but requires that you register an email identity to use when sending emails.
Device Fingerprinting
In order to effectively use adaptive authentication, you need to submit a device fingerprint when authenticating the user. Here, there is some good news. There is no additional code. You just have to include the library in your build.gradle file:
implementation("com.amazonaws:aws-android-sdk-auth-userpools:2.6.+@aar") {
    transitive = true
}
implementation "com.amazonaws:aws-android-sdk-cognitoidentityprovider-asf:1.0.0"
Note that you must include transitive = true on the userpools SDK and include the ASF (Adaptive Security Fingerprinting) library to include device fingerprinting.
Analytics
Irrespective of whether you actually block requests or enhance security, all security issues are logged to Amazon CloudWatch once the advanced security settings are enabled. This allows you to set up alerts and produce security dashboards using the features within Amazon CloudWatch.
At a minimum, you should configure the following:
- Metrics for counts of blocked logins (due to compromised credentials), medium-risk and high-risk adaptive security events.
- Metrics for failed logins
- Alerts for when the metrics go “too high”
If the “failed logins” is too high, then you are likely suffering from a denial of service attack. High usage of compromised logins could indicate a breach elsewhere that you need to be aware of. In all cases, you need to decide how to deal with security threats like these.
Wrap up
I hope you have enjoyed this series on authentication in Android and Amazon Cognito. There is still a lot of topics I have not covered, but I will cover those in additional topics as they become relevant.
The top take-aways:
- Use Amazon Cognito federated identities (an identity pool) to federate your chosen authentication source(s).
- Amazon Cognito user pools can be used for username and password authentication with advanced and adaptive security features.
- If you are developing a social or consumer app, use a social login.
- Authentication is inevitably about convenience vs. security. Use biometrics to increase the convenience without sacrificing security.
- Always enable adaptive security features when they are available.
Thanks for reading!
Leave a comment