
Tailwind Photos: Registration (Authentication)
In the last article, I introduced the resources necessary for my mobile backend, driven mostly by the serverless capabilities of Azure Functions. I also provided a mechanism for deploying the resources automatically using Azure Resource Manager (or ARM). Today, I want to look at the next step - authentication.
In my Android app, I’ve already integrated the various identity providers (or IdP) for Facebook, Google, and Microsoft accounts. Having the IdP access token is great if you want to access the graph for the social media provider. However, we want to access another API. In order to do that, we’re going to have to swap the access token we have for a token provided by our backend. Fortunately, all the IdPs provide mechanisms for authorizing the token you have, and that mechanism is integrated into the Azure Functions runtime under a set of configuration parameters called siteAuth, which is exposed in the Azure portal as Authentication / Authorization.
First, let’s update our template to provide these settings. To do this, you need a bunch of information:
- For Facebook, the App ID and App Secret.
- For Google, the Client ID and Client Secret.
- For Microsoft, the Client ID of the app registration and the Tenant ID of the directory.
I place all of these into an azuredeploy-parameters.json file:
{
  "$schema": "https://schema.management.azure.com/schemas/2015-01-01/deploymentParameters.json#",
  "contentVersion": "1.0.0.0",
  "parameters": {
    "sendgridPassword": {
      "value": "GEN-UNIQUE"
    },
    "aadClientId": {
        "value": "something"
    },
    "aadTenantId": {
        "value": "something"
    },
    "facebookAppId": {
        "value": "something"
    },
    "facebookAppSecret": {
        "value": "something"
    },
    "googleClientId": {
        "value": "something"
    },
    "googleClientSecret": {
        "value": "something"
    }
  }
}
Replace the “something” with the real values from your configuration. You can find these values as follows:
- For Facebook, go to the API console, select your app, then Settings > Basic. The App ID is shown immediately. You have to click Show next to the App Secret and enter your password again.
- For Google, go to the API Console, select your app, then Credentials, select the web client for Google Sign-in. The Client ID and secret are shown at the top of the page.
- For Microsoft, log into the Azure portal, select Azure Active Directory, then go to App Registration, followed by your app. The client ID and tenant ID are shown at the top of the page.
The easiest way to set up authentication is with the az webapp auth update command. First, run the following:
az webapp auth show --name twprodfunctions --resource-group tailwind-photosThis will show you the current settings. Now, run the following to update:
az webapp auth update \

  --name twprodfunctions \

  --resource-group tailwind-photos \

  --aad-client-id $aadClientId \

  --aad-token-issuer-url https://sts.windows.net/$aadTenantId \

  --action AllowAnonymous \

  --enabled true \

  --facebook-app-id $facebookAppId \

  --facebook-app-secret $facebookAppSecret \

  --facebook-oauth-scopes "public_profile email" \

  --google-client-id $googleClientId \

  --google-client-secret $googleClientSecret \

  --token-store true
Replace the strings prefixed with $ with the appropriate strings from the identity providers.
You can also do this via an ARM template by setting up an authsettings embedded resource on the Microsoft.Web/site resource. Check the ARM template documentation for more information.
Why place the strings in a file at all? I place the strings in a file so I can construct the small script I use to deploy the authentication settings. I use the same format as the
azuredeploy.parameters.jsonso that I can update the Azure ARM deployment configuration to do this for me as well.
The authentication process
So, how do we actually go about swapping an IdP token for an Azure Functions token? When you turn on site auth, you get a set of HTTP APIs to do this for you. The first is /.auth/login/idp, when idp is replaced by one of the providers (facebook, google, or aad). To use this API, POST a JSON document to the endpoint to get a token. The form of the JSON document is as follows:
{
  "id_token": "string",
  "access_token": "string",
  "refresh_token": "string",
  "redirect_uri": "string",
  "authorization_code": "string"
}
Not all these are required. In fact, for some providers, you won’t have them. Google requires the id_token, Facebook requires the access_token and AAD requires both. Everything else is optional.
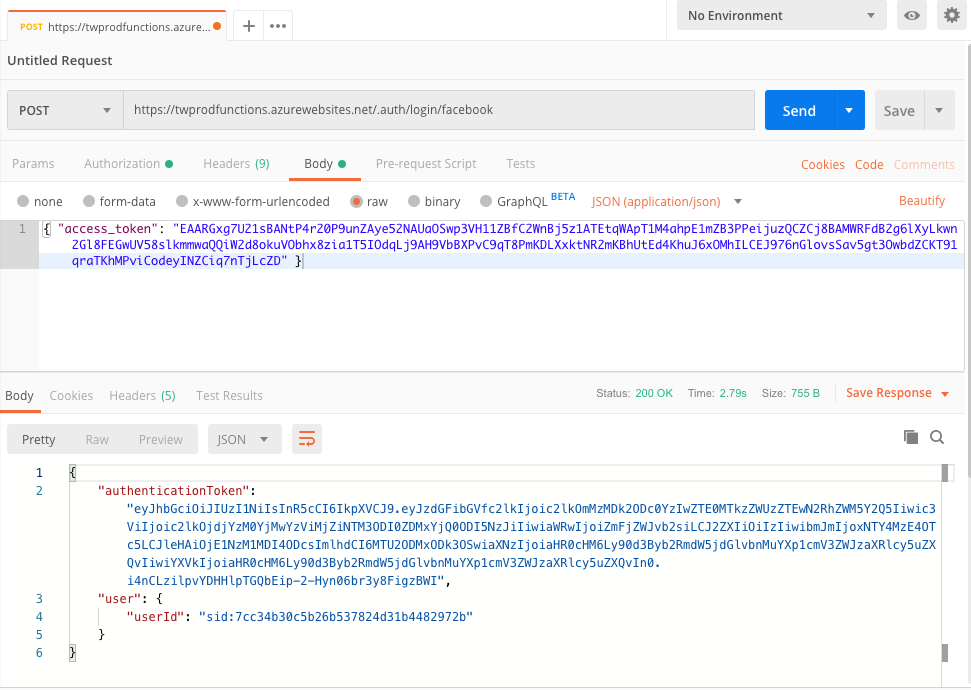
The response from this POST request will be a session authorization token. You can use this in an X-ZUMO-AUTH header for subsequent requests to functions that require authentication. You can test this out with Postman. First, run your Android app to get a token of the appropriate sort, then do the post yourself:
The second endpoint is /.auth/me. You use this within the function app code to access the details of the token that you have been provided. This includes, most notably, the sub field appears as user_id which will be used to link the provider authentication to our registration.

Note that there is an expiry time. In this case, you will need to validate that your secret from the IdP is still valid, then go through the process again to get a new token,
So, what do you do?
- Do a HTTP request to
/.auth/login/idpwith the appropriate arguments and get the response back. - Then do a HTTP request to
/.auth/mewith theX-ZUMO-AUTHheader to ensure authentication is working. - Then update the
LiveDataobject with the results.
Once this is done, you have a valid token with which to do further requests to the backend.
Next steps
Next, I’m going to write the Android side of what I’ve been doing manually in this article. I’ll update my authentication process to do the token flow and only do the LiveData update when the result of /.auth/me returns.
Until, and as always, check out the code within my tailwind-photos-backend repository.
Leave a comment