
Azure Active Directory Authentication for Blazor WASM (Part 2: The Client)
I’m in the middle of adding authentication to my Blazor WASM app. In the last article, I introduced the service side of things to consider when integrating Azure Active Directory authentication. It’s now time to complete the work by considering the Blazor WASM client. As there was last time, this is [well documented], but comes with some wrinkles when you consider bringing authentication into an app later.
I’ve got a Sign-in button called AuthButton.razor that looks like this:
<button type="button" class="auth-button">Sign in</button>
Exciting, isn’t it. It doesn’t do anything. What I’ll be doing in this article is turning it into something that allows the user to trigger an authentication event and that allows the user to sign out later on, changing state as necessary.
Jobs to be done
As with the server, there’s a list of things to do:
- Register an app with Azure Active Directory for the client app.
- Give the app registration permission to access the scope we previously set up for the server.
- Add client app configuration with the client app registration settings.
- Add authentication service support to the client app.
- Update components to support authorized views.
Now, let’s get to it!
Step 1: Register an ap with Azure Active Directory.
When you set up client authentication with Azure Active Directory, you inevitably set up two application registrations - one for the service and one for the client. You then expose an API on the service registration and ask permission to access that API on the client registration. In the last article, I configured the service side, so now it’s time to create an app registration on the client side.
- Sign in to the Azure portal, and navigate to Azure Active Directory.
- Select App registrations in the sidebar.
- Press the New registration button.
- Provide a name for the app (I used
CloudMUD for Blazor (Dev)). - Choose a Supported account types. For this application, I’ve selected Accounts in any organizational directory (Any Azure AD Directory - Multitenant) and personal Microsoft accounts (e.g. Skype, Xbox) as this allows anyone who has either an AAD account or a Microsoft account to log into my app.
- Set the Redirect URI to **Single-page application (SPA) and provide the redirect URI
https://localhost/authentication/login-callback. - Press the Register button at the bottom of the page.
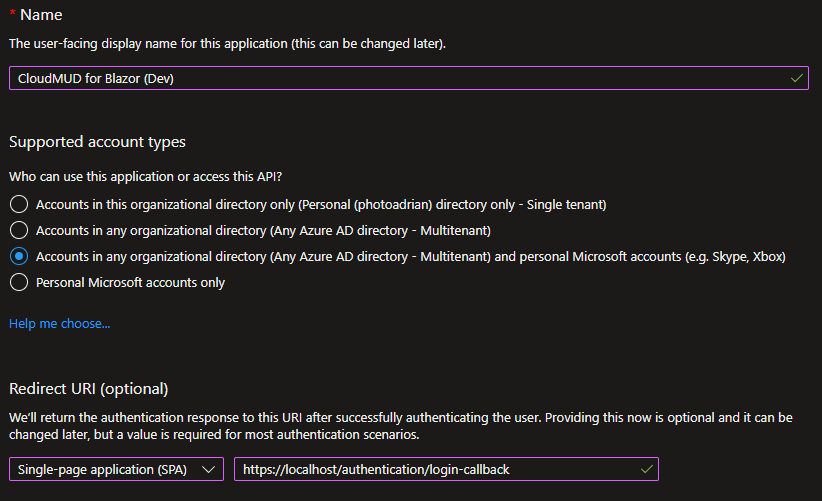
Pay particular attention to the Redirect URI. It’s different from the service version and has to match the URI you are using in your application. When you register the production app, it will be based on the URI of your production service.
As before, record the Application (Client) ID in your handy Notepad. Make sure you distinguish it from the service application ID - they are different and used in different places.
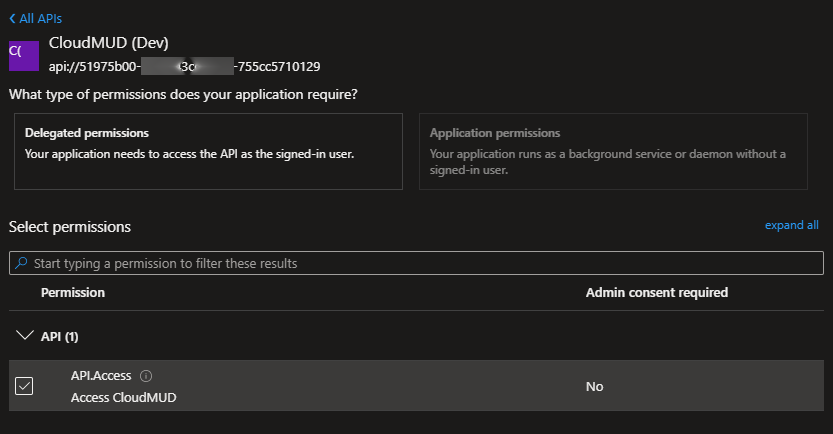
Step 2: Grant permission to access the API
You will now be shown the settings for the app registration. You can also get this information later. Navigate back to App registrations and select the app registration you created.
- Select API permissions in the sidebar.
- Press Add a permission.
- Select the My APIs tab.
- Select CloudMUD (Dev) (or whatever you called the service side app registration you created in the last article).
- Check the box next to API.Access (or whatever you called the service side scope you created in the last article).
- Press Add permissions at the bottom of the page.
Step 3: Add client configuration to the app
Open up the cloudmud.Client project, then the wwwroot directory. Add appsettings.json file to the wwwroot with the following contents:
{
  "AzureAd": {
    "Authority": "https://login.microsoftonline.com/{TENANT ID}",
    "ClientId": "{CLIENT APP ID}",
    "ValidateAuthority": true,
    "Scope": "api:{SERVER APP ID}/API.Access"
  }
}
Replace the replacable things here with your settings from your Notepad file. For example, using the example data I used last time:
{
  "AzureAd": {
    "Authority": "https://login.microsoftonline.com/e86c78e2-8bb4-4c41-aefd-918e0565a45e",
    "ClientId": "b40e140a-56c9-4ba4-91e5-b39e9ea83abc",
    "ValidateAuthority": true,
    "Scope": "api://41451fa7-82d9-4673-8fa5-69eff5a761fd/API.Access"
  }
}
It’s easy enough to mess up the app registrations here - make sure the ClientId is the app registration you created above and the Scope is the scope string you copied when you exposed the API during the last article.
Yes, this is also leaking information. We don’t want to check this file into source code control just yet (and may want to list the file in a
.gitignorefile). In the next article, we’ll fix the project so that this information is loaded from the service.
Step 4: Add the authentication service
Start by adding the following NuGet packages:
Microsoft.Authentication.WebAssembly.MsalMicrosoft.Extensions.Http
The Microsoft.Authentication.WebAssembly.Msal NuGet package to the cloudmud.Client project. This contains a set of primitives to authenticate to Azure Active Directory and obtain tokens for calling protected APIs, and the Microsoft.Extensions.Http package provides primitives for using scoped Http client factories, which helps with sending authentication to the remote service.
Back in the cloudmud.Client project, open up the Program.cs file. This is a file I have not touched thus far, but it’s thankfully short. There is already a HttpClient service that has been added to support REST requests. I’m going to replace that with the following code:
/*
** Add a HttpClient for REST APIs to the app.
*/
var name = "cloudmud.Client.ServerAPI";
var aadScope = builder.Configuration["AzureAd:Scope"];
builder.Services
    .AddHttpClient(name, client => client.BaseAddress = new Uri(builder.HostEnvironment.BaseAddress))
    .AddHttpMessageHandler<BaseAddressAuthorizationMessageHandler>();
builder.Services
    .AddScoped(sp => sp.GetRequiredService<IHttpClientFactory>().CreateClient(name));

/*
** Add support for Azure Active Directory
*/
builder.Services
    .AddMsalAuthentication(options =>
    {
        builder.Configuration.Bind("AzureAd", options.ProviderOptions.Authentication);
        options.ProviderOptions.DefaultAccessTokenScopes.Add(aadScope);
    });
The first section changes the provided HttpClient and swaps it for a named IHttpClientFactory which handles adding the authorization header for me if the user is authenticated. The second section brings in the MSAL authentication module.
Finally, add the MSAL low-level service to the wwwroot/index.html file. Add the following line in the same place as where the _framework/blazor.webassembly.js file is brought in:
<script src="_content/Microsoft.Authentication.WebAssembly.Msal/AuthenticationService.js"></script>
Finally (before I tackle the components that I have written), I need to update three existing razor files. First up is _Imports.razor. I want to be able to handle authorization everywhere. To do
that, add the following lines:
@using Microsoft.AspNetCore.Authorization;
@using Microsoft.AspNetCore.Components.Authorization;
@using Microsoft.AspNetCore.Components.WebAssembly.Authentication;
Order is not important, so just add it where you feel like it should go. Next up, I need to ensure that the authorization context is available in all the components. To do that, update the App.razor as follows:
<CascadingAuthenticationState>
    <Router AppAssembly="@typeof(App).Assembly">
        <Found Context="routeData">
            <AuthorizeRouteView RouteData="@routeData" DefaultLayout="@typeof(MainLayout)">
                <NotAuthorized>
                    <p role="alert">You are not authorized to access this resource</p>
                </NotAuthorized>
            </AuthorizeRouteView>
        </Found>
        <NotFound>
            <PageTitle>Not found</PageTitle>
            <LayoutView Layout="@typeof(MainLayout)">
                <p role="alert">Sorry, there's nothing at this address.</p>
            </LayoutView>
        </NotFound>
    </Router>
</CascadingAuthenticationState>
The basics here are that the entire router is surrounded by a CascadingAuthenticationState - this ensures that the authorization context is available everywhere. Then, replace the RouteView with the AuthorizeRouteView and ensure that a NotAuthorized section is added to handle the case when the user is not authenticated.
Finally, add Pages/Authentication.razor with the following contents:
@page "/authentication/{action}"

<RemoteAuthenticatorView Action="@Action" />

@code {
    [Parameter]
    public string? Action {get; set; }
}
This creates routes called /authentication/login and /authentication/logout to help with the authentication process. You can actually attach it to any URL.
Step 5: Update components
Now, let’s talk about updating the AuthButton.razor component so that it is aware of Azure Active Directory. Before, we just had a button. Now let’s look at it:
@using Microsoft.AspNetCore.Components.WebAssembly.Authentication
@inject NavigationManager Navigation

<AuthorizeView>
    <Authorized>
        <button type="button" class="auth-button" @onclick="SignOutEventHandler">Sign out</button>
    </Authorized>
    <NotAuthorized>
        <button type="button" class="auth-button" @onclick="SignInEventHandler">Sign in</button>
    </NotAuthorized>
</AuthorizeView>

@code {
    void SignOutEventHandler() {
        Navigation.NavigateTo($"authentication/logout?post_logout_redirect_uri=/");
    }

    void SignInEventHandler() {
        Navigation.NavigateTo($"authentication/login?returnUrl={Uri.EscapeDataString(Navigation.Uri)}");
    }
}
The button is a sign-out button when the user is authorized, and a sign-in button when the user is not authorized. When you run the app, clicking on Sign in will create a pop-up, asking you to sign in, then asking you to consent (check out which strings are used where so you can adjust to get the right user experience on consent).
It’s likely that sign-out doesn’t work (at least, it didn’t for me - I’ll work on it!). You can run the app now and sign in. Check out the session storage (using the browser developer tools) to see the information that MSAL stores in your browser.
Let’s do something more significant, however. In the last article, I set up an API that required authorization. I can update the Pages/Index.razor to use that now:
@page "/"
@attribute [AllowAnonymous]
@inject HttpClient Http

<h1>Hello, world!</h1>

<AuthorizeView>
    <NotAuthorized>
        <p>You are not authorized.  Data will not be loaded.</p>
    </NotAuthorized>
    <Authorized>
        @if (forecasts == null)
        {
            <p><i>Loading...</i></p>
        }
        else
        {
            <table class="table">
                <thead>
                    <tr>
                        <th>Date</th>
                        <th>Temp. (C)</th>
                        <th>Temp. (F)</th>
                        <th>Summary</th>
                    </tr>
                </thead>
                <tbody>
                    @foreach (var forecast in forecasts)
                    {
                        <tr>
                            <td>@forecast.Date.ToShortDateString()</td>
                            <td>@forecast.TemperatureC</td>
                            <td>@forecast.TemperatureF</td>
                            <td>@forecast.Summary</td>
                        </tr>
                    }
                </tbody>
            </table>
        }
    </Authorized>
</AuthorizeView>

@code {
    private WeatherForecast[]? forecasts;

    protected override async Task OnInitializedAsync()
    {
        try
        {
            forecasts = await Http.GetFromJsonAsync<WeatherForecast[]>("WeatherForecast");
        }
        catch (AccessTokenNotAvailableException exception)
        {
            exception.Redirect();
        }
    }
}
Let’s take this bit by bit. The [AllowAnonymous] at the top says that the user doesn’t have to be authenticated to use this page, but I still want to know if they are authenticated or not. I then wrap the page in an <AuthorizeView> which lets me define different layouts depending on whether the user is signed in currently. If the user is signed in, then a terse message is displayed. If not, then the data is fetched and then a table is displayed.
Next steps
There isn’t much to do now for authorization. In the next article, I’ll talk about the changes necessary to make this project suitable for deploying to the cloud, including discussing how to get rid of the appsettings.json in the client project and where to store secrets in the cloud.
Until next time, happy hacking!
Leave a comment