
Azure Active Directory Authentication for Blazor WASM (Part 4: SignalR)
I really thought I was through with Azure Active Directory! Honest! However, another key piece came up. My CloudMud is a real-time pub/sub application that uses SignalR. How do I authenticate to the SignalR connection? Well, like most things, there is a recipe. So let’s get to it.
The Server side of things
Let’s take a look at the unauthenticated version first. I need to integrate SignalR into my app. Fortunately, there is a tutorial for that. I just followed it. This involved:
- Adding the SignalR NuGet packages to the server project.
-
Adding services to the
Program.cs:builder.Services.AddSignalR(); builder.Services.AddResponseCompression(options => { options.MimeTypes = ResponseCompressionDefaults.MimeTypes.Concat(new[] { "application/octet-stream" }); }); -
Mapping a “hub” in the application builder:
app.UseResponseCompression(); app.MapHub<GameHub>("/hub"); -
Adding a basic hub:
 using Microsoft.AspNetCore.SignalR;

 namespace cloudmud.Server.Hubs
 {
     public class GameHub : Hub
     {
         public string Username
         {
           get => "-";
         }

         public async Task SendMessage(string message)
         {
             await Clients.All.SendAsync("ReceiveMessage", Username, message);
         }
     }
 }
I’m expecting that the authentication will provide the username, so it’s just a dummy value for now.
The Client side of things
After adding the SignalR NuGet packages to the project, all the code is in the Pages\Index.razor file:
@page "/"
@using Microsoft.AspNetCore.SignalR.Client;
@attribute [AllowAnonymous]
@inject NavigationManager NavigationManager
@implements IAsyncDisposable

<h1>Hello, world!</h1>

<AuthorizeView>
    <NotAuthorized>
        <p>You are not authorized.  Data will not be loaded.</p>
    </NotAuthorized>
    <Authorized>
        <div class="form-group">
            <label>Message: <input @bind="messageInput" size="50"/></label>
        </div>
        <button @onclick="Send" disabled="@(!IsConnected)">Send</button>
        <hr/>
        <ul id="messagedList">
            @foreach (var message in messages) {
                <li>@message</li>
            }
        </ul>
    </Authorized>
</AuthorizeView>

@code {
    private HubConnection? hub;
    private List<string> messages = new List<string>();
    private string? messageInput;

    protected override async Task OnInitializedAsync()
    {
        hub = new HubConnectionBuilder()
            .WithUrl(NavigationManager.ToAbsoluteUri("/hub"))
            .Build();

        hub.On<string, string>("ReceiveMessage", (user, message) =>
        {
            messages.Add($"{user}: {message}");
            StateHasChanged();
        });

        await hub.StartAsync();
    }

    private async Task Send()
    {
        if (hub is not null)
        {
            await hub.SendAsync("SendMessage", messageInput);
        }
    }

    public bool IsConnected => hub?.State == HubConnectionState.Connected;

    public async ValueTask DisposeAsync()
    {
        if (hub is not null)
        {
            await hub.DisposeAsync();
        }
    }
}
You can actually run this - it will work, but without authentication. Now, let’s add some authentication to this!
The Blazor side of authentication
When you send authorization with a HTTP call, you place it in a header (called Authorization). I can get the authorization token from MSAL via an IAccessTokenProvider, which can be injected into the page. Add the following to the top of the Index.razor file:
@inject IAccessTokenProvider TokenProvider
I can now write a method that gets the access token. It’s a recipe:
private async Task<string?> GetAccessTokenAsync()
{
  var tokenResult = await TokenProvider.RequestAccessToken();
  if (tokenResult != null)
  {
    if (tokenResult.TryGetToken(out AccessToken accessToken)) {
      return accessToken.Value;
    } else {
      Console.WriteLine("[GetAccessTokenAsync] No access token from tokenResult.TryGetToken()");
    }
  } else {
    Console.WriteLine("[GetAccessTokenAsync] No token result from TokenProvider.RequestAccessToken()");
  }
  return null;
}
The only thing that remains is to send the access token with each request. This is done by adjusting the HubConnection to use an access token provider:
protected override async Task OnInitializedAsync()
{
  hub = new HubConnectionBuilder()
    .WithUrl(NavigationManager.ToAbsoluteUri("/hub"), options =>
    {
        options.AccessTokenProvider = () => GetAccessTokenAsync();
    })
    .Build();

  hub.On<string, string>("ReceiveMessage", (user, message) =>
  {
    var encodedMsg = $"{user}: {message}";
    messages.Add(encodedMsg);
    StateHasChanged();
  });

  await hub.StartAsync();
}
If you run the app, you will see the authorization header being added to the request:

However, the server doesn’t know anything about the client authentication - it isn’t watching for it.
The server side of authentication
To fix the hub to recognize the authentication, just add an [Authorize] attribute to it.
Set a breakpoint at the Clients.All.SendAsync() call, and inspect the context:
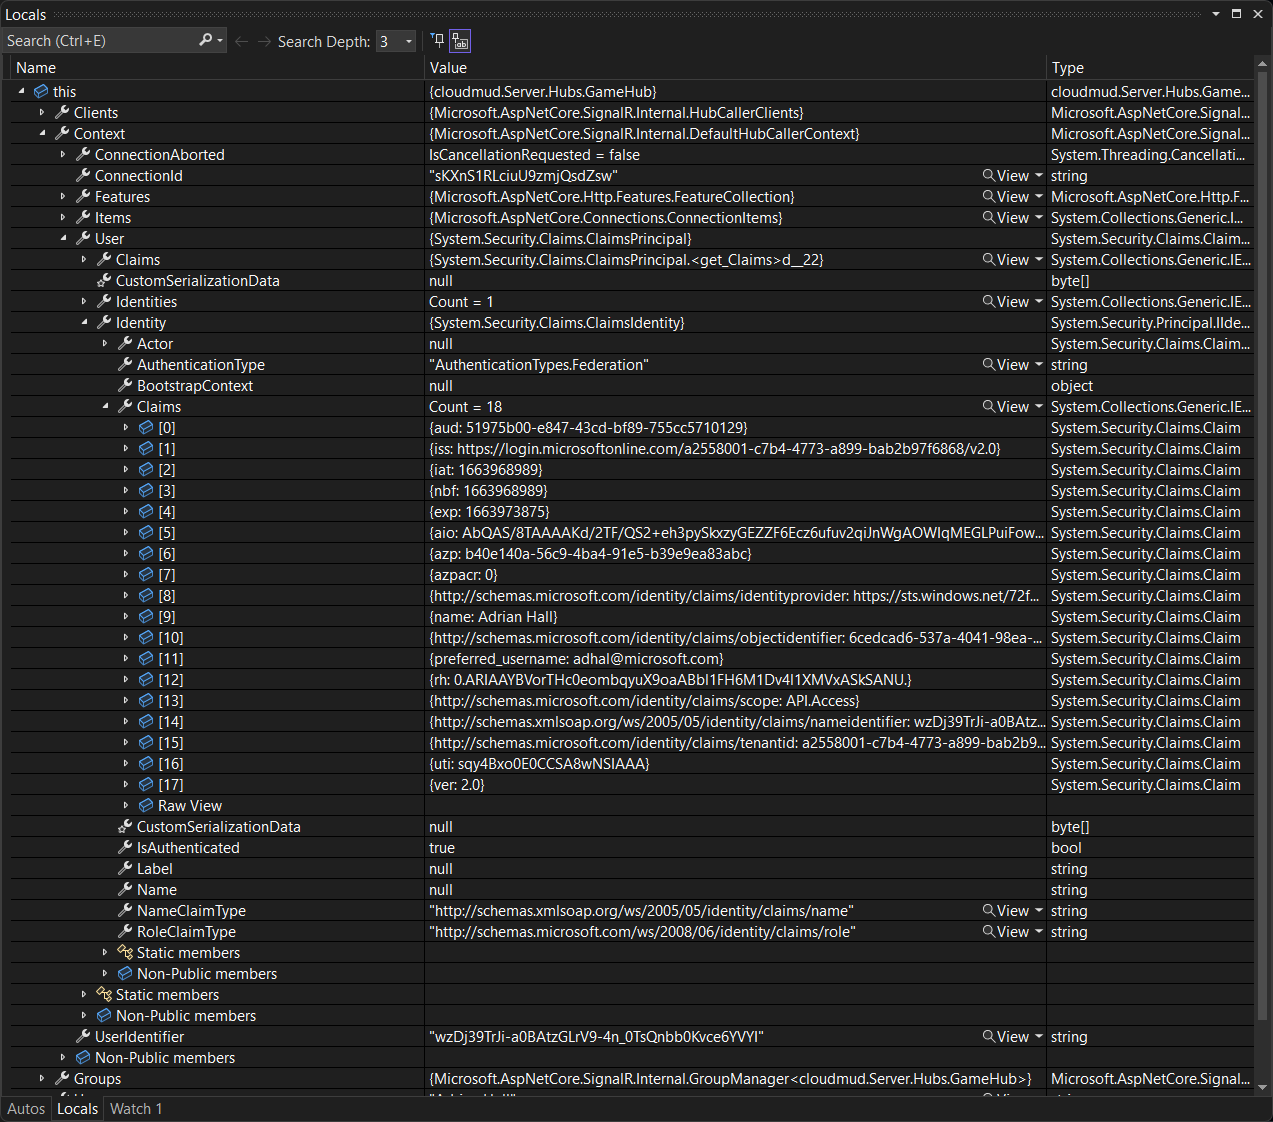
I want to call your attention to a couple of things:
- You can’t use
Context.User.Name- it’s not filled in. - You can use
Context.User.Identity.Claimsto get a real name. - You can use
Context.UserIdentityas a unique and stable ID for the user.
In my game, I’m going to do a database lookup on the Context.UserIdentity to get the “name” of the character being played. In this example, though, I’m going to use the “Name” claim for the username:
private string? Username
{
  get => Context.User?.Claims?.FirstOrDefault(c => c.Type.Equals("name", StringComparison.OrdinalIgnoreCase))?.Value ?? "-";
}
If you try out the app now, you will see that your messages are echoed back to you with your name. If another user logs in (to a different web browser), you will see their messages appear with their name as well. Real-time pub/sub with authentication achieved!
Leave a comment