
Build a GraphQL Weather API with OpenWeatherMap and AWS AppSync
I love GraphQL even for the small apps. Generating a simple API allows me to change out back end details without re-compiling my front end. It also allows me to rotate API keys easily, handle authentication, and get in depth monitoring of the individual fields being used. So, naturally, when I am building a new weather app (don’t judge — everyone makes one), I naturally want to use a weather API based on GraphQL.
Except there isn’t one. So I created one using AWS AppSync — a managed offline and real-time service in AWS that allows me to create a GraphQL API and connect it to a variety of data sources. Most recently, AWS AppSync introduced HTTP endpoints as a data source and that’s what I am going to use today.
Well, I didn’t create the weather API — that has been handled by several API providers on the web. I’m using the one by OpenWeatherMap. Before you continue, you will need an API key, which means signing up for their service.
Step 1: Create an AWS AppSync API
I’ve gone over this before, as have many other blogs. Here are the simple steps again:
- Open the AWS AppSync Console.
- Click on the Create API button.
- Select the Author from scratch template, and give your API a name before clicking on Create.
You will see your API key and endpoint on this page. You can set up authentication (optional for this one — API key is fine!) and enable logging in the Settings page. I highly recommend that you enable verbose logging during development.
Step 2: Add a HTTP Data Source
The HTTP resolver was added in the July 2018 release of AWS AppSync and its an awesome addition that makes this project possible.
- Select Data Sources.
- Click on New.
- Enter a name for your data source (I called mine OpenWeatherMap).
- Select HTTP endpoint in the Data source type drop-down.
- Enter https://api.openweathermap.org in the HTTP endpoint field.
The HTTP endpoint is just the base URL — the protocol and hostname/port number. It does not contain any path information.
Step 3: Create a schema
I want to separate what the GraphQL service provides from what the weather API provides. If I use the same schema for both, then I get an easier response mapping template, but I lose the ability to change backend API at will. I need to do more as a result.
Click on Schema to edit the schema. My schema is really simple:
type Query {
 weatherByCity(city: String!): Weather
}

type Weather {
 timestamp: Int
 location: String
 condition: Int
 description: String
 temperature: Float
 pressure: Float
 humidity: Float
 wind_speed: Float
 wind_direction: Int
 cloud_cover: Float
 rain_volume: Float
 snow_volume: Float
}

schema {
 query: Query
}
Once entered, click on Save.
The Weather type is really flat. If you just want to pass the API results through un-hindered, you just have to create a type (which can potentially have embedded types) that maps the JSON you receive from the backend API to your GraphQL requirements. However, I want to transform the data. That means I have to do more work in the mapping, but I get to use any type I want in the GraphQL schema and can divorce it from the response from the service. If the OpenWeatherMap API changes, I don’t have to change my schema.
Step 4: Create the request mapping
After you have saved your schema, click the Attach button next to the WeatherByCity query. Select the OpenWeatherMap data source in the drop-down.
The request mapping turns your GraphQL query into the HTTP request that your backend API needs. The OpenWeatherMap API has a form for a “city search” query as follows:
https://api.openweathermap.org/data/2.5/weather?q=name&APPID=apikey
This is provided by the following request mapping:
{
    "version": "2018-05-29",
    "method": "GET",
    "resourcePath": "/data/2.5/weather",
    "params":{
        "query": {
            "q": "$context.args.city",
            "APPID": "APIKEY"
        },
        "headers": {
            "Content-Type": "application/json"
        }
    }
}
Replace the APIKEY with the API key of your OpenWeatherMap API. You can include query parameters, body and headers within the params section. The body should be a string, so convert it if you need to send JSON. The $util.toJSON() utility method is useful here. This is where you should include your API key as well. When your client submits the request, they are going to include the API key for the GraphQL service. The API key in the request mapping is the API key for the backend service.
Step 5: Write the response mapping
One of the criteria I have for this API is that I want to hide the details of the backend API. I do this by divorcing the types — one type for the client and one type for the backend API. The response mapping template does the work of mapping one to the other
#if($context.result.statusCode == 200)
## Success - decode the body and reconstruct the response with the schema in mind
#set($response = $util.parseJson($context.result.body))
#set($result = {
 "timestamp": $response.dt,
 "location": $response.name,
 "condition": $response.weather[0].id,
 "description": $response.weather[0].description,
 "temperature": $response.main.temp,
 "pressure": $response.main.pressure,
 "humidity": $response.main.humidity,
 "wind_speed": $response.wind.speed,
 "wind_direction": $response.wind.deg,
 "cloud_cover": $response.clouds.all,
 "rain_volume": $util.defaultIfNullOrEmpty($response.rain["3h"], 0),
 "snow_volume": $util.defaultIfNullOrEmpty($response.rain["3h"], 0)
})
$util.toJson($result)
#else
## Error - send the proper error message
$utils.appendError($ctx.result.body, $ctx.result.statusCode)
#end
One important consideration is that the body of the response is provided as a string. If the API provides data as JSON or XML, you need to convert it to an object before use. This is done with $util.parseJson() in the case of JSON data.
Don’t forget to save your resolver before you go on to the next step.
Step 6: Test your API
Move on to the Queries page. Enter the following in the query editor:
query GetWeather($city:String!) {
  weatherByCity(city:$city) {
    timestamp,
    location,
    temperature
  }
}
Select the Query Variables section below the query editor and enter the following:
{ "city": "London" }
Click the Play button. You should see the following results:
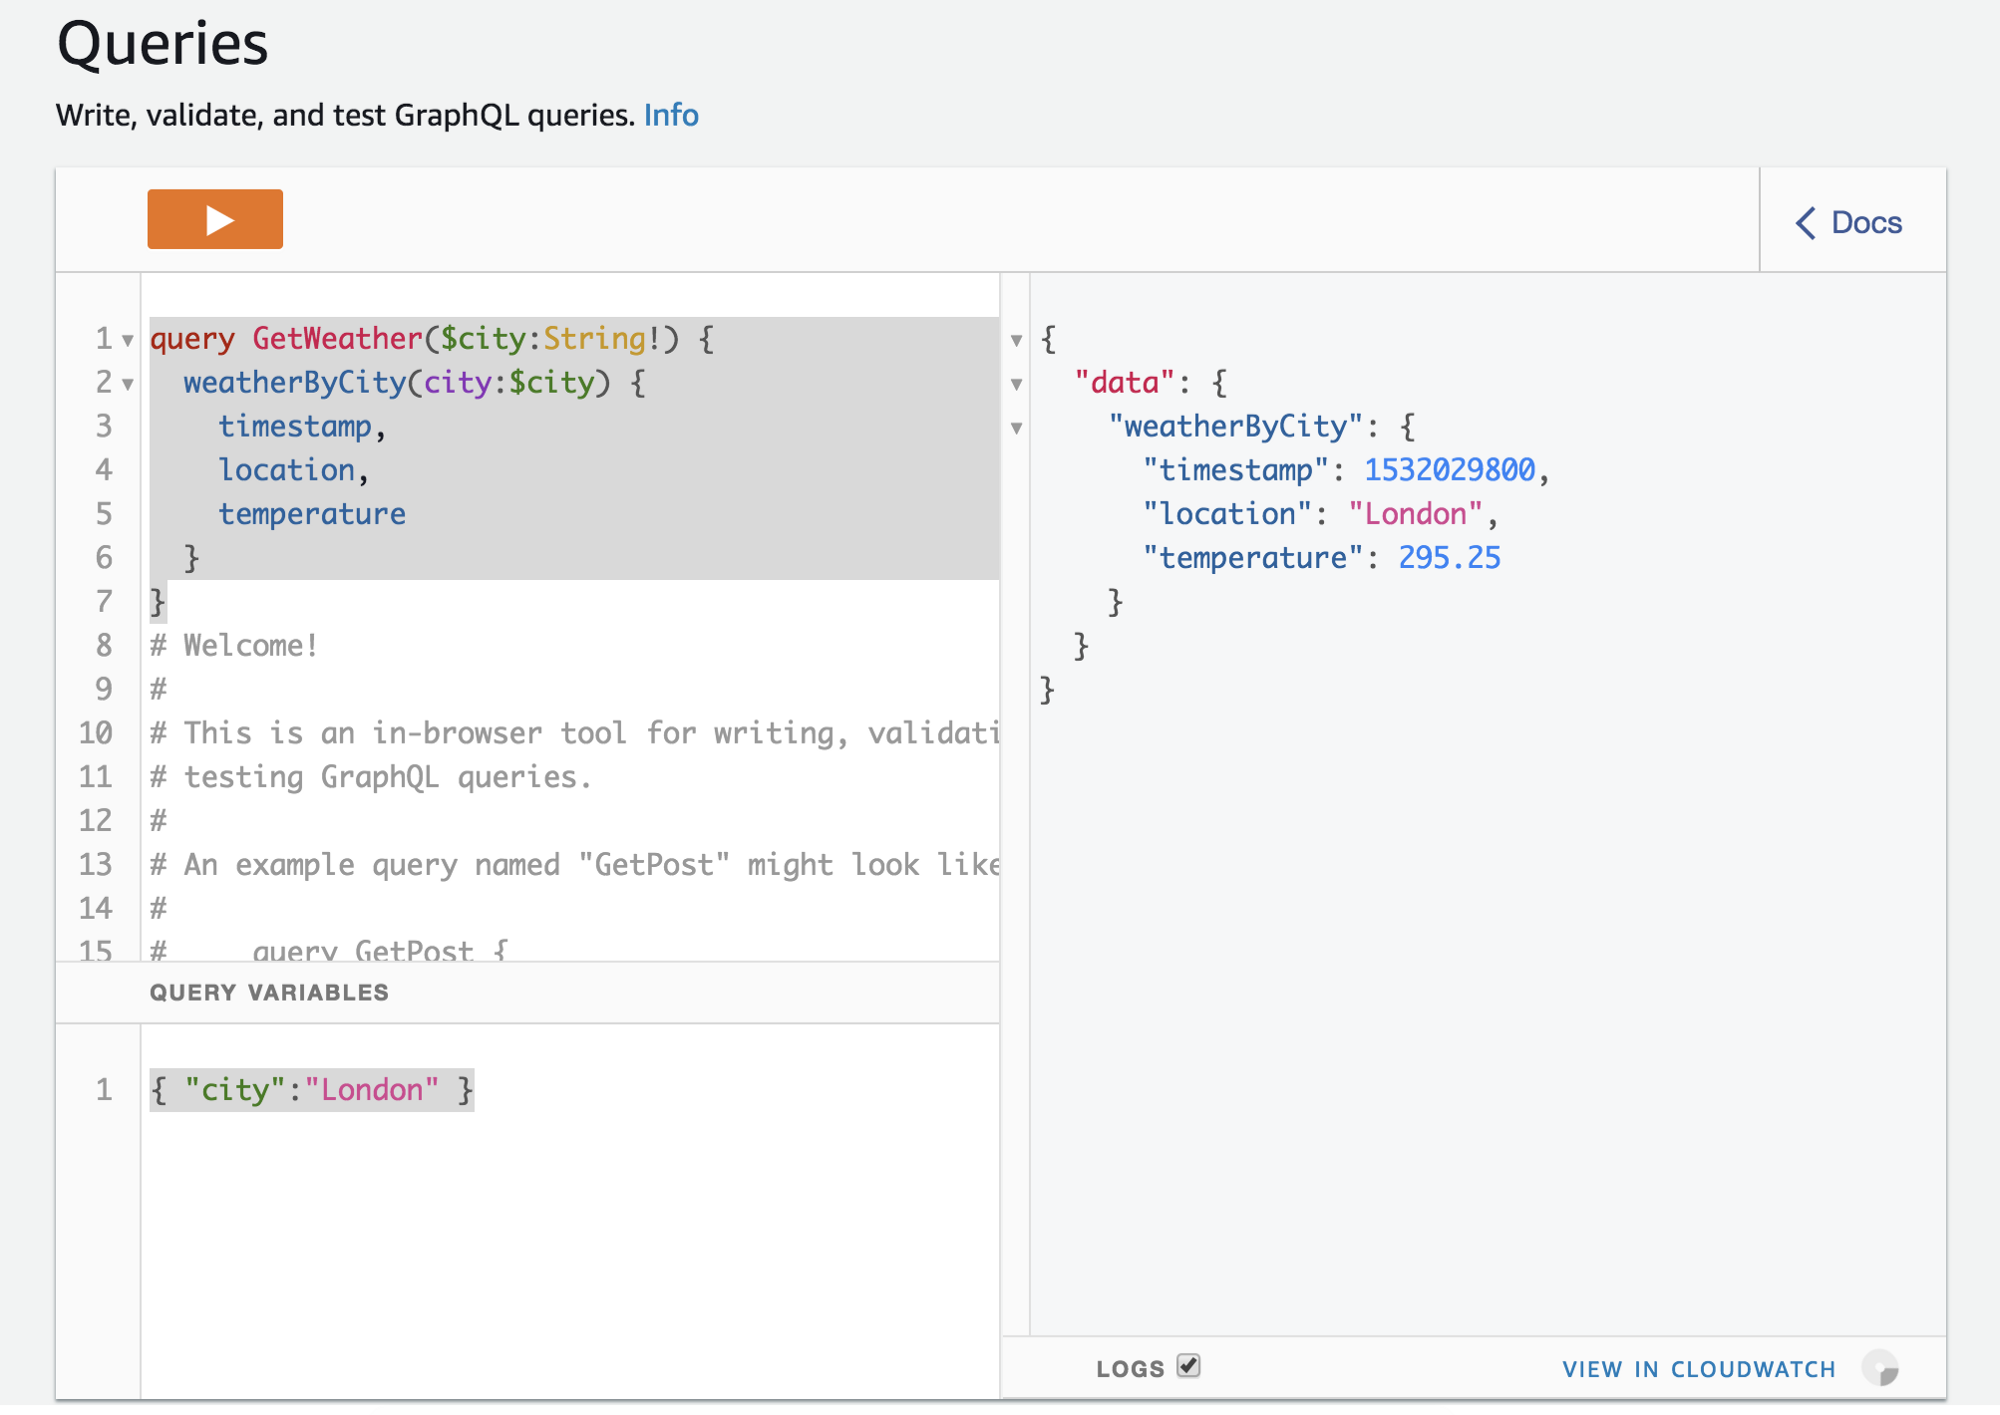
Congratulations! You’ve created a GraphQL weather API.
However, we aren’t finished. There are a couple of issues. here. Firstly, the location does not include the country information. Secondly, the temperature is in degrees kelvin, which isn’t exactly a normal temperature. I’d prefer degrees celsius. Also, the timestamp is in some obscure format. I’d prefer that to be in ISO-8601 format. Adding the country is easy. Just place curly-braces around the text and add in the country (which is stored in sys.country in the response. Similarly, converting kelvin to celsius is a little bit of math that you can put in the resolver. Here is the new response mapping template:
#if($context.result.statusCode == 200)
## Success - decode the body and reconstruct the response with the schema in mind
#set($response = $util.parseJson($context.result.body))
#set($temp = $response.main.temp - 273.15)
#set($msec = $response.dt * 1000)
#set($timestamp = $util.time.epochMilliSecondsToISO8601($msec))
#set($result = {
 "timestamp": "${timestamp}",
 "location": "${response.name}, ${response.sys.country}",
 "condition": $response.weather[0].id,
 "description": $response.weather[0].description,
 "temperature": $temp,
 "pressure": $response.main.pressure,
 "humidity": $response.main.humidity,
 "wind_speed": $response.wind.speed,
 "wind_direction": $response.wind.deg,
 "cloud_cover": $response.clouds.all,
 "rain_volume": $util.defaultIfNullOrEmpty($response.rain["3h"], 0),
 "snow_volume": $util.defaultIfNullOrEmpty($response.rain["3h"], 0)
})
$util.toJson($result)
#else
## Error - send the proper error message
$utils.appendError($ctx.result.body, $ctx.result.statusCode)
#end
Note that the calculations are done before the result is formed. The calculations or formatting has to be done prior to putting it in an object.
Finally, we need to change the type of the timestamp. Currently, it is an integer, but ISO 8601 is a textual field, so minimally we should convert it to a String type. However, the latest release also included a number of new scalar types. One of these is AWSDateTime which is an ISO-8601 formatted time. The new type in the schema looks like this:
type Weather {
 timestamp: AWSDateTime
 location: String
 condition: Int
 description: String
 temperature: Float
 pressure: Float
 humidity: Float
 wind_speed: Float
 wind_direction: Int
 cloud_cover: Float
 rain_volume: Float
 snow_volume: Float
}
Wrap Up
I’ve introduced a couple of new features of AWS AppSync here — HTTP resolvers and the new scalar types. REST isn’t legacy yet, but random HTTP endpoints to retrieve formatted data should be an endangered species at this point. With this technique, I can finally put my HTTP based APIs to pasture.
Leave a comment