
Add unit testing to your React app
Thus far, in my journey to produce a customized toolchain for my React development, I’ve covered a lot of ground. See part 1 and part 2 for that coverage. I’ve come to the point where I need to discuss testing, which is a complex area.
First, there are at least four types of testing you need to do:
- Unit testing is something you should be running on a regular basis - a series of tests that test each component to ensure that the functionality is correct from the outside.
- Integration testing, done less frequently, provides assurance that combinations of components work together.
- Visual testing, a newer concept, really, is a visual inspection of the output to ensure they look good. I use Storybook for this.
- End to end testing checks your web application on a browser to ensure it operates correctly.
You can do unit testing and integration testing with the same toolchain, and this is the topic for today. (I covered visual testing during part 2, and will cover end-to-end testing another time).
What to consider
There are three tools you need to implement, two of which are common to all testing, and the third is a topic of UI frameworks:
- A test runner allows you to run the tests and report on the results.
- An assertion library allows you to decide if the test is successful or not.
- A rendering engine renders your components into a DOM so you can test them.
If you were to use the CRA defaults, you would pick Jest and testing-library. This is a pretty good mix - Jest is an all-in-one assertion library and test runner, and testing-library has a good mix of rendering options and event triggers to allow you to test your components.
Assertion libraries
There are three assertion libraries that you should be aware of:
There are many implementations of the three styles. Let’s say you want to check that a variable (x) is actually a specific string. You can see all three styles here:
// Assert
assert.equal(x, 'foo');

// Expect
expect(x).to.equal('foo');

// Should
x.should.equal('foo');
These are all equivalent. My personal favorite is chai, which has been around for a long time. It allows me the flexibility of choosing a test style depending on what reads the best. However, you do have to use the Chai spies, which doesn’t read well when you use it in a TypeScript test suite. Also, note that both Jest and Jasmine have their own assertion libraries built in, which you would be over-riding.
Rendering engines
The main competitor to testing-library is Enzyme. It works with every test framework out there (see later), and allows you to walk the virtual DOM and fire events at specific nodes. It’s my preferred rendering engine for testing.
Test runners
Test runners will be the central place to kick off the tests. There are a bunch available, most notably Jest, Jasmine, and Mocha. All three provide code coverage (what percentage of your code is covered by test cases, plus which lines still need additional testing), plus good reporting. All three handle exceptions, component rendering, and async function calls (all of which you will bump into). Really, it’s a toss up as to which one to use. If you are deciding for yourself, try out a recent project and write all the code you need for an assortment of tests.
My own experience inevitably led me back to Jest for the test runner. It is backed by Facebook, so well funded. It handles TypeScript nicely, and it works with a variety of rendering engines, allowing me to use Enzyme, which is a little more featured then the testing library that is used in CRA. You can even use Chai with it, if you prefer to use the should or assert semantics in your test suites.
Configuring the test environment
To start with, let’s write some functions that need testing. I’ve created a ‘tests’ folder that contains example.ts with the following content:
export function testSyncFunction(): number {
  return 42;
}

export function testAsyncFunction(): Promise<number> {
  return new Promise((resolve) => {
    setTimeout(() => {
      resolve(42);
    }, 250);
  });
}

export function testExceptionFunction(): void {
  throw new Error('test-error');
}

export function testCallbackFunction(callback: (value: number) => void): void {
  callback(42);
}
These four functions allow me to see what the test suite will look like. I’ll create an example.test.ts file along side it for the tests:
/* eslint-env jest */
import * as examples from './example';

describe('examples', () => {
  it('handles a basic assertion', () => {
    expect(42).toBe(42);
  });

  it('handles a function call', () => {
    expect(examples.testSyncFunction()).toBe(42);
  });

  it('handles an async function', async () => {
    const actual = await examples.testAsyncFunction();
    expect(actual).toBe(42);
  });

  it('handles callbacks', () => {
    const callback = jest.fn();
    examples.testCallbackFunction(callback);
    expect(callback).toHaveBeenCalledTimes(1);
    expect(callback).toHaveBeenCalledWith(42);
  });

  it('handles exceptions', () => {
    expect(() => {
      examples.testExceptionFunction();
    }).toThrowError();
  });
});
It’s a bit light on everything, most notably matchers. However, I can expand my example.ts and example.test.ts to ensure myself that everything in the testing environment is working.
TIP Jest (and other test runners) can handle both unit testing and integration testing. I place the unit tests alongside the code to be tested, but I place integration tests in a special “tests” folder. This allows me to run just the unit tests or just the integration tests easily.
Let’s get started with the installation:
$> npm i -D jest
Then add the following scripts to the package.json:
"script": {
  ... other scripts
  "test": "jest",
  "test:watch": "jest --watchAll",
  "test:coverage": "jest --collect-coverage"
}
Use npm run test, and watch it fail. That’s because Jest doesn’t know anything about TypeScript. There are a bunch of ways around this, including compiling the code into JavaScript separately. However, I like to “test in place” without generating extra artifacts that clutter the project directory. Fortunately, there is an easy way to fix this, using ts-jest:
$> npm i -D ts-jest @types/jest
$> npx ts-jest config:init
This generates a base jest.config.js file which integrates ts-jest into your testing. Now, when you run npm run test, you will get something akin to the following:
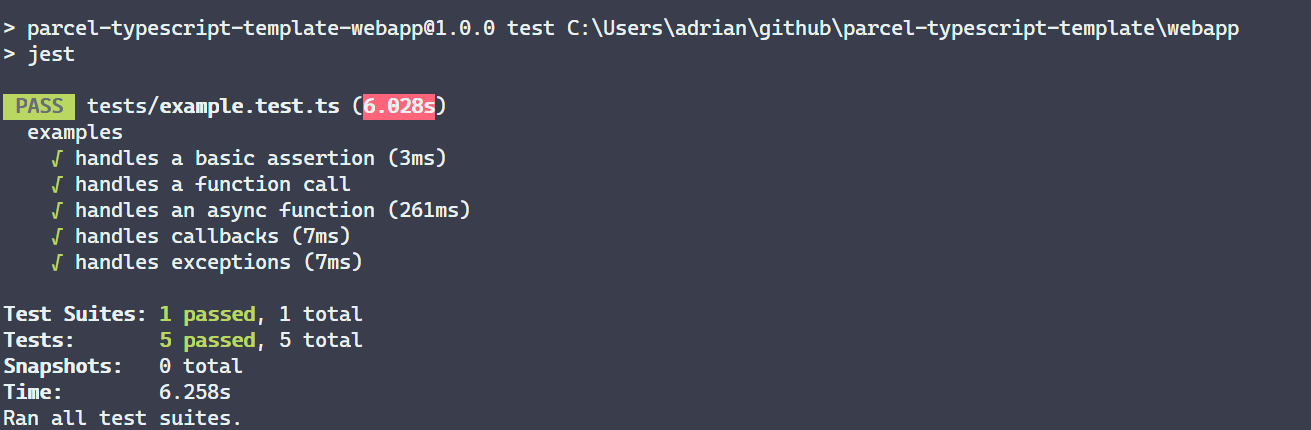
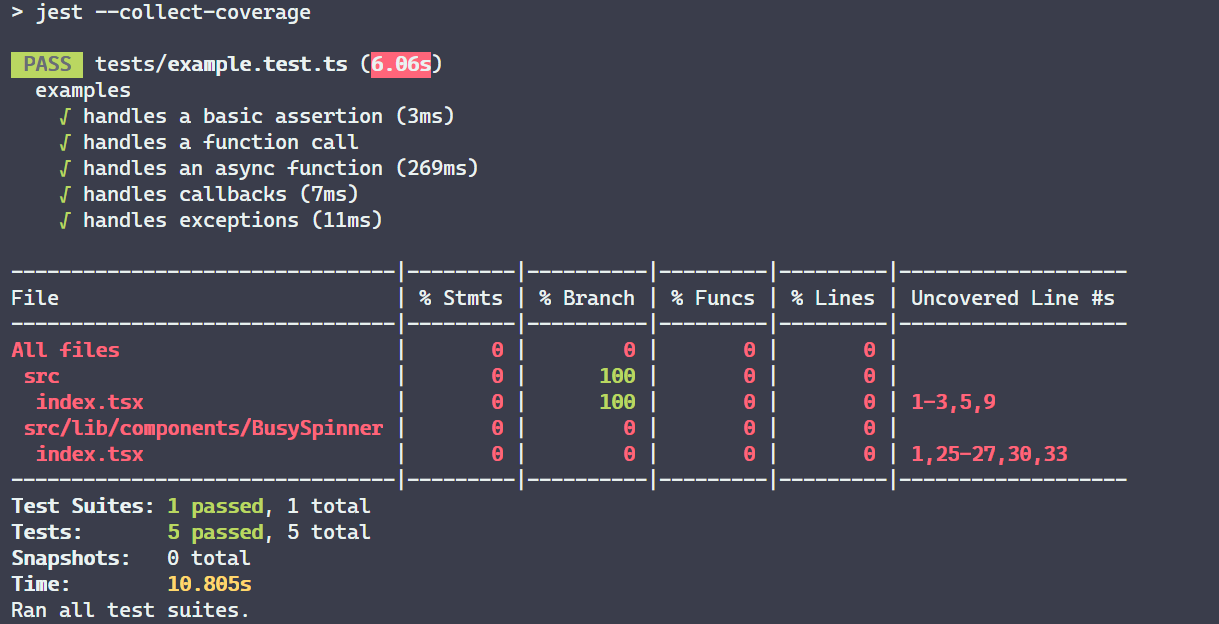
All the tests pass. I’ve also got a base configuration file from which I can extend. Checkout Configuring Jest for details on this file. My main additions are to collect coverage properly. Let’s collect coverage now with npm run test:coverage:
This is obviously wrong. It isn’t taking into account the src directory where my code is stored. I can fix this with the addition of a collectCoverageFrom entry in the config. However, I don’t want to include the test files or the stories in the coverage report. Here is my updated configuration:
module.exports = {
  collectCoverageFrom: [
    'src/**/*.{js,jsx,ts,tsx}'
  ],
  coveragePathIgnorePatterns: [
    '/.*.stories.[jt]sx?$',
    '/.*.test.[jt]sx?$',
    '/node_modules'
  ],
  preset: 'ts-jest',
  testEnvironment: 'node',
};
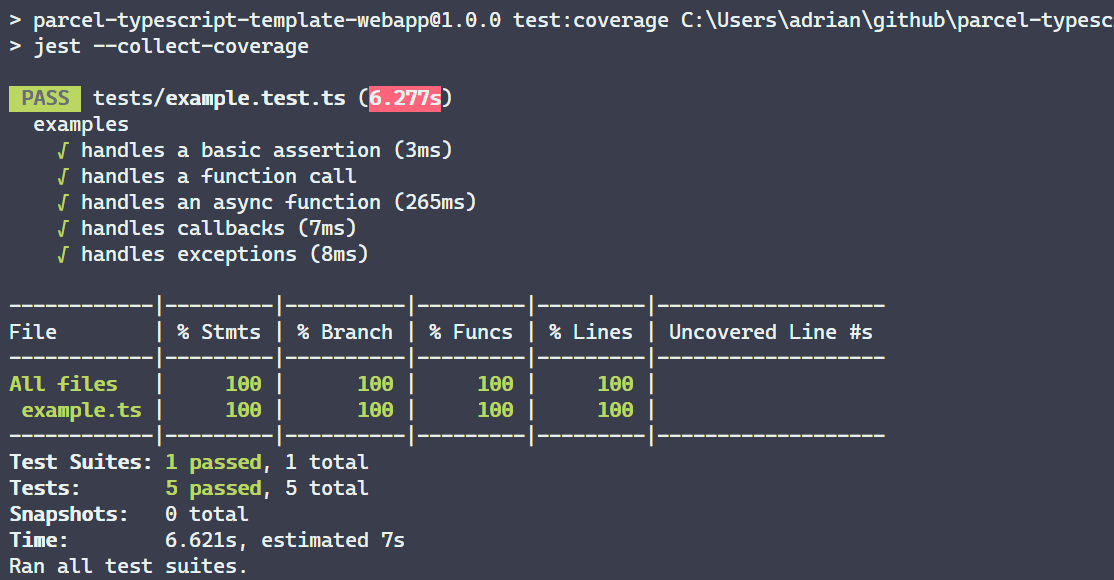
This produces a better result for the npm run test:coverage command:
Testing React components
Now that I can handle basic tests, let’s move on to the problem of testing React components with Enzyme. As I mentioned earlier, I place the tests for a component right alongside the component itself. I always write the test plan first, then fill in the details.
For best results, it’s a good idea to write the tests first then write the component - a good practice known as Test-Driven Development or TDD. I’ll be honest here, and say I don’t do the best job at testing my work, although I am trying to improve that situation.
What’s the test plan? Something like this:
/* eslint-env jest */

describe('BusySpinner', () => {
  it('spins busy when isBusy is true', () => {

  });

  it('displays the content when isBusy is false', () => {

  });
});
Just by writing this down, you are thinking about how the component works and all the edge conditions. This is a fairly simple component, but most components are much more complex.
Start by installing Enzyme in your project:
$> npm i -D enzyme enzyme-adapter-react-16 enzyme-to-json identity-obj-proxy
$> npm i -D @types/enzyme @types/enzyme-adapter-react-16
There are different adapters for each version of React, so make sure you use the right one. The enzyme-to-json library allows you to serialize components into JSON, which allows you to snapshot them (more on that later), and identity-obj-proxy allows you to deal with embedded CSS and SCSS files. You also need to have a test setup that configures the adapter. I place mine in enzyme.config.ts:
import Enzyme from 'enzyme';
import Adapter from 'enzyme-adapter-react-16';

configure({ adapter: new Adapter() });
Finally, add this to the Jest configuration:
module.exports = {
  collectCoverageFrom: [
    'src/**/*.{js,jsx,ts,tsx}'
  ],
  coveragePathIgnorePatterns: [
    '/.*.stories.[jt]sx?$',
    '/.*.test.[jt]sx?$',
    '/node_modules'
  ],
  moduleNameMapper: {
    '^.+\\.(css|scss)$': 'identity-obj-proxy'
  },
  preset: 'ts-jest',
  setupFilesAfterEnv: [
    '<rootDir>/enzyme.config.ts'
  ],
  snapshotSerializers: [
    'enzyme-to-json/serializer'
  ],
  testEnvironment: 'node',
};
You should be able to run the test-suite at this point with npm run test:coverage and see the new tests being run. Now, let’s fill them in with the two main options for testing components.
Snapshot testing
The first mechanism is snapshot testing, and it is perhaps the easiest. When the test is first run, a snapshot of the component is taken. This is then used in subsequent runs to determine whether the component has changed or not.
/* eslint-env jest */
import { shallow } from 'enzyme';
import React from 'react';
import BusySpinner from '.';

describe('BusySpinner', () => {
  it('spins busy when isBusy is true', () => {
    const actual = shallow(
      <BusySpinner isBusy>
        <p data-id="test-data">Test Data</p>
      </BusySpinner>
    );
    expect(actual).toMatchSnapshot();
  });

  it('displays the content when isBusy is false', () => {

  });
});
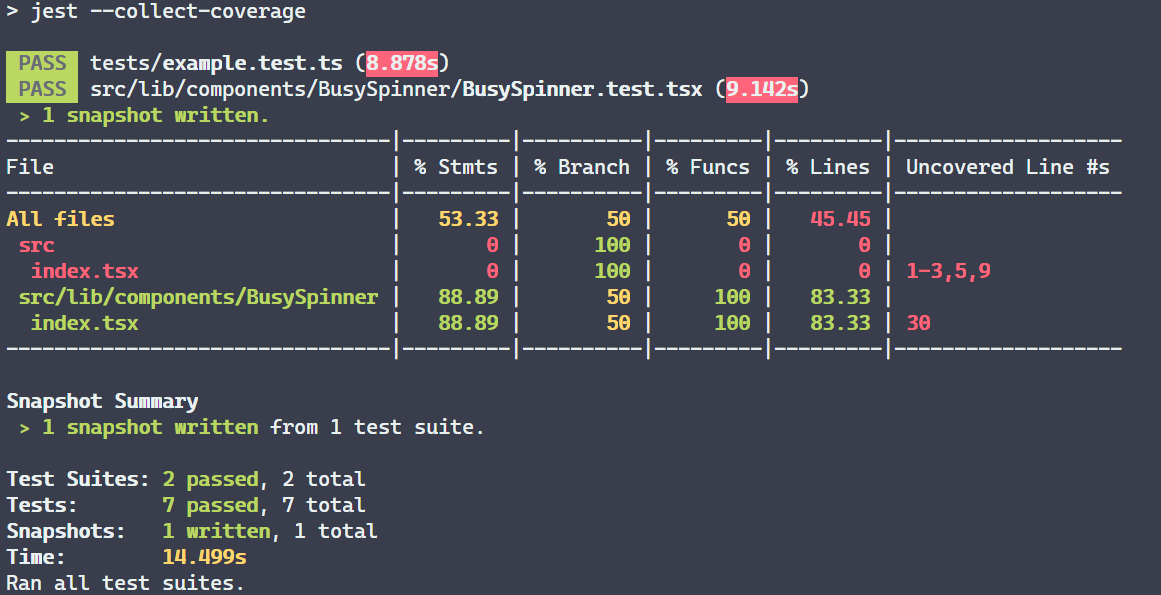
Note how it says “1 snapshot written”. Take a look at your source code tree, and you will notice a new folder (which you can and should check in to source code control) called __snapshots__. This contains the snapshots for the test - a JSON rendering of the component that can be compared.
DOM testing
The other mechanism that is commonly used is DOM testing. DOM testing checks the rendering and injects events as required. If your component is interactive, you should be using DOM testing. Let’s take a look at what that looks like with the other test I have to write:
  it('displays the content when isBusy is false', () => {
    const actual = render(
      <BusySpinner>
        <p data-id="test-data">Test Data</p>
      </BusySpinner>
    );
    const content = actual.find('[data-id="test-data"]');
    expect(content).toBeDefined();
  });
With this mechanism, you can also fire events into the DOM. My example doesn’t have events, but you could do something like the following if it did:
  it('responds to click events', () => {
    const onClick = jest.fn();
    const wrapper = shallow(<ClickableComponent onClick={onClick} />);
    wrapper.find('button').simulate('click');
    expect(onClick).toHaveBeenCalledTimes(1);
  });
Combine snapshot testing with DOM testing for the best results. Once you have covered all the paths, the code coverage should read 100% across the board. However, that doesn’t mean you’ve covered all the possible values. It just means the tests have exercised all of your code in some way. You should expand your tests to cover edge cases, like wierd inputs that you don’t expect (letters instead of numbers, or mal-formed SQL type injection attacks) and async problems (like a network going down).
Spend the time learning testing
I’ve spent many years of my life avoiding testing. It always seemed to be more code than it is worth. However, I’ve also found that a good set of tests greatly assists in pinpointing problems as a release revisions to my software. Even on a personal project, I write tests now. Despite the extra code, it saves time and problems later on.
What’s next?
My basic template is now complete (and you can get it from my GitHub repository). My own template will be progressed to include a bunch of React boiler-plate (such as React Router, Media queries, and other common libraries), along with a basic web-hosting service, which I will be integrating into the template. I won’t be covering the React boiler-plate, but I will be covering the cloud deployment and destruction in my template next.
Leave a comment