
Implementing swipe-right on a React Native FlatList
I’m progressing on my “master-detail” pattern for a react-native app. The actual implementation of master-detail is shockingly simple (more on that later). However, I bumped into some specific issues when I was implementing it. The first of these was covered last time – how to detect orientation changes in React Native. The next is this. How do I implement swipe-right so that I can add a swipe-to-delete function to a FlatList.
Let me explain a little further. The latest edition of React Native has updated the list handling. ListView is (or will be) deprecated. A bunch of new list handling methods come in, among them the FlatList, SectionList and VirtualizedList. This is great. I no longer have to implement a data source. All I have to do is pass the data I want to render to the FlatList and a rendering function and I am done.
There is also another component – the Swipeout – that implements swiping. However, it does it for ListView, which is deprecated. So no joy there. Or so I thought. It’s actually possible, but with a huge set of provisos.
Let’s start with the setup. I have two components – a NoteList.js component that renders the list, and a NoteListItem.js that renders the NoteListItem. I want a few events to fire on the NoteList.js:
onSelectItem(item)will fire when the item is pressed.onDeleteItem(item)will fire when the item is swipe-right deleted.onAddItem()will fire when the plus item in the status bar is pressed.
These will then effect a scene change or a data update as needed. There are a couple of rules to keep in mind:
- Touchable events must have a native item as their direct child (or pass on setNativeProps).
- Swipeout requires the
rowIdto handle open/close properly (so only one swipe drawer is open at any given time).
The first rule means you need to handle an onPress event in the NoteListItem renderer which is then picked up by the list item. Here is my NoteListItem.js script:
import React from 'react';
import PropTypes from 'prop-types';
import { StyleSheet, Text, TouchableHighlight, View } from 'react-native';

const styles=StyleSheet.create({
  // Place your stylesheet here

});

export default class NoteListItem extends React.Component {
    static propTypes = {
        /**
         * The item to be rendered
         */
        item: PropTypes.shape({
            noteId: PropTypes.string.isRequired,
            title: PropTypes.string.isRequired,
            content: PropTypes.string.isRequired,
            createdAt: PropTypes.number.isRequired,
            updatedAt: PropTypes.number.isRequired
        }).isRequired,

        /**
         * Event Handler when a user clicks on the item
         */
        onPress: PropTypes.func
    };

    static defaultProps = {
        onPress: () => { console.log(`NoteListItem::onPress(${this.props.item.noteId}`); }
    };

    render() {
        return (
            <TouchableHighlight onPress={this.props.onPress}>
                <View style={styles.container}>
                    <View style={styles.titleContainer}>
                        <Text style={styles.title}>{this.props.item.title}</Text>
                    </View>
                    <View style={styles.infoContainer}>
                        <Text style={styles.info}>{this.props.item.noteId}</Text>
                    </View>
                </View>
            </TouchableHighlight>
        );
    }
}
Note how I pass in the onPress event handler (with a default, in case you don’t do this). I also wrap the View (which is a native component) in the TouchableHighlight so that my entire view is clickable. This makes the entire row clickable if we define an onPress event handler.
Let’s take a look at the setup of the NoteList.js class first.
import React from 'react';
import PropTypes from 'prop-types';
import { FlatList, Platform, StyleSheet, TouchableHighlight, View } from 'react-native';
import Icon from 'react-native-vector-icons/MaterialCommunityIcons';
import Swipeout from 'react-native-swipeout';
import ActionBar from './ActionBar';
import NoteListItem from './NoteListItem';

const styles = StyleSheet.create({
  // Put your stylesheet here

});

export default class NoteList extends React.Component {
    static propTypes = {
        /**
         * The items to be rendered
         */
        items: PropTypes.arrayOf(PropTypes.shape({
            noteId: PropTypes.string.isRequired,
            title: PropTypes.string.isRequired,
            content: PropTypes.string.isRequired,
            createdAt: PropTypes.number.isRequired,
            updatedAt: PropTypes.number.isRequired
        })).isRequired,

        /**
         * The Add Item event handler
         */
        onAddItem: PropTypes.func,

        /**
         * The Delete Item event handler
         */
        onDeleteItem: PropTypes.func,

        /**
         * The Refresh Items event handler
         */
        onRefreshItems: PropTypes.func,

        /**
         * The Item Selection event handler
         */
        onSelectItem: PropTypes.func,

        /**
         * True if refreshing data now
         */
        refreshing: PropTypes.bool
    };

    static defaultProps = {
        onAddItem: () => { console.log('onAddItem pressed'); },
        onDeleteItem: (item) => { console.log('onDeleteItem ', item); },
        onRefreshItems: () => { console.log(`onRefreshItem called`); },
        onSelectItem: (item) => { console.log('onSelectItem ', item); },
        refreshing: false
    }

    /**
     * Creates a new version of the component.  The major feature here is to
     * set up the activeRow - this is set to the row that has the swipe-to-delete
     * buttons displayed
     *
     * @param {Object} props list of component properties
     * @memberof NoteList
     */
    constructor(props) {
        super(props);
    }

    /**
     * Renders a single row of the flat list
     */
    renderItem(row) {
        return (
            <NoteListItem item={row.item} onPress={() => this.props.onSelectItem(info.item)}/>
        );
    }

    /**
     * Render the component
     */
    render() {
        const statusBarSettings = {
            rightIcons: [
                <TouchableHighlight onPress={() => this.props.onAddItem()}>
                    <Icon style={styles.rightIcon} name="plus" />
                </TouchableHighlight>
            ],
            title: 'Notes'
        };

        const listSettings = {
            data: this.props.items,
            keyExtractor: (item, index) => item.noteId,
            onRefreshItems: this.props.onRefreshItems,
            refreshing: this.props.refreshing,
            renderItem: (info) => this.renderItem(info, this.state.activeRow)
        };

        return (
            <View style={styles.fullpage}>
                <View style={styles.statusBar}>
                    <ActionBar {...statusBarSettings} />
                </View>
                <View style={styles.content}>
                    <FlatList {...listSettings} />
                </View>
            </View>
        );
    }
}
This is all fairly basic FlatList code. If you use a simple application, like this:
const newItem = (title, content) => {
    return {
        noteId: uuid.v4(),
        title: title,
        content: content,
        createdAt: Date.now(),
        updatedAt: Date.now()
    }
};

export default class Application extends React.Component {
    render() {
        const items = [
            newItem('first item', 'first item content'),
            newItem('item 2', 'second item content'),
            newItem('item 3', 'third item content')
        ];

        return (
            <View style={styles.fullpage}>
                <NoteList
                    items={items}
                />
            </View>
        );
    }
}
Then you should be able to see the three items and click on them. A debug message will appear in the debug console. In addition, you can click on the plus sign in the status bar and get the onAddItem debug message.
Now, let’s consider swiping. All this work is done in the NoteList.js component. I’m going to use react-native-swipeout to handle swiping. Firstly, I need to understand what row is currently showing the swipe-right drawer. To do this, add an activeRow element to the component state:
constructor(props) {
    super(props);

    this.state = ({
        activeRow: null
    });
}
Next, ensure that the FlatList is re-rendered when the state is changed. This is handled in the FlatList props:
const listSettings = {
    data: this.props.items,
    extraData: this.state.activeRow,
    keyExtractor: (item, index) => item.noteId,
    onRefreshItems: this.props.onRefreshItems,
    refreshing: this.props.refreshing,
    renderItem: (info) => this.renderItem(info, this.state.activeRow)
};
This state is changed on two occasions. Firstly, when the user swipes right, I’m going to call event handler this.onSwipeOpen(). Then, when the swipe-right drawer closes, I’m going to call this.onSwipeClose(). I’ll use these methods to control the state:
onSwipeOpen(item, rowId, direction) {
    this.setState({ activeRow: item.noteId });
}

onSwipeClose(item, rowId, direction) {
    if (item.noteId === this.state.activeRow && typeof direction !== 'undefined') {
        this.setState({ activeRow: null });
    }
}
The important functionality is within the onSwipeClose() method. This will only reset the state to null (meaning nothing is selected) when the closed item is the currently active element. This is important because Swipeout calls the onClose event handler (which is this method) for all sorts of events, most of which do not actually indicate a new swipe.
Finally, let’s take a look at how this is rendered in the renderItem() method:
renderItem(info, activeRow) {
    const swipeSettings = {
        autoClose: true,
        close: info.item.noteId !== this.state.activeRow,
        onClose: (secId, rowId, direction) => this.onSwipeClose(info.item, rowId, direction),
        onOpen: (secId, rowId, direction) => this.onSwipeOpen(info.item, rowId, direction),
        right: [
            { onPress: () => this.props.onDeleteItem(info.item), text: 'Delete', type: 'delete' }
        ],
        rowId: info.index,
        sectionId: 1
    };

    return (
        <Swipeout {...swipeSettings}>
            <NoteListItem item={info.item} onPress={() => this.props.onSelectItem(info.item)}/>
        </Swipeout>
    );
}
The main item to note here is that the rowId is filled in by the index of the data object passed to FlatList, which starts at 0 and goes up from there. The onOpen() and onClose() event handlers are wired to the new onSwipeOpen() and onSwipeClose() methods, and the close flag is set so that the drawer is closed if the active row does not match.
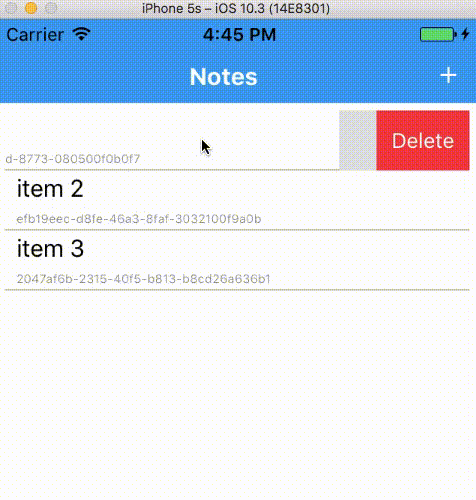
If you implement this code, you will note the following:
- Pressing a row calls
onSelectItem(). - Swiping right will open the swipe-right drawer with the Delete button in it.
- Swiping right on another row will cause the original swipe-right drawer to close.
- Pressing the delete button calls
onDeleteItem().
Hopefully, the next blog post will be about the master-detail pattern in React Native. Until then, I hope this helps implementing awesome lists.
Leave a comment