
Creating a React Native bridge library
React Native is really good at straddling the line between native and JavaScript. There is a bridge between the two that allows you to call native code from JavaScript. This is awesome for including things that require a special touch. Most React Native developers will never need to worry about the bridge because libraries exist to wrap a lot of the common native libraries that you see in Android and iOS.
But what if you want to create a bridge library of your own? That’s a whole other effort. Such an endeavor will require you to know Android (or Kotlin) and Objective-C (or Swift), plus the bridging technologies that React Native uses. I can’t help you decide what to put in a native library, but this blog post is a walk through of creating a React Native bridge library that can be distributed on npmjs.org.
Step 1: Prerequisites
Scaffolding a bridge library is different from scaffolding an app. Fortunately, there is an easy tool to do the scaffolding. Unfortunately, you have to install it:
[sudo] npm install -g react-native-create-library
You can use something like Visual Studio Code for all the code, but make sure you have the appropriate plugins so you get syntax highlighting and error detection. You will also want the latest versions of Android Studio and Xcode on your system. If you are doing a Windows library version, you will also want the .NET Core compiler on your system. Using a Mac is the only way to go here. Don’t even attempt building a bridge library on a PC.
Step 2: Scaffold your library
My particular library is going to be called react-native-secure-keystore. I want Android and iOS versions (sorry Windows) and the idea is to have a key-value store that is secured by your fingerprint. I use the following command line to create the library:
react-native-create-library --package-identifier com.shellmonger.reactnative --platforms android,ios secure-keystore
This is not quite right, but it’s close. Here is the tree structure that is created:
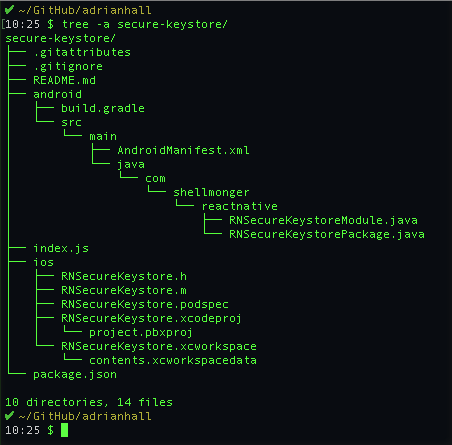
There are a couple of points here.
- The name of the directory is
secure-keystoreinstead ofreact-native-secure-keystore. If I had putreact-native-secure-keystoreas the name, my classes would beRNReactNativeSecureKeystoreModule.java– which is ugly. Renaming is easy (and we will take care of that in a moment.) - Although
.gitignoreis added, a git repository is not included. You will have to create it.
These problems are easily fixed:
$ mv secure-keystore react-native-secure-keystore
$ cd react-native-secure-keystore
$ git init
$ git add -A
$ git commit -m "Initial Commit"
It would also be a good idea at this point to create a GitHub repository and add the GitHub repository as a remote. Also, do the other things you would normally do when created an npm package:
- Update the
package.jsonwith repository, issues, author, home page and license. - Update the
README.mdwith relevant information. - Add a
LICENSE.mdfile.
Step 3: Write some code
Getting to writing code didn’t take too long. Let’s take a look at how this works. The index.js file brings in the native modules and exposes them. You may want to export some JavaScript code that implements a particular interface, add TypeScript definitions, or any number of other things. However, the base functionality is that your compiled code is exposed as part of the NativeModules import from React Native. All the exposed methods are available as NativeModules.RNSecureKeyStore.MethodName. Note the RNSecureKeyStore comes from the arguments for the react-native-create-library command line tool.
In this example, there is an iOS version and an Android version. Each of these has a directory that can be opened in the appropriate workspace – Xcode for iOS and Android Studio for Android. iOS has one module called RNSecureKeyStore and Android has a boilerplate file called RNSecureKeystorePackage.java (which you won’t touch) and functionally the same module called RNSecureKeystoreModule.java. You will have to add methods to each one. The default languages are Java and Objective-C.
Let’s add a simple method that returns a boolean – true if the device is ready to handle fingerprint authentication, false otherwise. Doing the Android version first, here is the code:
package com.shellmonger.reactnative;

import android.hardware.fingerprint.FingerprintManager;
import android.os.Build;

import com.facebook.react.bridge.Promise;
import com.facebook.react.bridge.ReactApplicationContext;
import com.facebook.react.bridge.ReactContextBaseJavaModule;
import com.facebook.react.bridge.ReactMethod;
import com.facebook.react.bridge.Callback;

public class RNSecureKeystoreModule extends ReactContextBaseJavaModule {

  private final ReactApplicationContext reactContext;

  public RNSecureKeystoreModule(ReactApplicationContext reactContext) {
    super(reactContext);
    this.reactContext = reactContext;
  }

  @Override
  public String getName() {
    return "RNSecureKeystore";
  }

  /**
   * PUBLIC REACT API
   *
   *  isAvailable()   Returns true if the fingerprint reader can be used
   */
  @ReactMethod
  public void isAvailable(final Promise promise) {
    try {
      FingerprintManager manager = getFingerprintManager();
      boolean v = (manager != null && manager.isHardwareDetected() && manager.hasEnrolledFingerprints());
      promise.resolve(v);
    } catch (Exception ex) {
      promise.reject("ERR_UNEXPECTED_EXCEPTION", ex);
    }
  }

  /**
   * Returns fingerprint manager or null
   * @see https://stackoverflow.com/questions/34409969/how-to-check-device-compatibility-for-finger-print-authentication-in-android
   */
  private FingerprintManager getFingerprintManager() {
    if (Build.VERSION.SDK_INT >= Build.VERSION_CODES.M) {
      return (FingerprintManager) reactContext.getSystemService(reactContext.FINGERPRINT_SERVICE);
    } else {
      return null;
    }
  }
}
I generally produce two library files – the one ending in Module.java contains just the API being exposed to React. There is another one that contains the actual code. This allows me to test the library separately from the bridge a lot easier.
The ReactMethod attribute indicates that the method is exposed to React. It always takes a Promise as the last argument, and you need to either resolve or reject it. I always try to wrap my entire method in a try/catch and reject based on the exception. This ensures any exceptions can be handled in JavaScript code instead of crashing the app.
Android code may require permissions – there is an AndroidManifest.xml file to do that for you. In this case, add the USE_FINGERPRINT permission.
<manifest xmlns:android="http://schemas.android.com/apk/res/android" package="com.shellmonger.reactnative">
    <uses-permission android:name="android.permission.USE_FINGERPRINT"/>
</manifest>
It’s a good idea to open the android directory in Android Studio so that all the nice IDE features for Android are at your disposal – things like import auto-complete. If you do this, Android Studio will prompt you for upgrading the project. Don’t do it! This will implement a gradle version that is incompatible with React Native and cause all sorts of problems.
Switching over to the iOS side, I don’t like Objective-C. However, it is a necessary evil when working with bridging libraries, mostly because you cannot compile a static library with Swift. Even if you really want to write your library in Swift, you have to do that and then bridge it into Objective-C. So you might as well go the whole way and write the whole thing in Objective-C. (And yes, I do hope that this changes drastically soon so you can use the more modern languages). Let’s look at our iOS files. Firstly, the RNSecureKeystore.m file:
#import "RNSecureKeystore.h"
#import <LocalAuthentication/LocalAuthentication.h>

@implementation RNSecureKeystore

RCT_EXPORT_MODULE();

RCT_EXPORT_METHOD(isAvailable:(RCTPromiseResolveBlock)resolve rejecter:(RCTPromiseRejectBlock)reject)
{
    LAContext *context = [[LAContext alloc] init];
    if ([context canEvaluatePolicy:LAPolicyDeviceOwnerAuthenticationWithBiometrics error:NULL]) {
        resolve(@(YES));
    } else {
        resolve(@(NO));
    }
}

@end
This is (to me, at least) ugly code. However, I’m just copying something I got from Stack Overflow in this instance (much like the Android code from earlier). I don’t need to change anything else.
Testing your package
To test a React Native bridge library, it’s generally useful to write a test application. Here is how I do it:
$ yarn link
$ react-native init example
$ cd example
$ yarn link react-native-secure-keystore
$ react-native link react-native-secure-keystore
The first yarn link command registers the local copy of my library with yarn. Then I create a normal React Native app. I’m using react-native init instead of create-react-native-app because I’m going to link a library. The second yarn link links the local copy I registered earlier into the current project. Then I do the react-native link command to link all the native code bridges (not just mine).
The next step is to adjust my example app to exercise the new code. The essence of the new code is this:
import SecureKeystore from 'react-native-secure-keystore';

class App extends React.Component {
  constructor(props) {
    super(props);
    this.state = { isAvailable: false, ready: false };
  }

  async componentDidMount() {
    try {
      const isAvailable = await SecureKeystore.isAvailable();
      this.setState({ isAvailable, ready: true };
    } catch (ex) {
      console.log('Error = ', ex);
    }
  }

  render() {
    // Do something with this.state here
  }
}
The isAvailable constant should be a boolean. Since all bridge methods are async, I set it in state using an async lifecycle event handler.
Now, let’s run it with react-native run-ios! You will note that almost immediately, the isAvailable method returns false. In the iOS simulator, you can simulate TouchID. Go to the Simulator and choose Hardware -> Touch ID -> Enroll. Then reload the app – note that isAvailable is now true.
Running in the Android emulator using react-native run-android is a little trickier. The emulator you use must have support for the hardware. If you have a real device, that may be an easier method.
Writing tests
One of the problems you will encounter in this is how to test your library on real devices. Fortunately, there are services out there (AWS Device Farm is the one I use) that allow you to test your library on a wide variety of devices. What you want to do in this case is write an app that exercises the library through a set of screens. For example, you might have a main navigation where you press buttons to call each routine and fill in a text box with the result. Then, write UI tests in XCUI Test, Espresso or Appium to exercise the app. Of these, only Appium is cross-platform and it is fully supported by AWS Device Farm.
Leave a comment