
Deploy an AWS AppSync GraphQL API with CloudFormation
There are lots of tutorials about creating an AWS AppSync API from the ground up using the console. However, sooner or later, you are going to want to create an API for production.
You could, just as simply, point-and-click your way around the console to produce the same API. However, that is fraught with problems. You can’t check that API into source code control, nor can you repeatedly deploy the API. Ultimately, you’ll want to automate your deployments.
This article is about how you can automate your AWS AppSync deployments.
Get used to the terminology
I’m going to start using some terminology here that is unique to AWS CloudFormation. Just so we don’t get confused:
A CloudFormation template is a JSON or YAML file that describes what you are going to deploy. I like YAML for this sort of thing. I also use Visual Studio Code and there is an extension specifically for editing CloudFormation YAML.
A CloudFormation stack is an implementation of your template. You will run a command line tool (the AWS CLI) to create the stack or delete the stack. When the stack is created, all the resources are created. When the stack is deleted, well — all the resources are deleted.
A CloudFormation resource is a description of an AWS resource. It has all the settings for that resources. Resources can depend on other resources, and you can specify this dependency in the template.
Design your resource hierarchy
Ultimately, I want to build an AWS AppSync API for my notes app. However, that comes with a multitude of other things. I need to specify the schema, resolvers, data sources, DynamoDB table, Amazon Cognito user pool, and any IAM roles that I need to use to link them together.
A CloudFormation stack is practically never a single resource. Let’s look at the dependency tree for my notes app:
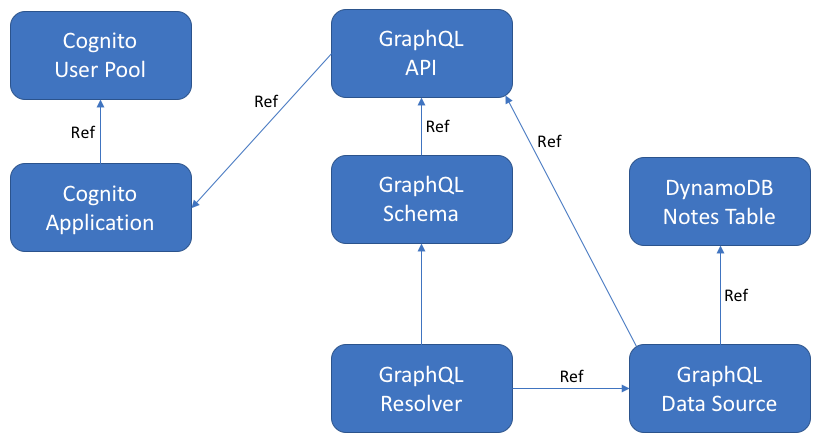
Note that almost everything has a Ref link. A ref link means that the configuration (and hence the CloudFormation template) is going to include a reference to the thing it depends on. This results in a natural order to creating things:
- The Cognito user pool and DynamoDB table are created first.
- The Cognito application is created next.
- The GraphQL API is created after that.
- Then, the GraphQL schema and the data sources are created.
- Finally, the GraphQL resolver is created.
I have not included the IAM roles or the IAM policies here which need to be created prior to the resources that use them. I will need two roles each with their own policy:
- Amazon Cognito will need to publish via SNS to handle multi-factor authentication and the confirmation of user sign-ups.
- AWS AppSync will need to read and write to the Amazon DynamoDB table.
When you are going through the configuration with the console, you will note this ordering implicitly is enforced. You can’t create a data source until the table is created, for instance.
The only link that doesn’t have a reference is the resolver linkage to the schema. The linkage between these two resources is embedded in the text of the GraphQL schema in the form of the name of the queries and mutations.
Since we can’t get the list of queries and mutations as the output of the CloudFormation resource creation, we will have to insert an explicit dependency on these resources.
Build the template file and parameters
A CloudFormation template has the general form:
---

Description: AWS AppSync Notes API


Parameters:


Resources:


Outputs:
Then, the parameters (the things you need to specify on the command line), resources (the AWS resources that will be created) and outputs (the things that you may need later on that can be output on the command line) are listed under the sections.
I only have one parameter — the API name:
---

Description: AWS AppSync Notes API


Parameters:

  APIName:

    Type: String

    Description: "Name of the API, for generate names for resources"

    MinLength: 3

    MaxLength: 20

    AllowedPattern: '^[a-zA-Z][a-zA-Z0-9_]*$'


Resources:


Outputs:
Note that I have to specify this parameter. This ensures that I don’t try to create resources of the same name as something that exists because it has a default value. You can also create optional parameters as long as you give the parameter a default value.
The Amazon Cognito resources
I have two Cognito resources, seven AppSync resources, and a DynamoDB resource to build. Let’s start with Amazon Cognito. I want to do username and password sign-in and sign-up with a phone-number verification via SMS.
First, let’s set up an IAM role and policy to allow the user pool to write to SNS:
1
2
3
4
5
6
7
8
9
10
11
12
13
14
15
16
17
18
19
20
21
22
23
24
25
26
27
28
29
  SNSRole:

    Type: AWS::IAM::Role

    Description: "An IAM Role to allow Cognito to send SNS messages"

    Properties:

      RoleName: !Sub ${APIName}-cognito-sns-role

      ManagedPolicyArns:

        - Ref: CognitoSNSPolicy

      AssumeRolePolicyDocument:

        Version: 2012-10-17

        Statement:

          - Effect: Allow

            Action:

              - sts:AssumeRole

            Principal:

              Service:

                - cognito-idp.amazonaws.com

    DependsOn:

      - CognitoSNSPolicy


  CognitoSNSPolicy:

    Type: AWS::IAM::ManagedPolicy

    Properties:

      Description: Managed policy to allow Amazon Cognito to access SNS

      PolicyDocument:

        Version: 2012-10-17

        Statement:

          - Effect: Allow

            Action: sns:publish

            Resource: "*"
Notice how I construct the role name based on the APIName parameter. The !Sub operator substitutes strings before creating the resource. Also, notice how I include a policy within the role. I explicitly depend on the policy so that it exists when I create the role. This is a good model for creating IAM roles that you will need.
Each resource you create has a logical name that is used to reference that resource throughout the CloudFormation template. In this case, my role can be referred to as SNSRole and the policy by CognitoSNSPolicy. The DependsOn section uses this to link the policy to the role.
I also need to create the Amazon Cognito user pool and an application client that AWS AppSync will use:
  UserPool:

    Type: "AWS::Cognito::UserPool"

    Description: "A Cognito user pool for authenticating users"

    Properties:

      UserPoolName: !Sub ${APIName}-user-pool

      AutoVerifiedAttributes:

        - phone_number

      MfaConfiguration: "ON"

      SmsConfiguration:

        ExternalId: !Sub ${APIName}-external

        SnsCallerArn: !GetAtt SNSRole.Arn

      Schema:

        - Name: name

          AttributeDataType: String

          Mutable: true

          Required: true

        - Name: email

          AttributeDataType: String

          Mutable: false

          Required: true

        - Name: phone_number

          AttributeDataType: String

          Mutable: false

          Required: true


  UserPoolClient:

    Type: "AWS::Cognito::UserPoolClient"

    Description: "App Client used by AWS AppSync"

    Properties:

      ClientName: !Sub ${APIName}-appsync-client

      GenerateSecret: false

      UserPoolId: !Ref UserPool
There are a couple of notable items here. First, how do I know what properties I can set? Each resource has a type. You can find a listing of all the types in the CloudFormation documentation. The general form is AWS::product::type. Some products have only one type (like DynamoDB); others have many (check out ApiGateway!). Click on the type in the documentation to get the list of properties that you can set. Some properties are required — others are optional.
Secondly, what’s with the !GetAtt and !Ref? Remember when I showed the dependency tree for this stack? Most of the lines were marked with Ref — a reference. When a resource is created, there are certain output values. Every single resource has a “reference”. Most resources also have a number of “attributes”. You access the reference with !Ref and the attributes with !GetAtt. Note the documentation calls these Fn::Ref and Fn::GetAtt — it’s the same thing.
Create the Amazon DynamoDB resources
There is only one DynamoDB table in my example:
  DynamoDBNotesTable:

    Type: "AWS::DynamoDB::Table"

    Description: "Data store for AWS AppSync Notes Type"

    Properties:

      TableName: !Sub ${APIName}-notes-table

      AttributeDefinitions:

        - AttributeName: "NoteId"

          AttributeType: "S"

        - AttributeName: "UserId"

          AttributeType: "S"

      KeySchema:

        - AttributeName: "NoteId"

          KeyType: "HASH"

        - AttributeName: "UserId"

          KeyType: "RANGE"

      ProvisionedThroughput:

        ReadCapacityUnits: 5

        WriteCapacityUnits: 5
This is fairly straight-forward as templates go. If you want to see a fuller example of what a DynamoDB table definition can look like, take a look at the documentation.
Create the AWS AppSync resources
There are nine resources to create for the AWS AppSync API:
- An IAM policy to allow AppSync to query DynamoDB
- An IAM role that includes the IAM policy
- An AppSync API
- An AppSync Schema
- An AppSync Data Source
- Four AppSync Resolvers
Let’s look at the IAM policy and role first:
  DynamoDBRole:

    Type: AWS::IAM::Role

    Properties:

      RoleName: !Sub ${APIName}-appsync-dynamodb-role

      ManagedPolicyArns:

        - Ref: AppSyncDynamoDBPolicy

      AssumeRolePolicyDocument:

        Version: 2012-10-17

        Statement:

          - Effect: Allow

            Action:

              - sts:AssumeRole

            Principal:

              Service:

                - appsync.amazonaws.com

    DependsOn:

      - AppSyncDynamoDBPolicy


  AppSyncDynamoDBPolicy:

    Type: AWS::IAM::ManagedPolicy

    Properties:

      Description: Managed policy to allow AWS AppSync to access the tables created by this template.

      Path: /appsync/

      PolicyDocument:

        Version: 2012-10-17

        Statement:

          - Effect: Allow

            Action:

              - dynamodb:GetItem

              - dynamodb:PutItem

              - dynamodb:DeleteItem

              - dynamodb:UpdateItem

              - dynamodb:Query

              - dynamodb:Scan

              - dynamodb:BatchGetItem

              - dynamodb:BatchWriteItem

            Resource: !Join [ "", [ !GetAtt DynamoDBNotesTable.Arn, "*" ] ]
This is very similar to the SNS Role we looked at earlier. The only addition is that we need to take the DynamoDBNotesTable ARN, add a wild-card to it, then use that in the policy document. This is done by the !Join operator. This, in effect, says “I’m allowed to do anything to any record within this table”.
Next, let’s take a look at the API, schema, and data source:
  AppSyncApi:

    Type: "AWS::AppSync::GraphQLApi"

    Description: "The GraphQL API for the Notes App"

    Properties:

      AuthenticationType: "AMAZON_COGNITO_USER_POOLS"

      Name: !Sub ${APIName}

      UserPoolConfig:

        UserPoolId: !Ref UserPoolClient

        AwsRegion: !Sub ${AWS::Region}

        DefaultAction: "ALLOW"


  AppSyncSchema:

    Type: "AWS::AppSync::GraphQLSchema"

    Properties:

      ApiId: !GetAtt AppSyncApi.ApiId

      Definition: |

        type Note {

          NoteId: ID!

          title: String

          content: String

        }

        type PaginatedNotes {

          notes: [Note!]!

          nextToken: String

        }

        type Query {

          allNotes(limit: Int, nextToken: String): PaginatedNotes!

          getNote(NoteId: ID!): Note

        }

        type Mutation {

          saveNote(NoteId: ID!, title: String!, content: String!): Note

          deleteNote(NoteId: ID!): Note

        }

        type Schema {

          query: Query

          mutation: Mutation

        }

  AppSyncNotesTableDataSource:

    Type: "AWS::AppSync::DataSource"

    Properties:

      ApiId: !GetAtt AppSyncApi.ApiId

      Name: !Sub ${APIName}_notes_table

      Description: "The Notes Table AppSync Data Source"

      Type: AMAZON_DYNAMODB

      ServiceRoleArn: !GetAtt DynamoDBRole.Arn

      DynamoDBConfig:

        TableName: !Ref DynamoDBNotesTable

        AwsRegion: !Sub ${AWS::Region}
There are a couple of things to note here:
- There is a pseudo-parameter called
AWS::Region— this is the region you are deploying all your resources in. You don’t need to specify the region when you are creating resources, but you do need to specify the region when you are linking resources together. - To embed the schema, you start with the pipe symbol (
|), then a new line, and then put your text. You finish by either an adjustment in the indent level (because of the termination) or a blank line. - You can cut-and-paste your schema into the CloudFormation template after you have it working.
Finally, let’s take a look at the resolvers:
  AppSyncAllNotesQueryResolver:

    Type: "AWS::AppSync::Resolver"

    DependsOn: AppSyncSchema

    Properties:

      ApiId: !GetAtt AppSyncApi.ApiId

      TypeName: Query

      FieldName: allNotes

      DataSourceName: !GetAtt AppSyncNotesTableDataSource.Name

      RequestMappingTemplate: |

        {

          "version": "2017-02-28",

          "operation": "Query",

          "query": {

            "expression": "UserId = :id",

            "expressionValues": {

              ":id": $util.dynamodb.toDynamoDBJson($ctx.identity.sub)

            }

          }

        },

        "limit": $util.defaultIfNull(${ctx.args.limit}, 20),

        "nextToken": $util.toJson(${ctx.args.nextToken})

      ResponseMappingTemplate: |

        {

          "notes": $util.toJson($ctx.result.items),

          "nextToken": $util.toJson(${ctx.args.nextToken})

        }

  AppSyncGetNoteQueryResolver:

    Type: "AWS::AppSync::Resolver"

    DependsOn: AppSyncSchema

    Properties:

      ApiId: !GetAtt AppSyncApi.ApiId

      TypeName: Query

      FieldName: getNote

      DataSourceName: !GetAtt AppSyncNotesTableDataSource.Name

      RequestMappingTemplate: |

        {

          "version": "2012-02-28",

          "operation": "GetItem",

          "key": {

            "NoteId": $util.dynamodb.toDynamoDBJson($ctx.args.NoteId),

            "UserId": $util.dynamodb.toDynamoDBJson($ctx.identity.sub)

          }

        }

      ResponseMappingTemplate: "$util.toJson($ctx.result)"


  AppSyncSaveNoteMutationResolver:

    Type: "AWS::AppSync::Resolver"

    DependsOn: AppSyncSchema

    Properties:

      ApiId: !GetAtt AppSyncApi.ApiId

      TypeName: Mutation

      FieldName: saveNote

      DataSourceName: !GetAtt AppSyncNotesTableDataSource.Name

      RequestMappingTemplate: |

        {

          "version": "2012-02-28",

          "operation": "PutItem",

          "key": {

            "NoteId": $util.dynamodb.toDynamoDBJson($ctx.args.NoteId),

            "UserId": $util.dynamodb.toDynamoDBJson($ctx.identity.sub)

          },

          "attributeValues": {

            "title": $util.dynamodb.toDynamoDBJson($ctx.args.title),

            "content": $util.dynamodb.toDynamoDBJson($ctx.args.content)

          }

        }

      ResponseMappingTemplate: "$util.toJson($ctx.result)"


  AppSyncDeleteNoteMutationResolver:

    Type: "AWS::AppSync::Resolver"

    DependsOn: AppSyncSchema

    Properties:

      ApiId: !GetAtt AppSyncApi.ApiId

      TypeName: Mutation

      FieldName: deleteNote

      DataSourceName: !GetAtt AppSyncNotesTableDataSource.Name

      RequestMappingTemplate: |

        {

          "version": "2012-02-28",

          "operation": "DeleteItem",

          "key": {

            "NoteId": $util.dynamodb.toDynamoDBJson($ctx.args.NoteId),

            "UserId": $util.dynamodb.toDynamoDBJson($ctx.identity.sub)

          }

        }

      ResponseMappingTemplate: "$util.toJson($ctx.result)"
This is my longest listing because it includes the velocity template for each resolver. As before, you can just cut-and-paste the velocity template into the CloudFormation template.
One key thing to note here is that there is no “reference” between a resolver and a schema. However, they depend on one another. You can’t create a resolver for an operation before the schema has been created. This means an explicit DependsOn property must be added to the resolver template.
This also has another important effect and it only comes into consideration when you update the schema. The dependency tree is honored on creation. It is not honored fully on update.
If you are adding a new resolver to a type in the schema, you will need to do two updates. The first is for the schema only. The second is to add the resolvers. This is because the resolver creation MUST happen after the type exists in the schema.
There is a simple way around this problem. When you add or remove a query or mutation, change the logical name of the schema. This will cause the updates to happen in the right order. Your existing schema and resolvers are not affected by this change, so you still don’t suffer any down time from the change.
Create some outputs
The final step in creating a CloudFormation template is to create some outputs. You generally need some information about the created stack. In this case, I’m interested in the information about the Cognito user pool, DynamoDB table and the AWS AppSync API. Here is my Outputs section:
Outputs:

  CognitoUserPoolId:

    Description: The Pool ID of the Cognito User Pool

    Value: !Ref UserPool

  CognitoUserPoolClientId:

    Description: The Client ID for AWS AppSync Auth

    Value: !Ref UserPoolClient

  DynamoDBNotesTableName:

    Description: The name of the DynamoDB Table

    Value: !Ref DynamoDBNotesTable

  GraphQLApiEndpoint:

    Description: The URL to the GraphQL Endpoint

    Value: !GetAtt AppSyncApi.GraphQLUrl

  GraphQLApiId:

    Description: The API ID of the GraphQL API

    Value: !GetAtt AppSyncApi.ApiId
Check out the completed CloudFormation template.
Create the CloudFormation stack
Before starting with CloudFormation, create an S3 bucket. CloudFormation is asynchronous and you don’t want to have a partially created stack and then disconnect. It also serves as a repository for the “current templates in use”. The S3 bucket does not need to have any special permissions and you definitely should not make it public to the Internet.
First, transfer the template to your S3 bucket:
aws s3 sync . s3://my-bucket-name/cloudformation
I keep my templates in a single directory (under source code control) and then sync them all at the same time. I use an S3 bucket for various things, so the CloudFormation templates go into a sub-directory. Next, let’s validate the template:
aws cloudformation validate-template \
  --template-url https://s3-us-west-2.amazonaws.com/my-bucket-name/cloudformation/AWSAppSync.yaml
{
    "CapabilitiesReason": "The following resource(s) require capabilities: [AWS::IAM::ManagedPolicy, AWS::IAM::Role]",
    "Description": "AWS AppSync Notes API",
    "Parameters": [
        {
            "NoEcho": false,
            "Description": "Name of the API - used to generate unique names for resources",
            "ParameterKey": "APIName"
        }
    ],
    "Capabilities": [
        "CAPABILITY_NAMED_IAM"
    ]
}
The output shows that everything is fine, but I need to specify some things when I create the stack. If the YAML (or JSON) is not syntactically correct, then you need to adjust your template.
Note that this does not validate that the CloudFormation template can be used to create a stack successfully. I found that most (potentially all) properties are only checked when the stack is created. When you are first creating a stack, you will want to use the console to check that things are created appropriately.
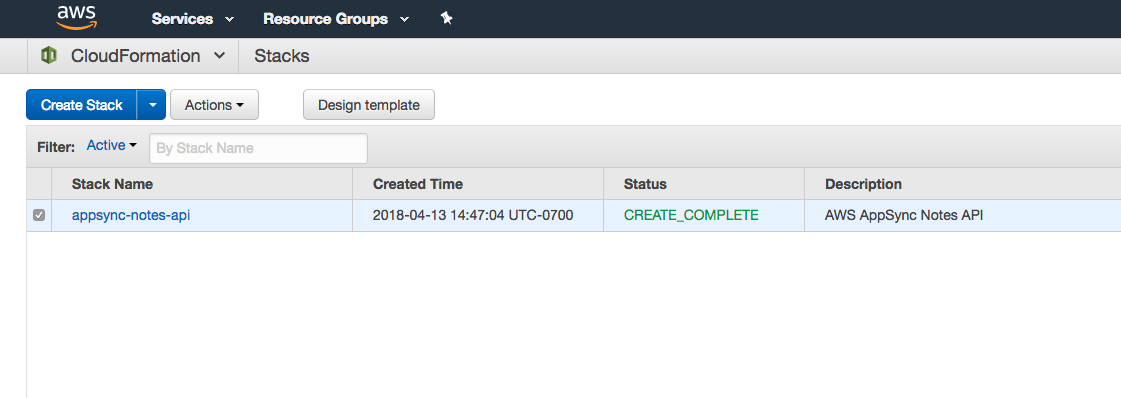
Talking of which, let’s create the stack:
aws cloudformation create-stack --stack-name appsync-notes-api --template-url https://s3-us-west-2.amazonaws.com/adrianha-amazon-scratch/AWSAppSync.yaml --capabilities CAPABILITY_NAMED_IAM --parameters ParameterKey=APIName,ParameterValue=ProdNotesAPI
{
    "StackId": "arn:aws:cloudformation:us-west-2:1234567890:stack/appsync-notes-api/7d4fc430-aaaa-11e8-9963-123456789"
}
That came back quickly. CloudFormation is asynchronous. You’ve just kicked off the process. It hasn’t completed. You can use the aws cloudformation describe-stacks command to see the current status:
arn:aws:cloudformation:us-west-2:1234567890:stack/appsync-notes-api/7d4fc430-aaaa-11e8-9963-123456789
{
    "Stacks": [
        {
            "StackId": "arn:aws:cloudformation:us-west-2:1234567890:stack/appsync-notes-api/7d4fc430-aaaa-11e8-9963-123456789",
            "Description": "AWS AppSync Notes API",
            "Parameters": [
                {
                    "ParameterValue": "ProdNotesAPI",
                    "ParameterKey": "APIName"
                }
            ],
            "Tags": [],
            "Outputs": [
                {
                    "Description": "The API ID of the GraphQL API",
                    "OutputKey": "GraphQLApiId",
                    "OutputValue": "r53477kvfzgrziigukivet1234"
                },
                {
                    "Description": "The Client ID for AWS AppSync Auth",
                    "OutputKey": "CognitoUserPoolClientId",
                    "OutputValue": "12345bblbnqdvs1bgkb7bgue8u"
                },
                {
                    "Description": "The name of the DynamoDB Table",
                    "OutputKey": "DynamoDBNotesTableName",
                    "OutputValue": "ProdNotesAPI-notes-table"
                },
                {
                    "Description": "The Pool ID of the Cognito User Pool",
                    "OutputKey": "CognitoUserPoolId",
                    "OutputValue": "us-west-2_vU86ABCDE"
                },
                {
                    "Description": "The URL to the GraphQL Endpoint",
                    "OutputKey": "GraphQLApiEndpoint",
                    "OutputValue": "https://abcdefg2djajhh5y4mrckvu7qu.appsync-api.us-west-2.amazonaws.com/graphql"
                }
            ],
            "EnableTerminationProtection": false,
            "CreationTime": "2018-04-13T21:47:04.111Z",
            "Capabilities": [
                "CAPABILITY_NAMED_IAM"
            ],
            "StackName": "appsync-notes-api",
            "NotificationARNs": [],
            "StackStatus": "CREATE_COMPLETE",
            "DisableRollback": false,
            "RollbackConfiguration": {}
        }
    ]
}
This stack was completed successfully. I can see all the outputs that I’ve defined. I can also see this same information on the AWS CloudFormation console:
When developing the CloudFormation stack, I can click on the stack name and get more information. This is especially useful when there are errors in the template. I can see exactly what property of what resource is causing the problem. My general workflow is
- Edit the template.
- Use
aws syncto copy the template to S3. - Use
aws cloudformation create-stackto kick off the create. - Monitor the creation using the console.
- If there are errors, then adjust the template.
- Use
aws cloudformation delete-stackto delete the stack. - Repeat from step 2 as needed.
- Check in the template to my source code repository.
One you have a good stack created, you can use aws cloudformation update-stack (instead of create-stack) to make changes. This will cause the minimal amount of change in the stack, which reduces downtime on your production backend.
Other ways to build CloudFormation templates
CloudFormation has a designer integrated into it. The designer is visual and includes access to all the properties as you are editing the underlying YAML or JSON format. It’s a good visual representation of your stack.
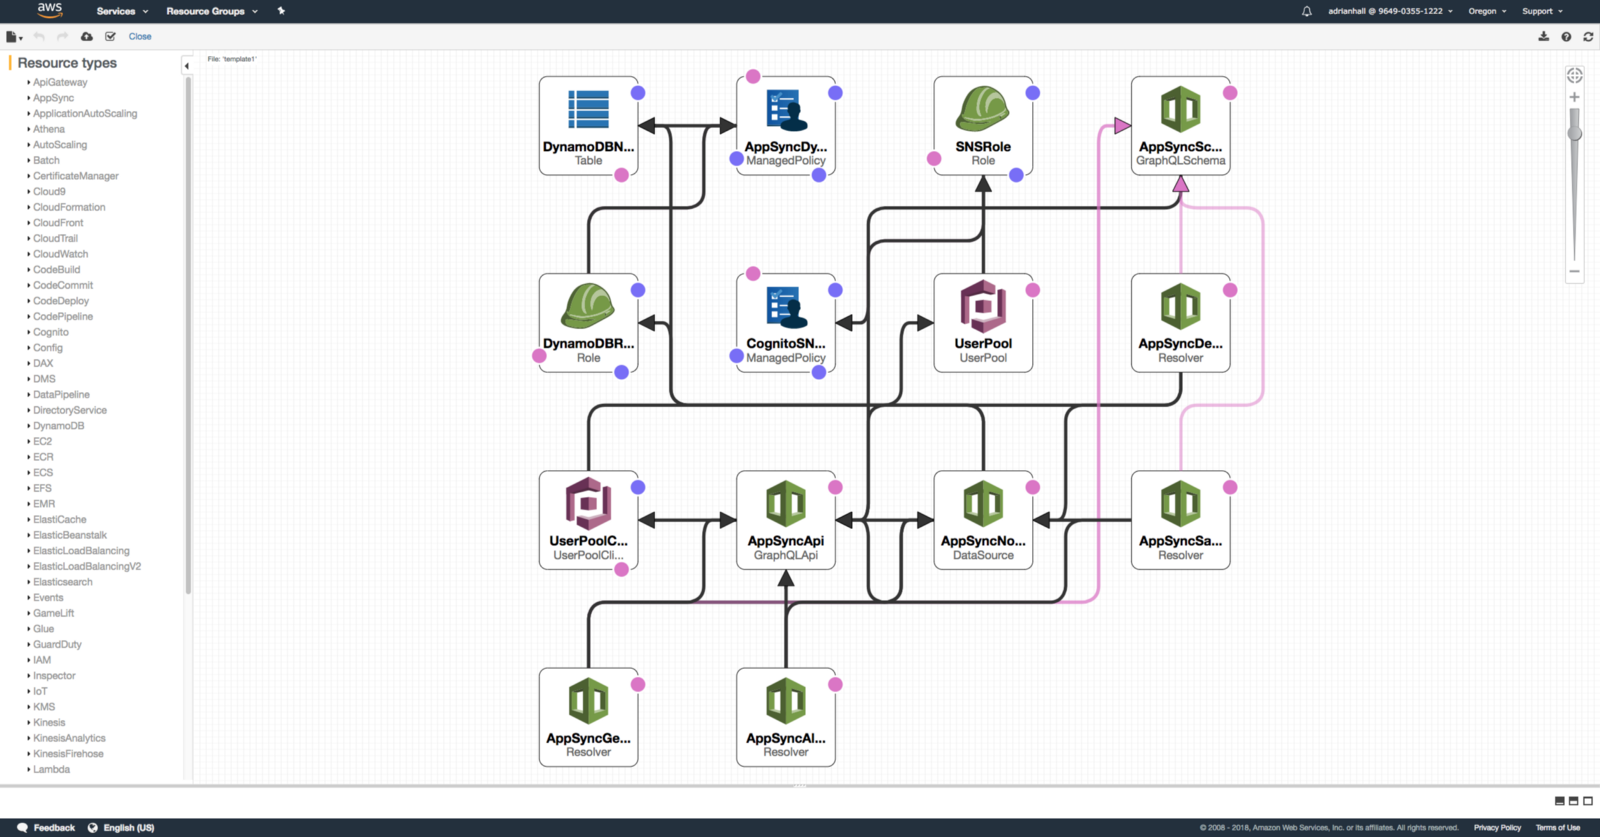
I found the creation process much slower using the designer. However, it’s good to visualize an existing CloudFormation template that has been deployed as it is built in. There are also a bunch of DSLs for handling CloudFormation:
Instead of writing the YAML or JSON, you are writing in the DSL (domain specific language) provided by the tool. I don’t find this an improvement. However, if you like writing templates in Python or Ruby instead of YAML or JSON, this might be for you.
There are also template repositories, including the one maintained by AWS. I find the template repositories more useful, but they depend on the fact that you already know how to configure the service. In many cases, that means going through a configuration exercise on the service prior to integrating it into your template so you know what properties you need to set.
Ultimately, CloudFormation is a great tool for configuring resources in a repeatable way; especially for services that have a lot of interactions (like AWS AppSync). It enables you to do repeatable deployments and to check your cloud backend definition into source code control — both good things. This is a tool that you will want in your hands.
Leave a comment