
AI Assisted Editors: A Comparison (Part 1)
You can’t go a lap about development these days without bumping into AI assisted editors. Most of the AI tooling companies I see are heavily investing in Visual Studio Code based editors, but you have some others out there as well. I’m going to break the comparison I’m doing into three articles - one on the paid offerings I’ve personally used, one on the “free” offerings I’ve used, and one on the quirks of the LLMs that are in common use. Hopefully, by the end of this, you’ll understand the strengths and weaknesses of each one and be able to decide what to invest in.
What is an AI Assisted Editor?
As a developer, you open up an editor and write code. AI Assisted editors generally come in the forms of plugins that allow a large language model to take over the writing of the the code for you. They also generally provide information on the code base through a chat interface. This allows you to come up to speed on a new code base quickly by allowing the AI to focus your attention on the important bits.
I’ve personally used three AI assisted code editor plugins to create the same project (a web UI for Azurite) three times. The projects ended up very different even if they used the same AI models underneath. That’s not unusual and a natural part of the development process with AI. If you don’t like the solution, you can ask the AI to change or you can just wipe it out and start over.
I started off writing the project myself without AI. This took me a month, mostly because I’m not the best at designing UI and TailwindCSS is complex. But that’s a baseline.
The paid-plan editors
So, who are the contenders?
All of these have a free plan (at least, right now) that is VERY limited, and all of them charge about $20/month (US pricing) to get any reasonable use out of them. They all support the use of Claude Sonnet v3.7 and v4 as the underlying model; largely considered the gold standard in AI models in this space. After that, things diverge.
GitHub Copilot
Pros: Large selection of models; Enterprise feature set
Cons: Complex prompting; limited free version;
I’ve used GitHub Copilot in Visual Studio Code and Visual Studio. It’s also available for XCode, JetBrains, Neovim, Eclipse, and via GitHub Issues. It’s installed by default in Visual Studio Code and Visual Studio these days. The likelyhood is you have access to it. I found the free version (which only supports Claude Sonnet 3.5 and OpenAI GPT 4.1 among the base models) to be good only for about 30 minutes of coding. It’s enough to get a flavor but not enough to complete even a basic project.
In terms of model availability, it’s got Claude Sonnet 3.7, Claude Sonnet 4, Gemini 2.5 Pro, and several version of the OpenAI models available in the paid veersion. There is also a “Pro+” plan for $40/month that provides access to reasoning models (like Claude Opus 4 and OpenAI o3) plus access to GitHub Spark (which is a competitor to v0.dev and similar prototyping tools). It also provides access to local models like Ollama hosted models, which is great if you dislike sending your code to someone else. This expands the list to include models like Qwen2.5-coder or stable-coder. This list is by far the most expansive of any of the paid versions. (Note: using local models doesn’t help with pricing - you still pay for completions).
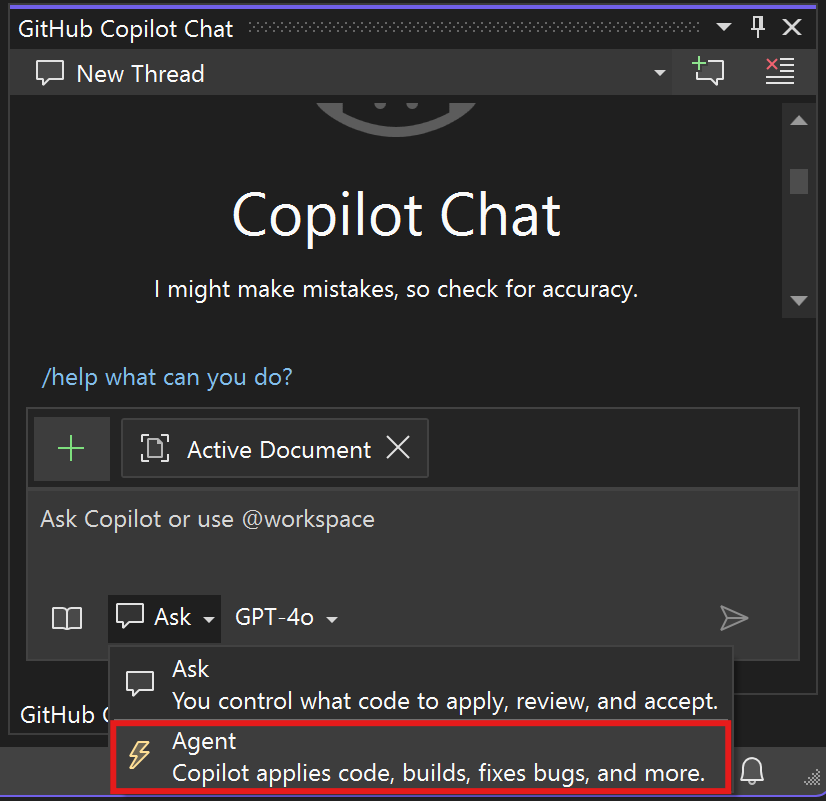
GitHub Copilot Chat (which is your basic interface) has three modes: Ask (where the model doesn’t do any changes to your code), Edit (where the model is allowed to make changes, but doesn’t use tools), and Agent (where the model uses tools). This is a super-important distinction. All the models (but explicitly Claude Sonnet 4) like to change your code. Sometimes, you only want an AI discussion to formulate a plan - Ask mode is perfect for this. The Ask and Edit modes also have access to reasoning models that cannot run tools, allowing you to get different responses.
When using GitHub Copilot Agent Mode, you can configure “auto-approved” tools. Let’s say, for example, you are ok with the agent running “npm test” whenever it wants. You can add that to the settings (which has an allow list and deny list) and the tool will auto-run.
Since GitHub Copilot is produced by (ultimately) Microsoft, it’s got a very enterprise-centric view of things. While this doesn’t make any difference to the average user, it allows enterprises to control which models are available and to turn off features for their developers. The other contenders don’t allow this.
So, how does GitHub Copilot work in practice? My application was written using a “plan and act” type of formula. First, I wrote a simple synopsis of the product I wanted to write, then I asked the agent to write the requirements, followed by the design, and finally the tasks needed to complete the task. Once I had the task list, I asked the agent to complete each task in turn. In between each one, I started a new chat session to avoid or minimize hallucination. This process required me to write specific prompts (which I placed in .github/prompts) and to write a copilot-instructions.md with project specific instructions for the LLM to consider when writing code. The instructions contained information on my tech stack, testing preferences, project structure, and so on.
So, where does it fall down?
- All the documentation shows the
copilot-instructions.mdas a single file, which isn’t ideal. There are always a split between organizational requirements and project requirements. Fortunately, you can split this file, but good luck finding the instructions. - The other entries in this list have a nicer way of approving the tool usage. Having to edit settings to auto-approve tools is bad.
- The agent will often do
cd somewhere && do-something. Even ifdo-somethingis approved, it won’t automatically do it because of the directory change. - There are many instances where the agent will not read the instructions, forget where it is, or other similar problems.
Overall, GitHub Copilot does the job, but it’s far from ideal. It does have the widest range of models, largest catalog of tools supported, and it works in the largest number of editors. It’s kind of like IKEA furniture - it does the job, but it’s not necessarily the best option for all projects.
I completed the GitHub Copilot project within 2 weeks. The savings primarily came from the fact that the React components and TailwindCSS took at most a few minutes to write whereas they took a half a day without AI. However, GitHub Copilot (in common with the other contenders) would then get itself into a loop trying to write and fix tests, add linting rules, and generally do things I had not asked.
Cursor
Pros: Model auto-selection; background agents; Planning mode
Cons: Yet Another Editor install; no ask mode; limited free version

Cursor provides an installable editor. The editor itself is based on the OSS version of Visual Studio Code, so you have access to most of the extensions in the Visual Studio Code marketplace. Want to use Cursor inside your existing editor? That’s unavailable. I was able to use the free version for about two hours before my tab completions ran out. I was able to use the agent for about another hour. Just like GitHub Copilot, the Pro version is $20/month, but there is another “Ultra” version that is $200/month. There is also teams and enterprise versions (although I haven’t used it in those modes but it looks similar to the controls on GitHub Copilot).
In terms of model availability, it’s very similar to GitHub Copilot. You have Grok 3 models in addition to the models from Claude and OpenAI. IF you want to bring your own model, you can also use AWS, Azure OpenAI, Google, Anthropic, or OpenAI. You can’t use local models, however - everything is cloud based. Just like GitHub Copilot, you will still pay for using Cursor as all the requests are routed through Cursor backends.
Cursor really likes “agent” mode. I found this frustrating - there are times I don’t want the agent to be editing code. I just want a discussion. Having to continually switch into ask mode was frustrating. There is no “edit” mode. Edit mode in GitHub Copilot expands the models available by allowing models that don’t have tool support (such as Claude Opus or o3). However, you have background agents. Let’s say you have five independent tasks to do and they are all working on different parts of the codebase. You can make four of them “background agents”. Behind the scenes, the agent will work in an independent branch, clone the repo, do the work, run tools, and check in the code for you. Unfortunately, I found this to be more aggravation than helpful in my project. I suspect a larger codebase and more mature product team would find this useful. GitHub Copilot on GitHub Issues is a similar sort of thing and I found the ability to assign an issue to a GitHub Copilot agent was a better implementation of this concept. Cursor also allows you to auto-approve tools for the agent to use. You can turn on auto-run mode and then explicitly provide the allow-list and deny-list.
Cursor has two automatic features that replace the copilot-instructions.md - the first is codebase indexing. This is a semantic analysis of your code base that allows the agent to provide context-aware suggestions. The other is “memories” - persistent storage of project context and decisions from past conversations. Together, these provide the automatic context capabilities that mean you don’t need to worry about providing instructions. However, I would prefer this to be explicit and stored with the repository. I found getting Cursor to obey my project requirements (such as using happy-dom when testing components) relatively hard.
One of the nicer features that I used a lot is the “planning” tool. The Agent can break down complex tasks into a structured to-do list and manage the execution accordingly. This feature made it easier to write, for example, the home page dashboard with a description and then get the task broken down further. It’s not capable of breaking down the entire project, though. I still had to get the agent to “plan and act” and pause after each step for review. In fact, going through this was more frustrating - no ask mode meant that I was forever telling the model to pause after doing the work I asked. However, it was also produced a better result - the requirements and design were better thought through with the agent routing feature selecting a more appropriate model for each step.
Overall, Cursor and GitHub Copilot do the same things. I found Cursor to be more polished and easier to use. I specifically liked the fact that I didn’t have to think about the model being used. However, I disliked that I had to use agent mode and didn’t have an option for turning off edits to just have a design conversation.
I completed the Cursor project within 2 weeks. It was about the same as GitHub Copilot, and the savings came from the same place. I ended up having to do more re-work in the design phase because I was unable to discuss options without the agent trying to make changes.
AWS Kiro
Pros: Spec-driven design; tool auto-approve
Cons: Yet Another Editor install; currently in preview; limited models
Cursor and GitHub Copilot are out in the wild and fully available. Kiro, by contrast, is in preview mode now. I’m making allowances for the fact that it is in preview which means that not all features are available yet. Just like Cursor, it’s based on the OSS version of Visual Studio Code. Only Claude Sonnet 3.7 and 4 are available - no other models. It’s got an “agent” mode (auto-pilot is turned on) and a “ask” mode (when it’s turned off), so you might think this is a “me too” offering from AWS.
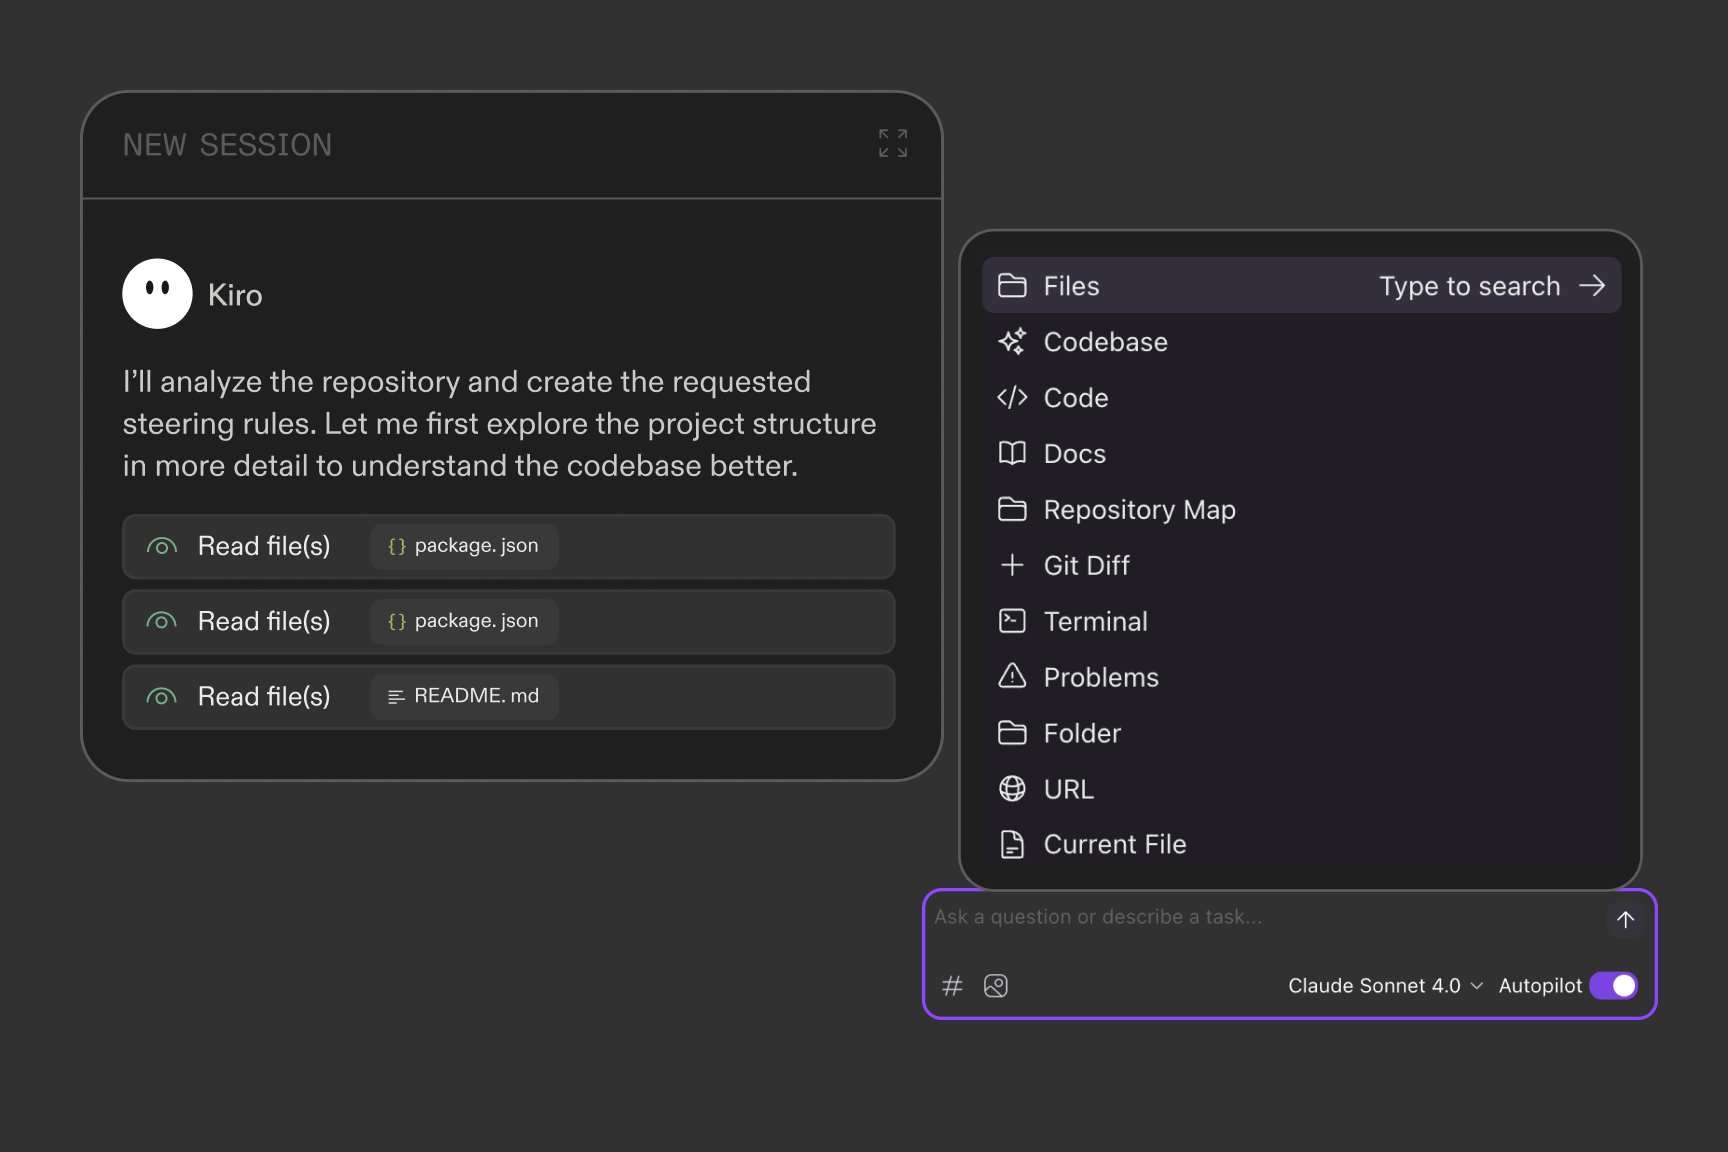
Not so fast. Kiro has a nice sidebar that has a feature to analyze the repository and provide “steering documents” - the equivalent to the copilot-instructions.md file in GitHub Copilot. These are broken into “tech”, “structure”, and “product” documents. Breaking things down into multiple documents opens up the way for providing enterprise standards to these documents - something I expect AWS to incorporate in the future. Additionally, Kiro is big into “spec-driven design”. You enter a request (e.g. “I want to build a home page dashboard”) into chat and tell it to create the spec. It will create a directory for the spec, then create a requirements.md - user stories with acceptance criteria. You can edit this file before moving onto the next step, which is design. The design.md has everything you’d expect, from sequence diagrams to architecture, to expected interfaces. Once you’re happy with the design, it will generate tasks - another document. You can edit each of these documents either with AI chat or just by editing the files.
Next, you can execute the tasks - there is a literal “Start Task” button next to each one. It reminds me of a Jupyter notebook in style. Every single task is executed in its own chat session. The model will take into account the steering documents and the design plus other specs you point at. It checks against the acceptance criteria at the end.
I completed the Kiro-driven project within 10 days. It was easily the fastest.
So, where were the problems? First, Kiro didn’t follow instructions. I had added a paragraph to the tech.md steering document to tell it to run npm run check and npm test after each task was complete. It didn’t. It also ran things multiple times unnecessarily. Since these runs consume tokens and time, this was a problem for me. I spent so much time hitting cancel. Also, like Cursor, Claude Sonnet 4 likes to ignore instructions (like “use happy-dom, not jest-dom”), which caused some frustration.
There were also issues which are associated with the Preview nature. There isn’t a pause button. There are limited models. The models are sometimes slow because Kiro is bumping into scale issues. There are also standout features that I want the other contenders to adopt. The first is the model they use for auto-approving commands. When the chat gets to a command, you get to auto-approve the command. It gives you two or three options. For example, if the command is npx vitest run --project unit, then you’ll be given the option to auto-approve the whole command and then maybe npx vitest * and npx * as alternatives. The second feature I really hope gets adopted widely is hooks. These are agent actions that get triggered when something happens. As an example, I told it that when src/**/*.ts was saved, it should ensure the file has comprehensive JSDoc comments and update them if not.
Wrap-up
I like all three products here, and all three provided a significant savings in time. Each one had its own drawbacks, though, so there isn’t a clear winner.
- If you like absolute control and the widest possible options; use GitHub Copilot
- If you prefer choices to be made for you when possible; use Cursor.
- AWS Kiro is something to keep an eye on. I certainly appreciate the spec-driven design process.
They all have agent mode; they all use the same base models; they all allow you to run tools; they all allow you to use MCP servers. You can ask all of them to refactor code, identify bugs, fix eslint errors, and write new code. They will all get into loops and require manual intervention sometimes. In all cases, you’ll be paying $20/mo. for any reasonable usage (beyond a couple of hours a month).
For right now, I’m using Kiro extensively. That’s more a function of the preview mode (and the fact that it is free at the moment) than any qualitative feature that it may have, although I am enjoying the spec-driven design. That may change in the future, however, as this is a rapidly evolving area.
I said this was part 1. Part 2 will cover the free and local options you have available. Until then, happy editing.
Leave a comment