
Tailwind Photos: Registration (The Backend Resources)
Over the last five blog posts, I’ve incorporated various social media authentication mechanisms and worked on silent authentication so that the user only ever has to log in once; if the user is logged in, they won’t ever see a sign in prompt. However, dealing with three distinct authentication mechanisms is not ideal. What happens when I add a fourth authentication type, or decide to do something custom like a username and password? Every time I use a new authentication scheme, my backend needs to understand this new scheme and deal with the authorization of the app to the backend.
In addition, I likely need to store my own profile information. One of the capabilities I want, for example, is the ability to follow a user. In this case, I’ll need to store additional information that isn’t available from the social media provider that is providing the basic information.
In short, I need a service in the cloud to store this sort of information.
Here is how it will work:
- The user will authenticate with their social media provider of choice.
- The app will send a request to
/api/tokento get a new JWT for my backend, using the authentication token from the social media provider. - The backend will validate the authentication token. If it is valid, it will look the user up in a database of some sort.
- If the user does not exist, then a
404 Not Foundresponse will be returned. - If the user exists and
state=REGISTERED, then return a200 Successwith a new JWT and the profile information. - If the user exists and
state=PENDING, then return a200 Successwithout a JWT, but the existing profile information.
- If the user does not exist, then a
- The app responds to the response. If a JWT is received, move to the main app. If not, go through registration.
Registration is done in two steps. First, the app displays a page asking for name and email address. This is submitted with the social media token to /api/register. The backend will store the data with a state=PENDING, then send the user (via email) a code. Finally, a response (200 Success) is returned with the data. When the user gets the code, they put it into the app, which sends it to /api/register?code=XXXXXX. This is validated, and then a 200 Success with a JWT is returned. The app can then move to the main app.
There are various error conditions to be programmed as well:
- When the registration email already exists, a
409 Conflictwill be returned. - When the back end cannot validate the social media token, a
401 Unauthorizedwill be returned. - When the code is wrong from
/api/register, a401 Unauthorizedwill be returned.
Backend Architecture
So far, so good. What about the architecture of the backend? There are several ways to implement the backend API within Azure. You need to decide on language, framework, and technologies. There are a lot of decisions that are made during this process that are based on:
- Cost of running the backend (and expected revenue)
- Expected load on the backend
- Capabilities of the development team
Sometimes, it’s better to use a serverless technology (for example, when you have a low volume site and can withstand a cold start occasionally because of app architecture). Sometimes, it’s better to use a container technology like Docker and Kubernetes (for example, when you have a higher volume site where the cost of the API calls exceeds the cost of the equivalent containers running all the time). In short, these decisions come down to individual requirements. Here are my decisions:
- I’m going to write the backend using Node/JavaScript.
- The database will be Azure CosmosDB.
- The APIs will be implemented using Azure Functions.
- Emails will be sent using SendGrid.
The architecture looks like the following:

Of course, I want repeatable deployments, so everything is going to be deployed via Azure Resource Manager (or ARM). This involves writing an ARM template (which I pretty much always write based on a template, but I’ll go through the basics here), and then running a deployment script using the Azure CLI.
Let’s say I have a prefix called twprod. I’d want the following resources:
- Azure App Insights:
twprodinsights - Azure CosmosDB:
twproddb - Azure Storage:
twprodstorage - SendGrid:
twprodsendgrid - Azure Function App:
twprodfunctions - Azure App Service Plan:
twprodfnappsvcplan
Build an ARM Template
An ARM template is a JSON formatted file called azuredeploy.json. I’m going to put it in its own repository, but you can combine this stuff in the repository for the app if you like. Since I want to also do an iOS version of the app, I think separating it is a good idea.
An ARM template has four sections:
parametersdefines the things that you pass in from the Azure CLI during the deployment.variablesdefines the things you use during resource deployment for variable configuration.resourcesdefine the resources that will be deployed.outputsdefine what you need to know after the deployment to properly integrate your backend into your app.
Your basic ARM template looks like this:
{
  "$schema": "https://schema.management.azure.com/schemas/2015-01-01/deploymentTemplate.json#",
  "contentVersion": "1.0.0.0",
  "parameters": {

  },
  "variables": {

  },
  "resources": [

  ],
  "outputs": {

  }
}
After that, it’s a fill-in-the-blanks process.
Parameters
I don’t like to use too many parameters. These are passed in from outside, so they need to be specified exactly the same each time. It’s better to adjust the template since then you have it under source control rather than relying on the whim of the person deploying the template. Here are mine:
  "parameters": {
    "prefix": {
      "type": "string",
      "defaultValue": "twprod",
      "metadata": {
        "description": "The prefix for all the resources"
      }
    },
    "location": {
      "type": "string",
      "defaultValue": "[resourceGroup().location]",
      "metadata": {
        "description": "The location for all resources"
      }
    },
    "sendgridPassword": {
      "type": "string",
      "defaultValue": "enter-a-password-here",
      "metadata": {
        "description": "The password for the Sendgrid service"
      }
    }
  },
I have three parameters that I can pass in. The prefix allows me to specify an dev environment, as an example. The location allows me to specify an alternate region. Finally, Sendgrid needs a password. In all cases, I’ve specified a default value. If the user deploying the script doesn’t specify any parameters, it doesn’t matter since the right thing will happen naturally.
Variables
Let’s move on to variables. This is where you can construct the names of all the resources based on a prefix. I also like to put the options that are available to the resources here.
    "variables": {
        "appInsightsName": "[concat(parameters('prefix'), 'insights')]",
        "cosmosDbName": "[concat(parameters('prefix'), 'db')]",
        "cosmosDbTier": "Standard",
        "sendgridAccountName": "[concat(parameters('prefix'), 'sendgrid')]",
        "storageAccountName": "[concat(parameters('prefix'), 'storage')]",
        "storageAccountId": "[concat(resourceGroup().id,'/providers/Microsoft.Storage/storageAccounts/',variables('storageAccountName'))]",
        "storageAccountType": "Standard_LRS",
        "functionAppName": "[concat(parameters('prefix'), 'functions')]",
        "functionAppRuntime": "node",
        "appHostingPlanName": "[concat(parameters('prefix'), 'appsvcplan')]"
    },
Variables are computed, which means there are operators (called functions) - like concatenation (which is the one I use most often). For a list of operators, see the documentation.
Resources
The next step is to add the resources to the template. You can search the ARM quickstart repository for templates for individual resources. However, putting them together is your job. Let’s go through each one in turn:
Storage
Storage is the easiest to do since it’s pretty much at the bottom of the heap for the architecture. It has no dependencies.
  {
      "type": "Microsoft.Storage/storageAccounts",
      "name": "[variables('storageAccountName')]",
      "apiVersion": "2019-04-01",
      "location": "[parameters('location')]",
      "kind": "Storage",
      "sku": {
          "name": "[variables('storageAccountType')]"
      }
  },
You are probably wondering how on earth you would figure this out without examples. I did too. First of all, there is a reference for ARM. This also has references for each resource. You can take a look at the Storage resource as an example. This gives you, among other things, an example template, a list of property values and what the properties mean. You should bookmark the reference if you are doing ARM development.
CosmosDB
Cosmos is a complex NoSQL database that has multiple facets. Each facet corresponds to a method for accessing the data. You can choose from MongoDB, SQL, Cassandra, and so on. You have to decide on the facet during deployment. It can’t be changed later. To deploy a CosmosDB, you need to create a database account:
  {
      "type": "Microsoft.DocumentDB/databaseAccounts",
      "name": "[variables('cosmosDbName')]",
      "apiVersion": "2015-04-08",
      "location": "[parameters('location')]",
      "properties": {
          "locations": [
              {
                  "locationName": "[parameters('location')]"
              }
          ],
          "databaseAccountOfferType": "[variables('cosmosDbTier')]"
      }
  },
This one has some required properties, so consult the documentation to see the available properties. The most notable one you may want to tweak is the default consistency level.
App Insights
App Insights is called “insights” when looking for the resource definition:
  {
      "type": "Microsoft.Insights/components",
      "name": "[variables('appInsightsName')]",
      "apiVersion": "2018-05-01-preview",
      "location": "[parameters('location')]",
      "kind": "web",
      "tags": {
          "[concat('hidden-link:', resourceGroup().id, '/providers/Microsoft.Web/sites/', variables('functionAppName'))]": "Resource"
      },
      "properties": {
          "Application_Type": "web",
          "ApplicationId": "[variables('functionAppName')]"
      }
  },
Azure Functions requires a special linkage, so make sure you use this recipe whenever you are using a function app.
Be careful of region availability Sometimes, the service will not be available in all regions. Currently, Azure Monitor is not available in all regions. If you wanted to run your service in (for example) Canada East, you would have to hard code the region for App Insights since it isn’t available in that region.
SendGrid
SendGrid is one of those useful resources that I turn to time and again for sending out emails:
  {
      "type": "Sendgrid.Email/accounts",
      "name": "[variables('sendgridAccountName')]",
      "apiVersion": "2015-01-01",
      "location": "[parameters('location')]",
      "plan": {
          "name": "free",
          "publisher": "Sendgrid",
          "product": "sendgrid_azure"
      },
      "properties": {
          "password": "[parameters('sendgridPassword')]",
          "acceptMarketingEmails": "0",
          "email": ""
      }
  },
Note that all the services defined thus far don’t have dependencies. The Azure Resource Manager can create these in parallel.
Azure Functions
Azure Functions, by contrast, depends on just about everything else. There are two parts to the Azure Function - the hosting plan (which we are setting to be dynamic) and the actual function app. Here is the hosting plan:
  {
      "type": "Microsoft.Web/serverfarms",
      "name": "[variables('appHostingPlanName')]",
      "apiVersion": "2018-02-01",
      "location": "[parameters('location')]",
      "sku": {
          "name": "Y1",
          "tier": "Dynamic"
      },
      "properties": {
          "name": "[variables('appHostingPlanName')]",
          "computeMode": "Dynamic"
      }
  },
There are different hosting plans available - one for App Service Environments, one for a non-dynamic hosting plan and one for dynamic hosting (which can only be used with function apps). If you are running a web service as well, then you can combine the app service plan for that with the function app one.
Talking of which, here is the function app:
  {
      "type": "Microsoft.Web/sites",
      "name": "[variables('functionAppName')]",
      "apiVersion": "2018-11-01",
      "location": "[parameters('location')]",
      "kind": "functionapp",
      "dependsOn": [
          "[resourceId('Microsoft.Web/serverfarms', variables('appHostingPlanName'))]",
          "[resourceId('Microsoft.Web/serverfarms', variables('appHostingPlanName'))]",
          "[resourceId('Sendgrid.Email/accounts', variables('sendgridAccountName'))]",
          "[resourceId('Microsoft.Insights/components', variables('appInsightsName'))]",
          "[resourceId('Microsoft.DocumentDB/databaseAccounts', variables('cosmosDbName'))]"
      ],
      "properties": {
          "serverFarmId": "[resourceId('Microsoft.Web/serverfarms', variables('appHostingPlanName'))]",
          "siteConfig": {
              "appSettings": [
                  {
                      "name": "AzureWebJobsDashboard",
                      "value": "[concat('DefaultEndpointsProtocol=https;AccountName=', variables('storageAccountName'), ';AccountKey=', listKeys(variables('storageAccountId'),'2019-04-01').keys[0].value)]"
                  },
                  {
                      "name": "AzureWebJobsStorage",
                      "value": "[concat('DefaultEndpointsProtocol=https;AccountName=', variables('storageAccountName'), ';AccountKey=', listKeys(variables('storageAccountId'),'2019-04-01').keys[0].value)]"
                  },
                  {
                      "name": "WEBSITE_CONTENTAZUREFILECONNECTIONSTRING",
                      "value": "[concat('DefaultEndpointsProtocol=https;AccountName=', variables('storageAccountName'), ';AccountKey=', listKeys(variables('storageAccountId'),'2019-04-01').keys[0].value)]"
                  },
                  {
                      "name": "WEBSITE_CONTENTSHARE",
                      "value": "[toLower(variables('functionAppName'))]"
                  },
                  {
                      "name": "FUNCTIONS_EXTENSION_VERSION",
                      "value": "~2"
                  },
                  {
                      "name": "WEBSITE_NODE_DEFAULT_VERSION",
                      "value": "10.14.1"
                  },
                  {
                      "name": "APPINSIGHTS_INSTRUMENTATIONKEY",
                      "value": "[reference(resourceId('Microsoft.Insights/components/', variables('appInsightsName')), '2018-05-01-preview').InstrumentationKey]"
                  },
                  {
                      "name": "FUNCTIONS_WORKER_RUNTIME",
                      "value": "[variables('functionAppRuntime')]"
                  },
                  {
                      "name": "SENDGRID_CONNECTIONSTRING",
                      "value": "[concat('Server=',reference(resourceId('Sendgrid.Email/accounts',variables('sendgridAccountName'))).smtpServer,';User=',reference(resourceId('Sendgrid.Email/accounts', variables('sendgridAccountName'))).username,';Password=',parameters('sendgridPassword'))]"
                  },
                  {
                      "name": "COSMOSDB_CONNECTIONSTRING",
                      "value": "[concat('Endpoint=https://',variables('cosmosDbName'),'.documents.azure.com;Key=',listKeys(resourceId('Microsoft.DocumentDB/databaseAccounts', variables('cosmosDbName')), '2015-04-08').primaryMasterKey)]"
                  }
              ]
          }
      }
  }
All the app settings become environment variables for your code to read, so you really want them to be easily understood. This is an opportunity for you to inform your function app (a collection of functions) where your other resources are located. A lot of these app settings are constructed at this time so that the function can easily digest the contents.
Outputs
Finally, let’s take a look at the outputs. We only need one output - the base URI of the function app. This is because everything else is relative to that URI. The base URI of the function app is what we (eventually) inject into our Android or iOS app to ensure that the app can talk to the backend.
    "outputs": {
        "baseUri": {
            "value": "[concat('https://',variables('functionAppName'),'.azurewebsites.net')]",
            "type": "string"
        }
    }
Deploying your resources
Now that we’ve got a completed deployment script, we can deploy it to a new resource group. I’m using the Azure CLI for this. First, login:
az loginThen create a resource group:
az group create --name twprod --location "West US"Remember that all the resources are going to be located in the same region unless you specify otherwise. The default region is the location of the resource group. Let’s kick off a deployment:
az group deployment create -g twprod --template-file .\azuredeploy.json --debugI’m putting maximum logging here as it’s helpful to identify issues with your template that prevent it from even being submitted. You’ll get an error message showing the offending code. At that point, it’s best to review the code and compare to the documentation.
Once the deployment is running, you can review the deployment in progress:
- Sign in to the Azure portal
- Select Resource Groups and then the resource group you are deploying.
- Under Deployments, you will see
1 deploying. Click on that link. - Click the deployment.
You will see the resources as they are created. If any resource fails, look at the Operation details to see what is wrong. For instance, here was my first run of the deployment:
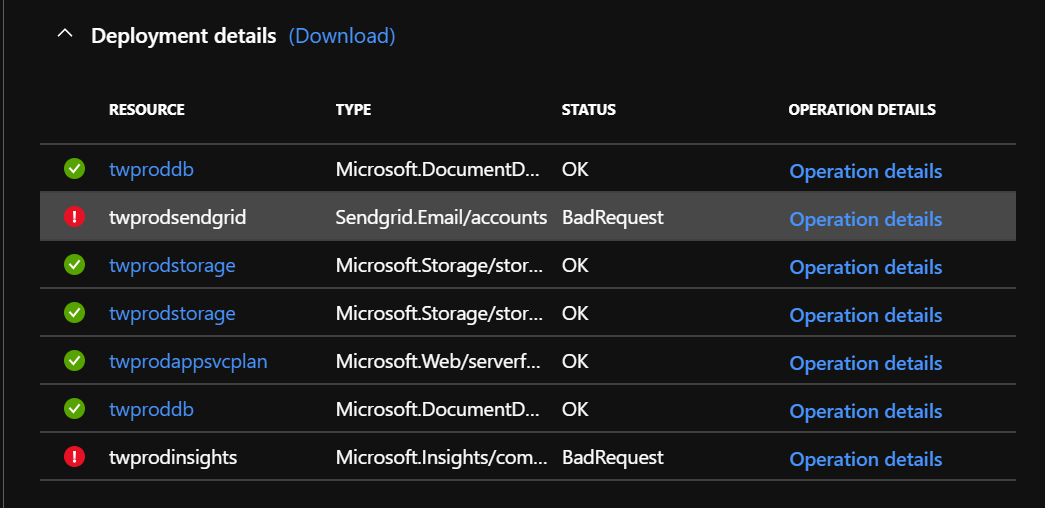
Let’s take a look at the errors. First, the one for Sendgrid:
{
  "error": {
    "code": "InvalidTemplate",
    "message": "Unable to process template language expressions for resource '/subscriptions/76b3a38a-6e13-467e-89f5-14e427f2fda8/resourceGroups/twprod/providers/Sendgrid.Email/accounts/twprodsendgrid' at line '1' and column '2069'. 'The template variable 'sendgridPassword' is not found. Please see https://aka.ms/arm-template/#variables for usage details.'",
    "additionalInfo": [
      {
        "type": "TemplateViolation",
        "info": {
          "lineNumber": 1,
          "positionNumber": 2069,
          "snippet": ""
        }
      }
    ]
  }
}
This is fairly obvious. I didn’t specify the sendgridPassword variable. This was an error in the template because the sendgridPassword is actually a parameter, so that was an easy fix. The second one is for App Insights:
{
  "error": {
    "code": "NoRegisteredProviderFound",
    "message": "No registered resource provider found for location 'westus' and API version '2018-05-01' for type 'components'. The supported api-versions are '2014-04-01, 2014-08-01, 2014-12-01-preview, 2015-05-01, 2018-05-01-preview'. The supported locations are ', eastus, southcentralus, northeurope, westeurope, southeastasia, westus2, uksouth, canadacentral, centralindia, japaneast, australiaeast, koreacentral, francecentral, centralus, eastus2, eastasia, westus, southafricanorth'."
  }
}
Again, this was an error in the template. I was using the wrong API version. I needed to use API version 2018-05-01-preview. Once I had corrected those two issues, I can run the same deployment script again. The Azure Resource Manager will figure out what needs to be changed and only deploy the bits needed to be changed.
Finally, there was a wrinkle in the Sendgrid deployment. I needed to accept the terms for the marketplace. In fact, the error was very specific:
Deployment failed. Correlation ID: 9a65ff5e-90cf-403f-919b-5ba94c3040e1. {
  "error": {
    "code": "ResourcePurchaseValidationFailed",
    "message": "User failed validation to purchase resources. Error message: 'Legal terms have not been accepted for this item on this subscription: '76b3a38a-6e13-467e-89f5-14e427f2fda8'. To accept legal terms using PowerShell, please use Get-AzureRmMarketplaceTerms and Set-AzureRmMarketplaceTerms API(https://go.microsoft.com/fwlink/?linkid=862451) or deploy via the Azure portal to accept the terms'"
  }
}
First, connect your account using Connect-AzureRmAccount. This is the equivalent of az login on the Azure CLI side. Then accept the terms with the following:
Get-AzureRmMarketplaceTerms -Publisher "sendgrid" -Product "sendgrid_azure" -Name "free" | Set-AzureRmMarketplaceTerms -AcceptFinally, I was able to get a good deployment! Make sure you also check out the outputs. This is available in the deployment screen or from the output of the az group deployment command.
However, this deployment has just deployed the resources. I have not configured the database, nor have I deployed any code. That’s for next time! Also, I’ve not given you the parameters file :-) I specify the prefix and password for production in an azure-parameters.json file. This looks something like the following:
{
  "$schema": "https://schema.management.azure.com/schemas/2015-01-01/deploymentParameters.json#",
  "contentVersion": "1.0.0.0",
  "parameters": {
    "prefix": {
      "value": "twprod"
    },
    "sendgridPassword": {
      "value": "GEN-UNIQUE"
    }
  }
}
This is not checked into the repository since it stores my secrets. However, I can deploy easily enough with the following command:
az group deployment create \

  --name prod \

  --resource-group twprod \

  --template-file azuredeploy.json \

  --parameters @azure-parameters.json
Next time, I’ll cover the initial code for generating the registration and show off how to deploy the code to a function app. In the interim, check out the new repository with my code in it.
Leave a comment