Enabling caching for Azure Mobile Apps with API Management
In my last article I introduced API Management and showed how it can be used to provide a front door to the REST API that is exposed by Azure Mobile Apps. What I implemented was a simple pass-through. It didn’t support authentication, and if a link was returned (for example, the “next-page” link in a query result),it pointed right back at the original source. It wasn’t much of an improvement. I’m going to change that today with a couple of improvements:
- Caching of read-only results.
- Renaming links within results.
You can do much more with policies (and I will get to some of these in future articles). This is just an introduction to dealing with policies, and caching specifically.
These are all done within the definition of the API in API Management through the use of policies. Quite simply, policies are chunks of XML configuration that adjust the behavior of the API even before it gets to your backend. If you open your API within the Azure Portal, you will have noticed the Policies editors right within the interface:
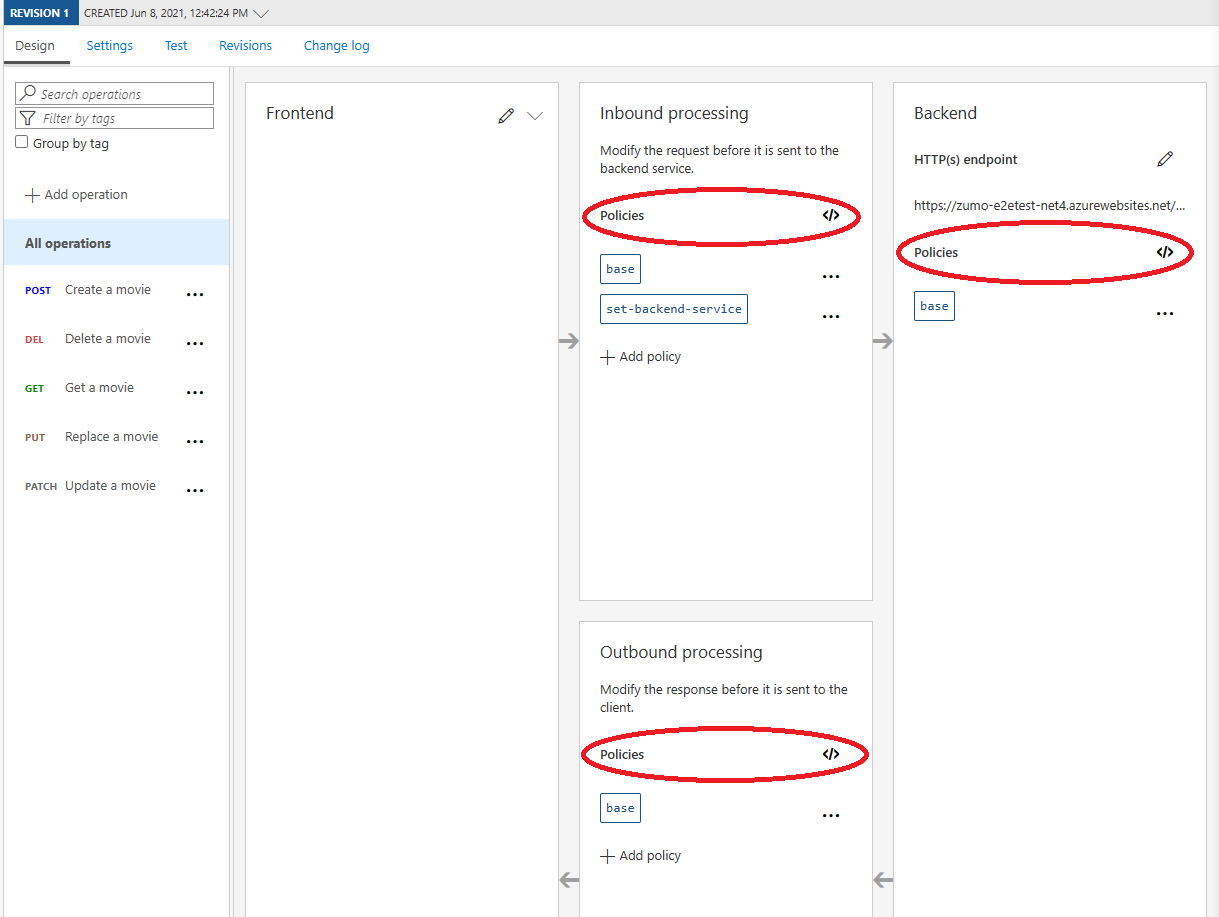
When you click on any of these links, you will see the following code:
<policies>
    <inbound>
        <base />
        <set-backend-service base-url="https://aspnetcore-zumo.azurewebsites.net/tables/movies" />
    </inbound>
    <backend>
        <base />
    </backend>
    <outbound>
        <base />
    </outbound>
    <on-error>
        <base />
    </on-error>
</policies>
There isn’t much there. In fact, the only “policy” is the one that sets the backend service that will handle requests. You can implement policies at multiple levels - at the “product” level (a collection of APIs), the API level, and the operation level. Let’s implement some policies!
Caching
The first one I am going to do is caching. In my API, each movie is identified by a unique resource locator. The movie does not change from user to user and it doesn’t change very often. In addition, each query similarly doesn’t change based on your user ID. This is an ideal place to implement caching - it’s an easy win to reduce latency for your users and reduce load on your backend services, especially when queries involve SQL database lookups.
NOTE
API Management does support internal caching, where you don’t need to have an external cache provider like Redis Cache. However, this doesn’t work on the Consumption plan I am using, nor is it recommended for production use. As a result, I’m using an external cache.
First, set up an external cache:
- Log on to the Azure portal, and select your resource group.
- Press Create to create a resource.
- Search for Azure Cache for Redis, then press Create.
- Fill in the details (Basics)
- The Resource group and Location should be identical to your API Management resource.
- For this experiment, I used the lowest level (Basic C0, which costs approx. $17/mo.)
- I used the same name as my API Management resource for the DNS Name.
- For simplicity, I am going to use a Public endpoint. However, in production, you would choose a private endpoint and set up virtual networking appropriately.
- Press Review + create at the bottom of the screen.
- Press Create to create the resource.
As with all deployments, this will take a few minutes to be created. Once the deployment is finished, I can go on to configuring your API Management resource. When the deployment is complete:
- Open the newly created resource.
- Select Access keys from the sidebar.
- Copy the Primary connection string as you will need it in the next step.
Now I can configure the API Management resource with the external cache.
- In the Azure portal, select your API Management resource.
- Select External cache in the sidebar.
- Press Add.
- Fill in the form:
- Cache instance: Custom
- Use from: the region where you deployed your Azure Cache for Redis.
- Connection string: the connection string you copied earlier.
- Press Save.
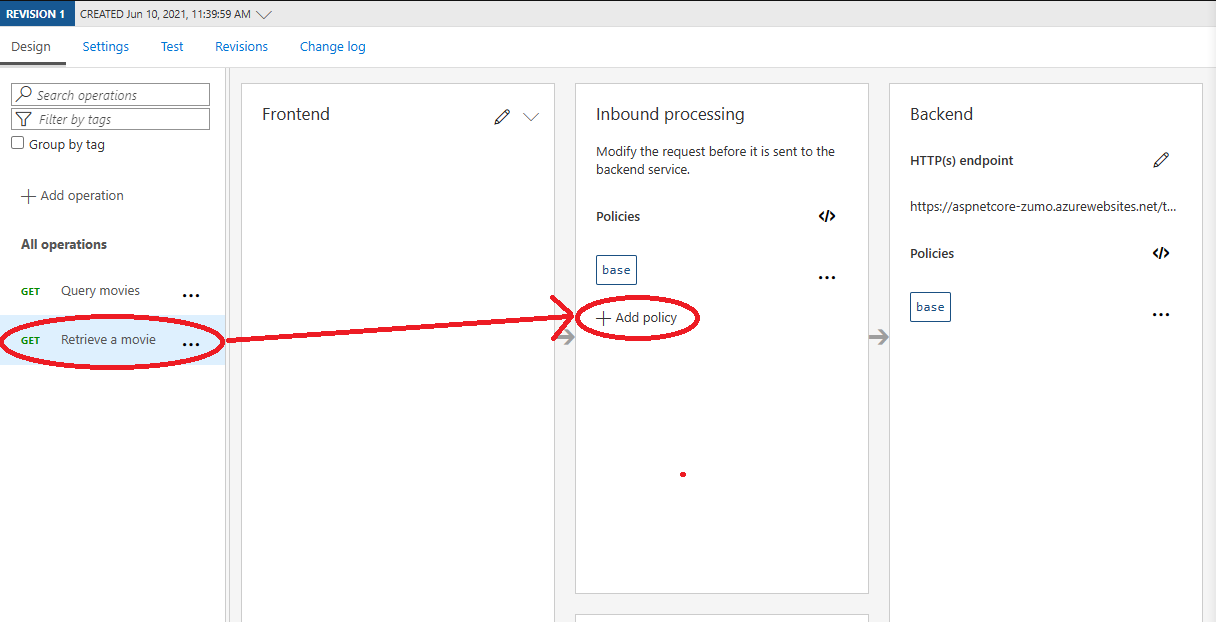
Now that I have a cache defined, I can implement caching in my API. My current API has two operations - Query movies and Retrieve a movie. The Query movies operation is a typical OData query string, and the Retrieve a movie operation is your typical GET operation with an ID. The simple case is for Retrive a movie.
- In the APIs, select Retrieve a movie.
-
Select the Add policy in the Inbound processing section:
-
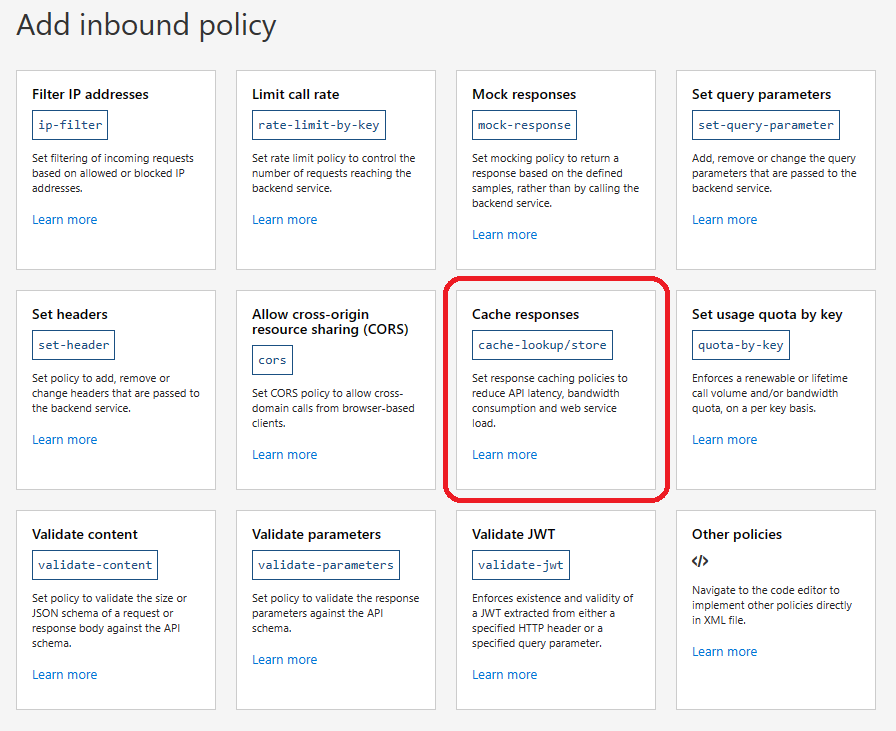
Press Cache responses.
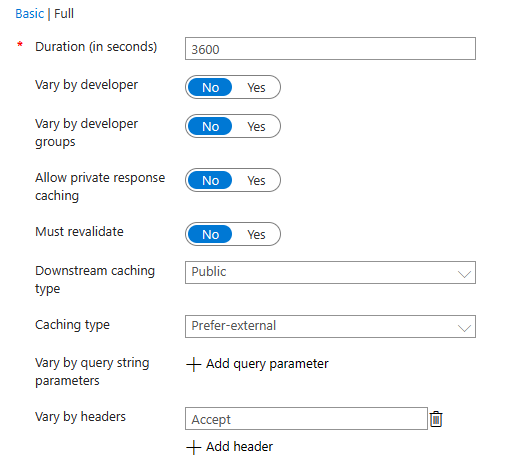
- Select the Full tab.
- Fill in the form:
- Duration: 3600 seconds (1 hour)
- Downstream caching type: Public
- Caching type: prefer-external
- Vary by headers: Accept
- Press Save.
This will add a cache-lookup policy to the inbound section and a cache-store policy to the outbound processing. These are always added in pairs. The cache-lookup will short-circuit the request if the request can be handled by the cache. The cache-store ensures results are stored in the cache when the backend is consulted. When there is a cache-hit, processing of the pipeline continues immediately after the cache-store.
You can test the caching as follows:
- Select Retrieve a movie, then select the Test tab.
- Enter a valid ID in the template parameters.
- Ensure
ZUMO-API-VERSION=2.0.0is a header, by using the Add header option. - Press Send.
You will see the response from the service, but you can also see information about how the request was processed in the Trace tab. Specifically, notice the following at the bottom of the Inbound section:
cache-lookup (7.182 ms)
    "Using cache 'southcentralus'."
cache-lookup (52.576 ms)
    {
    "message": "Cache lookup resulted in a miss. Cache headers listed below were removed from the request to prompt the backend service to send back a complete response.",
    "cacheKey": "3_aspnetcorezumomfaq6nmtaz8c0ursdsytypli23iqyibyhfw.411294_movies;rev=1.411420_retrieve-a-movie_4_https_aspnetcore-zumo.azurewebsites.net_443_/tables/movies/id-000&::Accept=*%2F*",
    "cacheHeaders": [
        {
            "name": "Cache-Control",
            "value": "no-cache, no-store"
        }
    ]
}
In my case, the backend request took 292ms, and the whole request took 699ms. This is a “cache-miss”. Now, send the request again. This time, I can see the following:
cache-lookup (0.014 ms)
    "Using cache 'southcentralus'."
cache-lookup (27.083 ms)
    {
    "message": "Cache lookup resulted in a hit! Cached response will be used. Processing will continue from the step in the response pipeline that is after the corresponding `cache-store`.",
    "cacheKey": "3_aspnetcorezumomfaq6nmtaz8c0ursdsytypli23iqyibyhfw.411294_movies;rev=1.411420_retrieve-a-movie_4_https_aspnetcore-zumo.azurewebsites.net_443_/tables/movies/id-000&::Accept=*%2F*"
}
In addition, there is no backend request. The response latency is 28ms, which is a fraction of the time taken to do the database query. Although your specific scenario may vary, a cache + database is cheaper to run than the database alone because you can use a much cheaper database to handle the requests.
You can enable caching for queries using the same process\, but you have to add the list of OData query parameters to the <vary-by> list. This is: $filter, $orderBy, $select, $skip, $top, $count, __includedeleted, and may include others, depending on your backend server.
Renaming links in responses
When I do a query against the service, I get a nextLink field. For example:
GET https://aspnetcore-zumo.azure-api.net/tables/movies?$top=2&$select=id,title HTTP/1.1
ZUMO-API-VERSION: 3.0.0
Accept: application/json

 {
    "items": [{
        "id": "id-000",
        "title": "The Shawshank Redemption"
    }, {
        "id": "id-001",
        "title": "The Godfather"
    }],
    "nextLink": "https://aspnetcore-zumo.azurewebsites.net/tables/movies?$select=id,title&$skip=2&$top=2"
}
This helps with paging in this case. However, you will note that the host name is the name of the backend server. I want all requests to go through the API Management service, which means that I need to rename this link. I don’t want to change the backend service to output the right thing. After all, it’s producing the right thing and I still need it to work during development. The policy cannot be set up with a simple form, but it’s easy enough to add.
- Select All operations in the APIs section.
-
In the Outbound processing, select the policy editor:
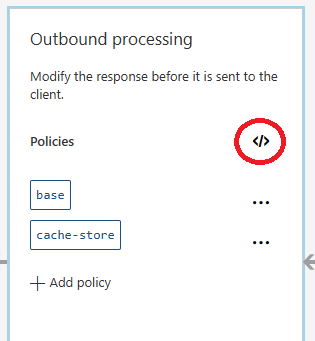
- Add the
<redirect-content-urls />policy in the<outbound>section. - Press Save at the bottom of the screen.
Your policy document should look like this:
<policies>
    <inbound>
        <base />
    </inbound>
    <backend>
        <base />
    </backend>
    <outbound>
        <base />
        <redirect-content-urls />
    </outbound>
    <on-error>
        <base />
    </on-error>
</policies>
I’m doing this on all operations because other operations may leak the backend Uri as well.
When I re-do the test now, I see the following:
GET https://aspnetcore-zumo.azure-api.net/tables/movies?$top=2&$select=id,title HTTP/1.1
ZUMO-API-VERSION: 3.0.0
Accept: application/json

 {
    "items": [{
        "id": "id-000",
        "title": "The Shawshank Redemption"
    }, {
        "id": "id-001",
        "title": "The Godfather"
    }],
    "nextLink": "https://aspnetcore-zumo.azure-api.net/tables/movies?$select=id,title&$skip=2&$top=2"
}
The nextLink value has been updated. Note that the value has to match exactly. If, for example, your content adds the port number (e.g. the nextLink is https://aspnetcore-zumo.azurewebsites.net:443 when it comes back), then the replacement won’t work. You can add an additional policy to handle this case:
<find-and-replace from="https://aspnetcore-zumo.azurewebsites.net:443/tables/movies" to="https://aspnetcore-zumo.azure-api.net/tables/movies" />
Use the policy editor to add this in the same place as the <redirect-content-uris /> policy. It’s also a good idea to put these in front of the <cache-store/> policy if there. This way the right external values are stored in the cache, resulting in even less processing in the case of a cache-hit.
BONUS: Handling early reject
My API service requires a ZUMO-API-VERSION header, and it must be 2.0.0 or 3.0.0. No other values are supported. I’d like to have a policy that ensures the ZUMO-API-VERSION is one of these values. I can put a policy statement in the inbound section to check this:
    <inbound>
        <base />
        <check-header name="ZUMO-API-VERSION" failed-check-httpcode="400" failed-check-error-message="Invalid ZUMO-API-VERSION Header" ignore-case="true">
            <value>2.0.0</value>
            <value>3.0.0</value>
        </check-header>
    </inbound>
I can put this in the All operations policy document so that it applies to all operations.
Next time
Next time, I’m going to move on to supporting multiple versions of the protocol, looking at the problem three different ways. Until then, I hope this article has been useful.

Leave a comment