Testing your Mobile Application
There is nothing that causes more problems than when a developer works on testing. Testing a cross-platform client-server application across all the permutations that are possible is hard work. You will spend more time on developing tests than on writing code. Much of what is asked, however, is not required. That is primarily because most people want to test the entire stack. There are generally minimal custom code in the backend, so that can significantly reduce the amount of tests you write.
In this section, we will look at what it takes to do unit tests for your mobile backend and the mobile app, together with an end-to-end testing capability that allows you to test your application on many devices at once.
Testing your Mobile Backend
Most of the code within the mobile backend is pulled from libraries - ASP.NET, Entity Framework and Azure Mobile Apps. These libraries are already tested before release and there is not much you can do about bugs other than reporting them (although Azure Mobile Apps does accept fixes as well). As a result, you should concentrate your testing on the following areas:
- Filters, Transforms and Actions associated with your table controllers.
- Custom APIs.
You should also do "end-to-end" testing. This is where you use UI testing to test both the client and the server at the same time. End to end testing is a much better test of the overall functionality of your server.
In addition, your mobile backend will come under a lot of strain after you go to production. You should plan on a load test prior to each major release in a staging environment that is identical to your production environment. We'll cover this later in the book.
Unit Testing
Let's take a simple example of an app that we developed back in Chapter 3. We used the data connections to develop a personal todo store - one in which the users ID is associated with each submitted record and the user could only see their own records. The table controller looked like the following:
namespace Backend.Controllers
{
    public class TodoItemController : TableController<TodoItem>
    {
        protected override void Initialize(HttpControllerContext controllerContext)
        {
            base.Initialize(controllerContext);
            MobileServiceContext context = new MobileServiceContext();
            DomainManager = new EntityDomainManager<TodoItem>(context, Request, enableSoftDelete: true);
        }

        public string UserId => ((ClaimsPrincipal)User).FindFirst(ClaimTypes.NameIdentifier).Value;

        public void ValidateOwner(string id)
        {
            var result = Lookup(id).Queryable.PerUserFilter(UserId).FirstOrDefault<TodoItem>();
            if (result == null)
            {
                throw new HttpResponseException(HttpStatusCode.NotFound);
            }
        }

        // GET tables/TodoItem
        public IQueryable<TodoItem> GetAllTodoItems()
        {
            return Query().PerUserFilter(UserId);
        }

        // GET tables/TodoItem/48D68C86-6EA6-4C25-AA33-223FC9A27959
        public SingleResult<TodoItem> GetTodoItem(string id)
        {
            return new SingleResult<TodoItem>(Lookup(id).Queryable.PerUserFilter(UserId));
        }

        // PATCH tables/TodoItem/48D68C86-6EA6-4C25-AA33-223FC9A27959
        public Task<TodoItem> PatchTodoItem(string id, Delta<TodoItem> patch)
        {
            ValidateOwner(id);
            return UpdateAsync(id, patch);
        }

        // POST tables/TodoItem
        public async Task<IHttpActionResult> PostTodoItem(TodoItem item)
        {
            item.UserId = UserId;
            TodoItem current = await InsertAsync(item);
            return CreatedAtRoute("Tables", new { id = current.Id }, current);
        }

        // DELETE tables/TodoItem/48D68C86-6EA6-4C25-AA33-223FC9A27959
        public Task DeleteTodoItem(string id)
        {
            ValidateOwner(id);
            return DeleteAsync(id);
        }
    }
}
In addition, we have a LINQ extension method for handling the PerUserFilter:
using Backend.DataObjects;
using System.Linq;

namespace Backend.Extensions
{
    public static class PerUserFilterExtension
    {
        public static IQueryable<TodoItem> PerUserFilter(this IQueryable<TodoItem> query, string userid)
        {
            return query.Where(item => item.UserId.Equals(userid));

        }
    }
}
In my minimalist testing suggestion, I would test the following:
- The LINQ Extension
PerUserFilter. - The
UserIdproperty. - The
ValidateOwnermethod.
The other methods are straight out of the standard table controller. I would defer unit testing of these until the end-to-end tests. Unit tests should be short and should be idempotent. The test should be able to be run multiple times and always return the same result. Since our service is defined to be run out of a stateful SQL database, it cannot be defined to be idempotent. However, the individual parts we are operating can be idempotent.
Unit tests are generally defined to be a separate project within the Visual Studio solution. By convention, they are named by appending .Tests to the project they are testing. My project is called Backend, so the test project is called Backend.Tests. To create the test project:
- Open the solution in Visual Studio.
- Right-click the solution, choose Add -> New Project....
- Select Installed > Visual C# > Test in the project type tree.
- Select xUnit Test Project as the project type.
- Enter Backend.Tests as the name, then click OK.
xUnit vs. MSTest vs. Others
Most version of Visual Studio support a specific type of test called MSTest. However, Visual Studio 2017 has integrated xUnit testing as well. xUnit is cross-platform whereas MSTest is PC only. I will be using xUnit for this project. If you are using a version of Visual Studio earlier than VS2017, you will not have the xUnit Test Project available. However, you can simulate the same project type manually. In addition, there are other test frameworks available. We will only be covering xUnit here.
Generally, copy the folder format from the main project to the test project. For example, the PerUserFilterExtension.cs file is in an Extensions folder within the main project. I'm going to create an Extensions folder within the test project and create a PerUserFilterExtensionTests.cs file with the tests in it. To create the tests:
- Right-click the
Extensionsfolder, and select Add -> New Item.... - Select Installed > Visual C# Items > Test in the project type tree.
- Select xUnit Test, and enter
PerUserFilterExtensionTests.csas the name. - Click Add.
Add your Project under Test as a Reference
You will need to add your project under test (in this case, the Backend project) as a reference to the test project.
You will get this code generated:
using System;
using System.Linq;
using Xunit;

namespace Backend.Tests.Extensions
{
    public class PerUserFilterExtensionTests
    {
        [Fact]
        public void TestMethod1()
        {
        }
    }
}
We are going to replace the TestMethod1() method with our unit tests. XUnit tests are designated with the [Fact] attribute. You do some work on the class to test specific conditions, then assert that the results are valid. In the case of this class, for instance, we want to test that the result is correct under the following conditions:
- A valid string is provided.
- A zero-length string is provided.
- Null is provided.
Under no conditions should the extension method throw an exception. That means three tests, coded thusly:
using Backend.DataObjects;
using Backend.Extensions;
using System;
using System.Collections.Generic;
using System.Linq;
using Xunit;

namespace Backend.Tests.Extensions
{
    public class PerUserFilterExtensionTests
    {
        [Fact]
        public void UserId_Is_Valid()
        {
            List<TodoItem> items = new List<TodoItem>
            {
                new TodoItem { UserId = "test", Text = "Task 1", Complete = false },
                new TodoItem { UserId = "test2", Text = "Task 2", Complete = true },
                new TodoItem { UserId = "test", Text = "Task 3", Complete = false }
            };

            var result = items.AsQueryable<TodoItem>().PerUserFilter("test");

            Assert.NotNull(result);
            Assert.Equal(2, result.Count());
        }

        [Fact]
        public void UserId_Is_Empty()
        {
            List<TodoItem> items = new List<TodoItem>
            {
                new TodoItem { UserId = "test", Text = "Task 1", Complete = false },
                new TodoItem { UserId = "test2", Text = "Task 2", Complete = true },
                new TodoItem { UserId = "test", Text = "Task 3", Complete = false }
            };

            var result = items.AsQueryable<TodoItem>().PerUserFilter(String.Empty);

            Assert.NotNull(result);
            Assert.Equal(0, result.Count());
        }

        [Fact]
        public void UserId_Is_Null()
        {
            List<TodoItem> items = new List<TodoItem>
            {
                new TodoItem { UserId = "test", Text = "Task 1", Complete = false },
                new TodoItem { UserId = "test2", Text = "Task 2", Complete = true },
                new TodoItem { UserId = "test", Text = "Task 3", Complete = false }
            };

            var result = items.AsQueryable<TodoItem>().PerUserFilter(null);

            Assert.NotNull(result);
            Assert.Equal(0, result.Count());
        }
    }
}
Use the same .NET Framework Version
You will note that your tests will not compile at this point. That is because the server is dependent on .NET Framework 4.6 and the test project is created with .NET Framework 4.5. Both test and main project must be configured to use the same version of the .NET Framework. Right-click the test project, select Properties, then change the version of the .NET Framework to match your main project. Save and re-build your test project.
Visual Studio has a couple of methods of running the tests. Visual Studio 2017 has in-built support for the xUnit test runner. You may have to download an extension or run them manually in earlier versions of Visual Studio. My favorite way of running the tests is to open the Test Explorer using Test -> Windows -> Test Explorer, then click Run All. You can then right-click the Test Explorer tab and select Float to float it as a window. This allows you to enlarge the window so you can see the tests after they have run:
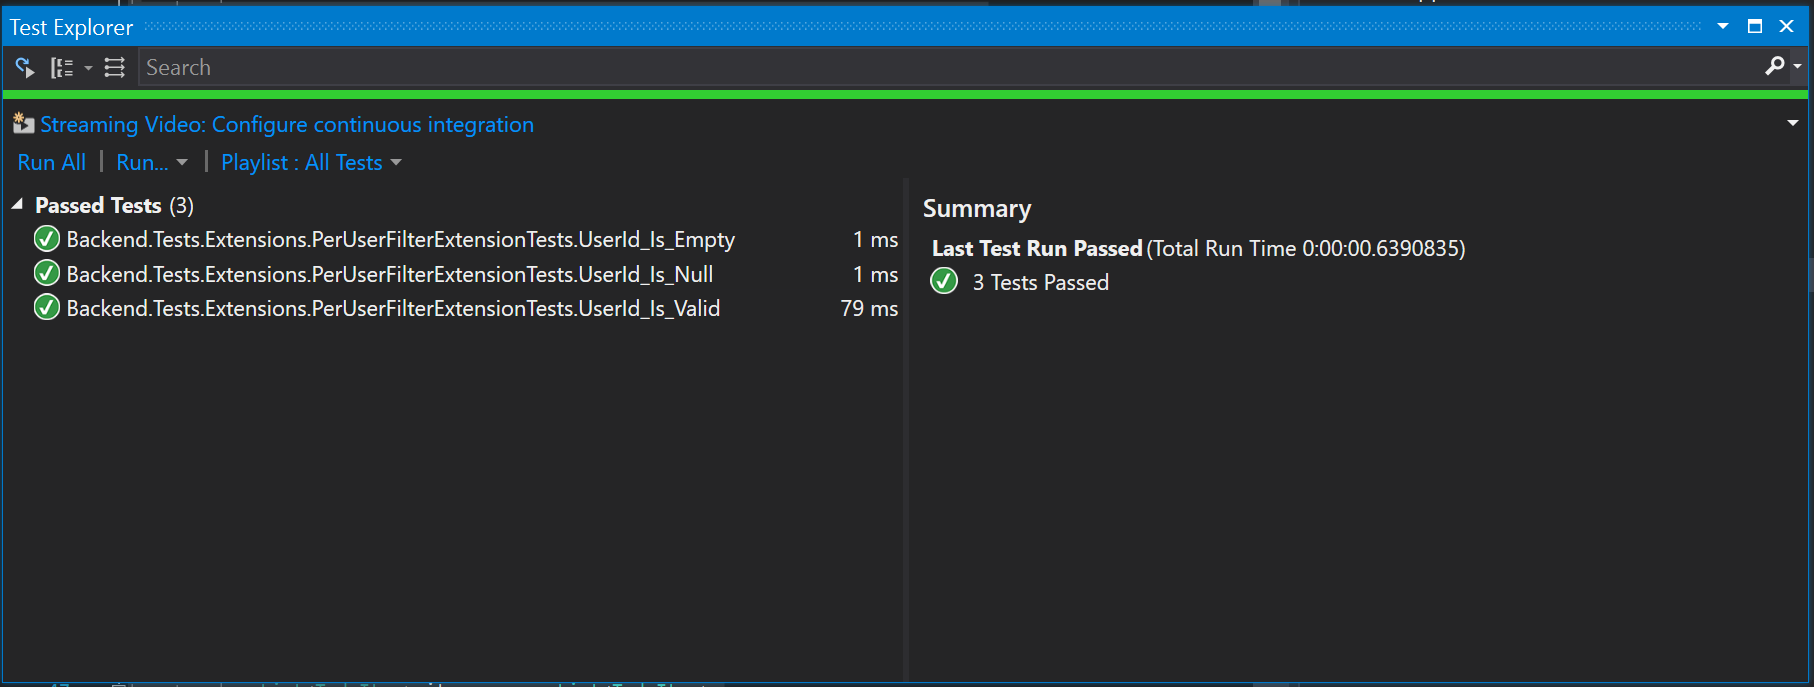
As you can see, my tests all passed. I can run these tests as many times as necessary as they do not depend on external requirements. This is not generally the case with table controllers. The table controller takes a dependency on a domain manager (most normally, the EntityDomainManager). The EntityDomainManager is configured to use a database via a connection string. Thus, we need to do things differently for testing table controllers even if we only test the unique functionality.
Let's take a look at the tests for the UserId property. The UserId property contains the contents of the NameIdentifier claim. My tests for this are:
- A correct set of claims are provided.
- An incomplete set of claims (without a NameIdentifier) are provided.
- No claims are provided.
The first and last are the typical authenticated and anonymous access tests. The first should provide the username in the NameIdentifier, and the latter should throw an error. The middle test is an important one for us. What do you want to happen if the user is authenticated, but the NameIdentifier claim was not provided? It's bad form for us to return a 500 Internal Server Error, even though that would be appropriate here. Instead I want to assume that the user id is blank so that everything keeps on working. (One can argue that this is not correct either!)
Install the same NuGet packages
Unlike the scaffolded project for Azure Mobile Apps or ASP.NET MVC, no additional packages are added to the test project, which means you will need to figure out which packages you need to simulate the requirements for the test. Don't guess. Look at the packages that are in your project under test and duplicate them. Right-click the solution and select Manage NuGet Packages to get a good idea of what your test package is missing. Under the Installed list, you can tell what packages are required and which projects have them installed.
Mock the ClaimsIdentity to test authentication:
using System.Security.Claims;

namespace Backend.Tests.Utilities
{
    public class TestPrincipal : ClaimsPrincipal
    {
        public TestPrincipal(params Claim[] claims) : base(new TestIdentity(claims))
        {
        }
    }

    public class TestIdentity : ClaimsIdentity
    {
        public TestIdentity(params Claim[] claims) : base(claims)
        {
        }
    }
}
My (incorrect - deliberately) test looks like the following:
using Backend.Controllers;
using Backend.Tests.Utilities;
using System.Security.Claims;
using System.Threading;
using Xunit;

namespace Backend.Tests.Controllers
{
    public class TodoItemControllerTests
    {
        [Fact]
        public void UserId_With_Correct_Claims()
        {
            var controller = new TodoItemController();
            controller.User = new TestPrincipal(
                new Claim("name", "testuser"),
                new Claim("sub", "foo")
            );
            var result = controller.UserId;

            Assert.NotNull(result);
            Assert.Equal("testuser", result);
        }

        [Fact]
        public void UserId_With_Incomplete_Claims()
        {
            var controller = new TodoItemController();
            controller.User = new TestPrincipal(
                new Claim("sub", "foo")
            );
            var result = controller.UserId;

            Assert.Null(result);
        }

        [Fact]
        public void UserId_With_Null_Claims()
        {
            var controller = new TodoItemController();
            controller.User = null;
            var ex = Assert.Throws<HttpResponseException>(() => { var result = controller.UserId; });
            Assert.Equal(HttpStatusCode.Unauthorized, ex.Response.StatusCode);
        }
    }
}
The UserId_With_Null_Claims test is an interesting recipe for testing that the right exception is thrown. In this case, I expect the methods to return a 401 Unauthorized response to the client. Of course, the [Authorize] tag will do this for my well before my code is hit, but it's good to be accurate.
If I run the tests, I get the following:
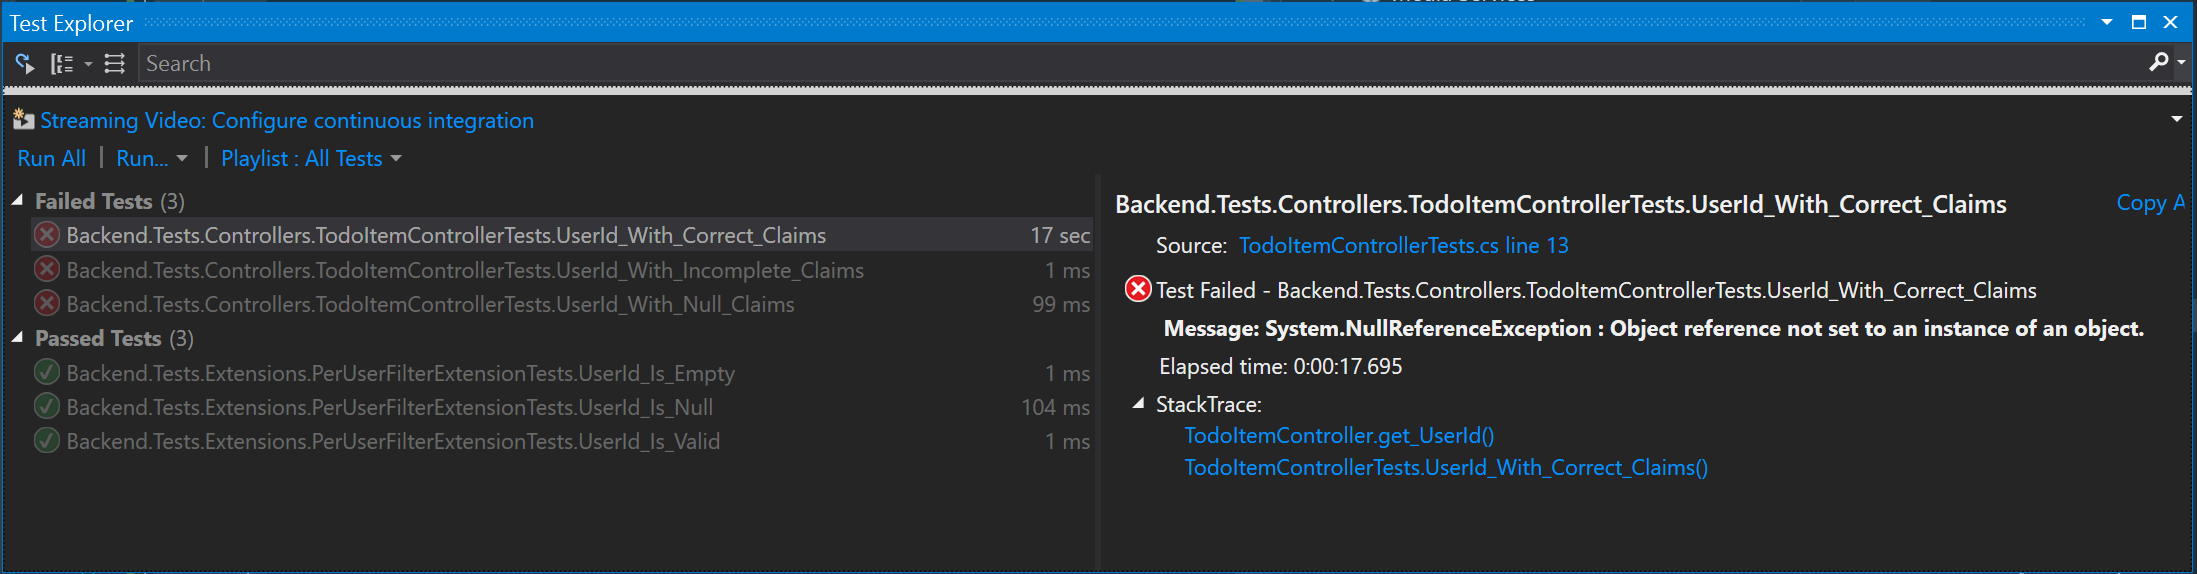
What I want to do is run that test again, but attach a debugger. To do this, set a breakpoint on the property in the TodoItemController. Then right-click the failing test and select Debug Selected Tests. This runs the test with a debugger connected. The breakpoint you set will be hit and you will be able to inspect the code state while it is running. The first test is failing because ClaimTypes.NameIdentifier is not "name". I re-wrote the test as follows:
    [Fact]
    public void UserId_With_Correct_Claims()
    {
        var controller = new TodoItemController();
        controller.User = new TestPrincipal(
            new Claim(ClaimTypes.NameIdentifier, "testuser"),
            new Claim("sub", "foo")
        );
        var result = controller.UserId;

        Assert.NotNull(result);
        Assert.Equal("testuser", result);
    }
This test will now pass. The other two tests are actually the result of incorrect code. I've adjusted the code accordingly:
    public string UserId
    {
        get
        {
            if (User == null)
            {
                throw new HttpResponseException(HttpStatusCode.Unauthorized);
            }
            var principal = User as ClaimsPrincipal;
            Claim cl = principal.Claims.FirstOrDefault(c => c.Type == ClaimTypes.NameIdentifier);
            return cl?.Value;
        }
    }
This is a little longer than the original one-liner, but it's more accurate. This means that when I've forgotten what this particular method does in six months time, it will still do the right thing in all conditions.
Use Test-Driven Development
There is a whole school of thought on how to develop using testing as the driver known as Test Driven Development or TDD. In this school of thought, you write the tests first, ensuring you have 100% of the cases covered. Your code is correct when the tests pass. This method provides for very rapid development, but you do spend most of your time developing tests rather than code.
The other big class of testing to do is against custom APIs. You can test these the same way. For example, the standard scaffolding for an Azure Mobile Apps server contains a ValuesController.cs, which I have modified:
using System.Web.Http;
using Microsoft.Azure.Mobile.Server.Config;

namespace Backend.Controllers
{
    // Use the MobileAppController attribute for each ApiController you want to use
    // from your mobile clients
    [MobileAppController]
    public class ValuesController : ApiController
    {
        // GET api/values
        public string Get(string user)
        {
            return $"Hello {user}!";
        }
    }
}
I can test this with the following:
using Backend.Controllers;
using Xunit;

namespace Backend.Tests.Controllers
{
    public class ValuesControllerTests
    {
        [Fact]
        public void Get_Name_Works()
        {
            var controller = new ValuesController();
            var result = controller.Get("adrian");
            Assert.Equal("Hello adrian!", result);
        }
    }
}
As with all other testing, ensure you think about all the things that could happen here, and test them all. Ensure that the appropriate response is always returned and that you are never leave your server or a connected client in a bad state. A big example of this in the case of mobile apps: If a response is meant to be a JSON encoded version of an object on your client, ensure it can be deserialized to that object under all conditions.
Testing your Mobile Client
Testing your mobile client will generally be a multi-part affair:
- Implement mock data services and test the UI in isolation.
- Implement unit tests for the non-UI components.
- Do end-to-end tests to ensure both client and server work together.
Unit tests for non-UI code is the same as the server-side code. You need to write the tests in a unit test framework like xUnit or MSTest. Use Test-driven development to ensure that your code is living up to its contract.
Using Mock Data Services
Unfortunately, setting up repeatable unit tests becomes increasingly difficult in a client-server application such as a cloud-enabled mobile app. For these aspects, you want to mock the data services. If you have followed along from the beginning, we've actually done a lot of the hard work for this.
- Create an Interface that represents the interface to the data service.
- Create a concrete implementation of that interface.
- Use a dependency injection service to inject the concrete implementation.
The whole idea here is that changing just one line of code will enable you to update from the mock implementation to the cloud implementation. This allows you to develop the UI independently of the backend communication code, and allows you to do repeatable UI tests later on.
Let's take a look at an example. In my Chapter8 project, I've got the Xamarin Forms application from the very first chapter. In the shared TaskList project, there is an Abstractions folder that contains the definitions for ICloudService:
namespace TaskList.Abstractions
{
    public interface ICloudService
    {
        ICloudTable<T> GetTable<T>() where T : TableData;
    }
}
There is also a definition for ICloudTable:
using System.Collections.Generic;
using System.Threading.Tasks;

namespace TaskList.Abstractions
{
    public interface ICloudTable<T> where T : TableData
    {
        Task<T> CreateItemAsync(T item);
        Task<T> ReadItemAsync(string id);
        Task<T> UpdateItemAsync(T item);
        Task DeleteItemAsync(T item);
        Task<ICollection<T>> ReadAllItemsAsync();
    }
}
The important part of this is this. The only place where the concrete edition, AzureCloudService(), is mentioned is in the App.cs file:
using TaskList.Abstractions;
using TaskList.Services;
using Xamarin.Forms;

namespace TaskList
{
    public class App : Application
    {
        public static ICloudService CloudService { get; set; }

        public App()
        {
            CloudService = new AzureCloudService();
            MainPage = new NavigationPage(new Pages.EntryPage());
        }
    }
}
Everywhere else uses the ICloudService interface and does not mention the concrete version. The application sets up the cloud service and every other class uses it. This allows us to set up a mock cloud service as follows. First, let's define the MockCloudService:
using System.Collections.Generic;
using TaskList.Abstractions;

namespace TaskList.Services
{
    public class MockCloudService : ICloudService
    {
        public Dictionary<string, object> tables = new Dictionary<string, object>();

        public ICloudTable<T> GetTable<T>() where T : TableData
        {
            var tableName = typeof(T).Name;
            if (!tables.ContainsKey(tableName))
            {
                var table = new MockCloudTable<T>();
                tables[tableName] = table;
            }
            return (ICloudTable<T>)tables[tableName];
        }
    }
}
It's very similar to the AzureCloudService class, but there is no MobileServiceClient. Instead, we store the cloud table instances in a dictionary to ensure successive calls to GetTable<>() return the same singleton reference. We aren't using the backend service. Similarly, we use a Dictionary<> to hold the items instead of the backend service in the MockCloudTable class:
using Microsoft.WindowsAzure.MobileServices;
using System;
using System.Collections.Generic;
using System.Text;
using System.Threading.Tasks;
using TaskList.Abstractions;

#pragma warning disable CS1998 // Async method lacks 'await' operators and will run synchronously

namespace TaskList.Services
{
    public class MockCloudTable<T> : ICloudTable<T> where T : TableData
    {
        private Dictionary<string, T> items = new Dictionary<string, T>();
        private int currentVersion = 1;

        public async Task<T> CreateItemAsync(T item)
        {
            item.Id = Guid.NewGuid().ToString("N");
            item.CreatedAt = DateTimeOffset.Now;
            item.UpdatedAt = DateTimeOffset.Now;
            item.Version = ToVersionString(currentVersion++);
            items.Add(item.Id, item);
            return item;
        }

        public async Task DeleteItemAsync(T item)
        {
            if (item.Id == null)
            {
                throw new NullReferenceException();
            }
            if (items.ContainsKey(item.Id))
            {
                items.Remove(item.Id);
            }
            else
            {
                throw new MobileServiceInvalidOperationException("Not Found", null, null);
            }
        }

        public async Task<ICollection<T>> ReadAllItemsAsync()
        {
            List<T> allItems = new List<T>(items.Values);
            return allItems;
        }

        public async Task<T> ReadItemAsync(string id)
        {
            if (items.ContainsKey(id))
            {
                return items[id];
            }
            else
            {
                throw new MobileServiceInvalidOperationException("Not Found", null, null);
            }
        }

        public async Task<T> UpdateItemAsync(T item)
        {
            if (item.Id == null)
            {
                throw new NullReferenceException();
            }
            if (items.ContainsKey(item.Id))
            {
                item.UpdatedAt = DateTimeOffset.Now;
                item.Version = ToVersionString(currentVersion++);
                items[item.Id] = item;
                return item;
            }
            else
            {
                throw new MobileServiceInvalidOperationException("Not Found", null, null);
            }
        }

        private byte[] ToVersionString(int i)
        {
            byte[] b = BitConverter.GetBytes(i);
            string str = Convert.ToBase64String(b);
            return Encoding.ASCII.GetBytes(str);
        }
    }
}
The mock service is instantiated within the App.cs file:
using TaskList.Abstractions;
using TaskList.Services;
using Xamarin.Forms;

namespace TaskList
{
    public class App : Application
    {
        public static ICloudService CloudService { get; set; }

        public App()
        {
#if USE_MOCK_SERVICES
            CloudService = new MockCloudService();
#else
            CloudService = new AzureCloudService();
#endif
            MainPage = new NavigationPage(new Pages.EntryPage());
        }
    }
}
Finally, I need to actually define USE_MOCK_SERVICES somewhere. Right-click the project and select Properties. Click Build. Add the USE_MOCK_SERVICES to the Conditional compilation symbols (which is a semi-colon separated list). Save the properties then rebuild the project you modified. You can run this version without any backend at all. It will not persist the data, but that's the point of mock data services.
Use a new Configuration
Another, more advanced, way of accomplishing this is to set up a new configuration. You can see the configuration is "Active (Debug)". You can add another configuration to this list called "Mock Services" by using the Build > Configuration Manager.... When you select that configuration, the mock services will automatically be brought in.
UI Testing
The mock services are a tool to enable UI unit testing. UI testing is unit testing for your UI. These are small tests that are executed on a real device and check to see if your main UI flows work as expected. There are actually a few ways of creating tests. I'm going to produce a simple test. In the test, I will simulate clicking on the entry button and ensuring that the task list page is produced. This test can then be run against one or more devices. Let's start by creating a TaskList.Tests project:
- Right-click the solution and select Add -> New Project...
- In the Installed > Visual C# > Cross-Platform node of the tree, select UI Test App (Xamarin.UITest | Cross-Platform).
- Give it a snappy name, like
TaskList.Tests, then click OK. - Wait for the project to be created.
- Right-click the References node in the newly created project and select Add Reference....
- Click Projects in the left hand side-bar.
- Click TaskList.Android. Ensure there is a checked box next to the TaskList.Android project.
- Click OK.
We are only going to test the Android edition of the project in this walkthrough, mostly because I do most of my work on a PC. The same methodology can be used for iOS, however.
Use NUnit v2.x
Xamarin.UITest does not support NUnit 3.x - make sure you do not upgrade the NUnit framework beyond the latest v2.x release when updating your NuGet packages.
The project contains two source files - AppInitializer.cs and Tests.cs. This latter file is where we are going to write the tests. The most efficient way of writing tests is to use the Xamarin Test Recorder. The workflow for using Xamarin Test Recorder is:
- If needed, export the mobile client so that it can be used on a device.
- Start Xamarin Test Recorder
- Specify the application to be tested and the device to run the aplication on.
- Interact with the application. The Test Recorder will create a C# test method.
- Incorporate the test into a Xamarin UITest project.
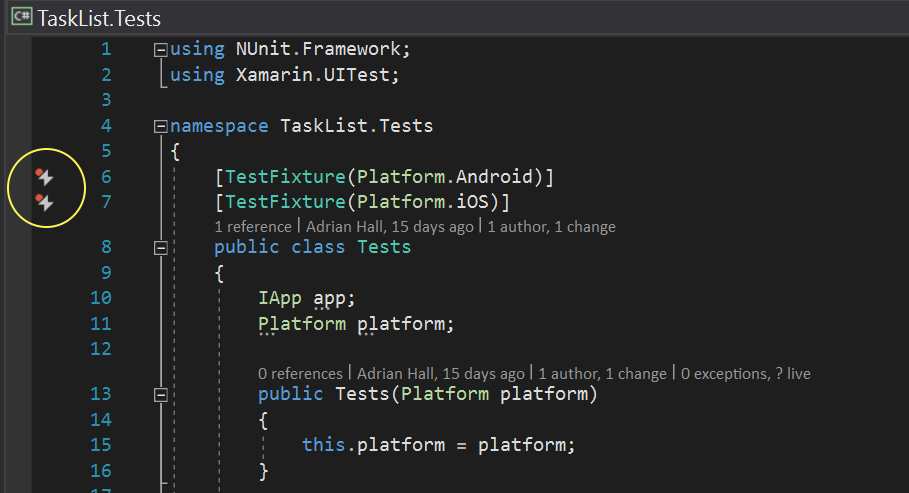
We already have the UITest project, so let's walk through the process of creating a simple test case for the process of creating a new task. Open the Tests.cs file. Note the "lightning" icon next to each [TestFixture] attribute:
Switch to a Release build in the configuration manager (or on the toolbar), then right-click the TaskList.Android project and select Build to build the project. Now that you have a working app, click the lightning icon next to the TestFixture for the Android platform, then select Record new test -> Build TaskList.Android project.

This will start your project in the selected device - normally an emulator. It will also create a NewTest() method. In the emulator, click on the Login button, followed by Add New Item, followed by Save. When you are done, switch back to the Visual Studio instance, click on the spanner next at the bottom of the file and select Stop Recording. The following code will be generated:
    [Test]
    public void NewTest()
    {
        app.Tap(x => x.Text("Login"));
        app.Tap(x => x.Text("Add New Item"));
        app.Tap(x => x.Text("Save"));
    }
You can take screen shots, by adding app.Screenshot("description"); in between each step:
    [Test]
    public void NewTest()
    {
        app.Tap(x => x.Text("Login"));
        app.Screenshot("Logged in - initial list of items");
        app.Tap(x => x.Text("Add New Item"));
        app.Screenshot("Empty detail record");
        app.Tap(x => x.Text("Save"));
        app.Screenshot("Back at list of items");
    }
Platform Support
Xamarin Test Recorder supports iOS and Android. You cannot record an iOS UITest on the PC. If you want to use one platform for recording tests, use a Mac.
You can run this as long as you adjust the AppInitializer.cs file as follows:
    if (platform == Platform.Android)
    {
        return ConfigureApp
            .Android
            .InstalledApp("tasklist.tasklist")
            .StartApp();
    }
Replace the tasklist.tasklist with the package name of your app. You can retrieve this in the Properties > Android Manifest page for the TaskList.Android app. Use the Test Explorer to run the test. You will see that the clicks are performed as expected.
Let's take this a little further. Let's say that rather than just clicking a few times, we wanted to ensure that the text box was filled with the text that is expected via an assertion. To uniquely identify a view, we need to add an AutomationId to the view. Adjust the TaskDetail.xaml file in the shared project as follows:
<?xml version="1.0" encoding="utf-8" ?>
<ContentPage
    x:Class="TaskList.Pages.TaskDetail"
    xmlns="http://xamarin.com/schemas/2014/forms"
    xmlns:x="http://schemas.microsoft.com/winfx/2009/xaml"
    Title="{Binding Title}">
    <ContentPage.Content>
        <StackLayout Padding="10" Spacing="10">
            <Label Text="What should I be doing?" />
            <Entry AutomationId="entrytext" Text="{Binding Item.Text}" />
            <Label Text="Completed?" />
            <Switch IsToggled="{Binding Item.Complete}" />
            <StackLayout VerticalOptions="CenterAndExpand" />
            <StackLayout Orientation="Vertical" VerticalOptions="End">
                <StackLayout HorizontalOptions="Center" Orientation="Horizontal">
                    <Button
                        BackgroundColor="#A6E55E"
                        Command="{Binding SaveCommand}"
                        Text="Save"
                        TextColor="White" />
                    <Button
                        BackgroundColor="Red"
                        Command="{Binding DeleteCommand}"
                        Text="Delete"
                        TextColor="White" />
                </StackLayout>
            </StackLayout>
        </StackLayout>
    </ContentPage.Content>
</ContentPage>
Note line 10. I've explicitly added an AutomationId to the entry text. I can now adjust the test to use this:
    [Test]
    public void NewTest()
    {
        app.Tap(x => x.Text("Login"));
        app.Screenshot("Logged in - initial list of items");
        app.Tap(x => x.Text("Add New Item"));
        app.Screenshot("Empty detail record");

        AppResult[] results = app.Query("entrytext");
        Assert.AreEqual(1, results.Length);
        Assert.AreEqual("New Item", results[0].Text);

        app.Tap(x => x.Text("Save"));
        app.Screenshot("Back at list of items");
    }
Run tests on Visual Studio Mobile Center
Although this process is good, it requires that you own a large number of devices and you manually test. Visual Studio Mobile Center (introduced below) has a test facility that allows you to run the same tests on hundreds of real devices and get reports of failures. Combine this with crash and analytics reporting and you will have a robust release testing mechanism for your product.
You can now create a complete set of tests:
- Unit tests for the custom code in the mobile backend.
- Unit tests with a mocked backend for the mobile client.
- UI tests with a mocked backend for the mobile client.
- End to End UI tests with a test backend and known dataset.
When you are in the normal development cycle, you should be doing the first three on a very regular basis throughout the day. You should perform end to end tests with the known test backend across a wide variety of devices before every release to the public app store.
Distributing your Mobile Client to Beta Users
There are a number of services that will distribute your client applications to your beta users. Since I am working primarily within Azure and the Microsoft family of products, I'm going to use Visual Studio Mobile Center. As of writing, Visual Studio Mobile Center is in preview, but already supports a large number of highly desirable features. One of these features is beta distribution. To create an application:
- Sign in to Visual Studio Mobile Center. You will need to create an account if you have not already done so.
- Click Add new -> Add new app.
- Give your app a name and select the OS (iOS or Android) and Platform (Xamarin).
- Click Add new app at the bottom of the page.
Create two apps if you distribute both iOS and Android apps
If you are distributing both an iOS and an Android app, you will need to create two apps - one for the iOS edition and one for the Android edition.
At this point, the cloud infrastructure necessary to handle the mobile client app is created. We can move on to the distribution phase. We need to create a group and invite some beta users to our group before doing a distribution:
- Click the Distribute icon (it looks like three arrow pointing up if your menu is collapsed).
- Click New Group.
- Name your group something like Beta Testers.
- Enter a comma-delimited list of email addresses to invite users to join the group.
- Click Create Group.
Collect and register UDID for iOS Distribution
Another quirk of the iOS ecosystem. You will need to register the UDID for each iOS beta tester. Apple does not allow software to be installed on non-registered devices except via the App Store.
A group called Collaborators is created and maintained by default. This contains a list of people whom you are collaborating with via Visual Studio Mobile Center. The APK or IPA file must be generated first.
- Open your solution in Visual Studio 2017.
- Select the Release, Any CPU, TaskList.Android configuration in the menu bar (for Android).
- Right-click the TaskList.Android project and select Rebuild.
- Once the build is complete, click Build -> Archive....
- Once the archive is created, click Open Folder.
The process is similar for iOS. You must build for a device and will only be able to distribute to registered devices. Now that we have an APK file:
- Return to the Visual Studio Mobile Center and select your app.
- Click Distribute in the left-hand sidebar.
- Click the group you created.
- Click Distribute new release.
- Drag and drop the APK file from the open folder to the landing area (or click upload and find your APK file).
- Wait for the APK file to be uploaded. A thin blue bar above the landing area is used to indicate progress.
- While you wait, type in some release note into the box provided.
- Click Next.
- Click Next again, as the group is already selected.
- Click Distribute.
Your beta testers will now get an email telling them there is a new app available and how to download it.