Building a React app with Parcel, Typescript, SASS, and ESLint
create-react-app (CRA) is great for getting started super-fast. It has just about everything you need for building all but the most demanding apps. It is, however, opinionated in how things get set up, and I’ve been chafing at the limitations for a while.
- You can’t alter the
tsconfig.jsonexcept in some non-important ways. - It uses webpack underneath, and that is unchangeable.
- It uses jest and testing-library. Changing this is a pain.
There are even packages that rewire the CRA so that you can do more. CRA tries to be all things to all people. Sometimes, paring it back is a good idea. It allows you to understand your tool chain rather than taking it for granted. Today, I’m going to introduce you to my tool chain for React apps, building it from the ground-up.
Get started with Parcel
All JavaScript applications seem to start off the same way:
$> mkdir parcel-typescript-template
$> cd parcel-typescript-template
$> git init
$> mkdir webapp
$> cd webapp
$> npm init -y
$> git add -A
$> git commit -m "Initial checkin"
Why do I put my web application one directory down? Well, I normally create connected apps, so there is an infrastructure component which sits alongside the web application. By putting the web application in a sub-directory, I can also store the infrastructure.
I call this a
templatebecause I use this as a template for other projects. Set up the repository on Github as a template and this functionality becomes really easy! When you create a new repository in GitHub, you can use this one as the template for the new repo.
Add a LICENSE.md and README.md to this project at the top level. Finally, add a .gitignore file to each directory. I use gitignore.io for this initial part (now owned by Toptal). The top level gets the Visual Studio Code + MacOS, and the webapp gets react + Node.
Next, let’s create a basic React app using Parcel as the bundler and Typescript for the language. Everything happens in the webapp folder. First, add some libraries:
$> npm i -D parcel-bundler typescript @types/react @types/react-dom
$> npm i -s react react-dom
The first line installs the devDependencies: Parcel and Typescript, plus the type definitions for React. Technically, Parcel will install Typescript for me, but I like to be explicit - it saves time later on. The second line installs the dependencies that will be included in the final bundles.
Next, create a basic index.html file in a new src directory:
<!DOCTYPE html>
<html lang="en">
  <head>
    <meta charset="utf-8" />
    <meta name="viewport" content="width=device-width, initial-scale=1" />
    <title>parcel-typescript-template</title>
  </head>
  <body>
    <noscript>You need to enable Javascript to run this application.</noscript>
    <div id="root">
      <!-- Your react app will be rendered here -->
    </div>
    <script src="../src/index.tsx"></script>
  </body>
</html>
Note that I’m not including a bundle. I’m including my Typescript file (that I have yet to write) right in the script tag. Parcel will take care of bundling this for me. Aadd the following src/index.tsx file:
import React from 'react';
import { render } from 'react-dom';

const Application: React.SFC<{}> = () => (
  <h1>Application</h1>
);

render(<Application />, document.getElementById('root'));
As React applications go, this is fairly bare-bones. It prints Application in the web browser.
The final piece you absolutely must do is to configure Typescript. You can create a basic tsconfig.json file using npx tsc --init. There are a couple of things you must set though. Here is my minimal version (I’ve removed everything that is a comment from it):
{
  "compilerOptions": {
    /* Specify ECMAScript target version */
    "target": "es5",
    /* Specify module code generation */
    "module": "esnext",
    /* Specify library files to be included in the compilation. */
    "lib": [
      "ESNext",
      "DOM"
    ],
    /* Specify JSX code generation */
    "jsx": "react",
    /* Generate corresponding .map files */
    "sourceMap": true,
    /* Enable all strict type-checking options */
    "strict": true,
    /* Specify module resolution strategy */
    "moduleResolution": "node",
    /* Base directory to resolve non-absolute module names */
    "baseUrl": "./src",
    /* Maps imports to locations - e.g. ~models will go to ./src/models */
    "paths": {
      "~/*": [ "./*" ]
    },
    /* List of folders to include type definitions from */
    "typeRoots": [
      "node_modules/@types"
    ],
    /* allow import React instead of import * as React */
    "allowSyntheticDefaultImports": true,
    /*  Emit interop between CommonJS and ES modules */
    "esModuleInterop": true,
  },
  "include": [
    "src/**/*"
  ]
}
Now that I have all the code written, I want to run the application. Add the following to the package.json scripts section:
"scripts": {
  "start": "parcel src/index.html --open"
},
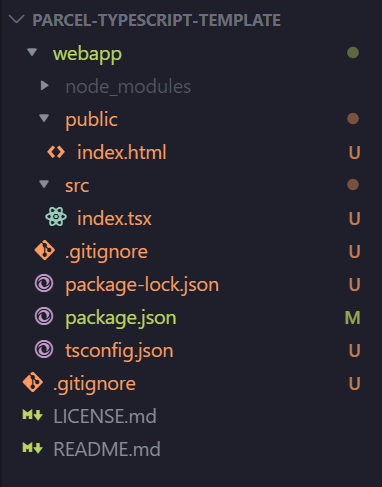
This tells parcel to bundle all the scripts together, then run it on a built-in server and open the default browser to the page. At this point, your directory structure should look like this:

It’s time to run the web app!
$> npm start
Your browser should open (eventually) and the application will be displayed.
I also want to be able to build a clean production version of the app. Parcel will happy build a copy of the web app in the dist directory for me. To ensure it is clean, I want to add a couple of modules:
$> npm i -D rimraf npm-run-all
The rimraf module allows me to remove a whole directory easily. The npm-run-all module allows me to run sequences of commands from within npm. Since I fully intend to add to the pre-build step, it makes sense to use this functionality as well. I can add the following to the scripts section:
"scripts": {
  "prebuild": "run-s clean",
  "build": "parcel build src/index.html --no-source-maps",
  "clean": "rimraf ./dist",
  "start": "parcel src/index.html --open"
}
Why do I like Parcel over Webpack? It’s a zero-configuration bundler (note that there was no configuration to do), and it is significantly faster than webpack. Why do I like TypeScript? I like the type safety. It allows me to spot type errors much more easily. Having Intellisense within Visual Studio Code isn’t a bad thing either!
Add SASS Stylesheets
Most applications have some sort of stylesheet. I tend to use ant.design as a component library, for instance. This requires a stylesheet, which I can include directly. I’ve got a bunch of SCSS files for making various things easier as well.
Tip You can include whatever you want in your own template. If you have a library of Typescript functions or SASS functions, or you always set up React Router, Redux, and a UI component library, then include it in the template.
Let’s create a src/assets/styles directory and place an _base.scss file in there:
@mixin full-page {
  height: 100%;
  left: 0;
  position: absolute;
  top: 0;
  width: 100%;
}
Then create a src/assets/index.scss file:
@import 'base';

html,
body,
div#root {
  @include full-page;
  margin: 0;
  padding: 0;
}
This will make the application “full screen” by default. There are other things you can do here. For instance, the entire Bootstrap4 is based on SASS, so you can pull that in easily. Just like create-react-app, you want to import the index.scss file into your index.tsx file:
import React from 'react';
import { render } from 'react-dom';
import './assets/index.scss';

const Application: React.SFC<{}> = () => (
  <h1>Application</h1>
);

render(<Application />, document.getElementById('root'));
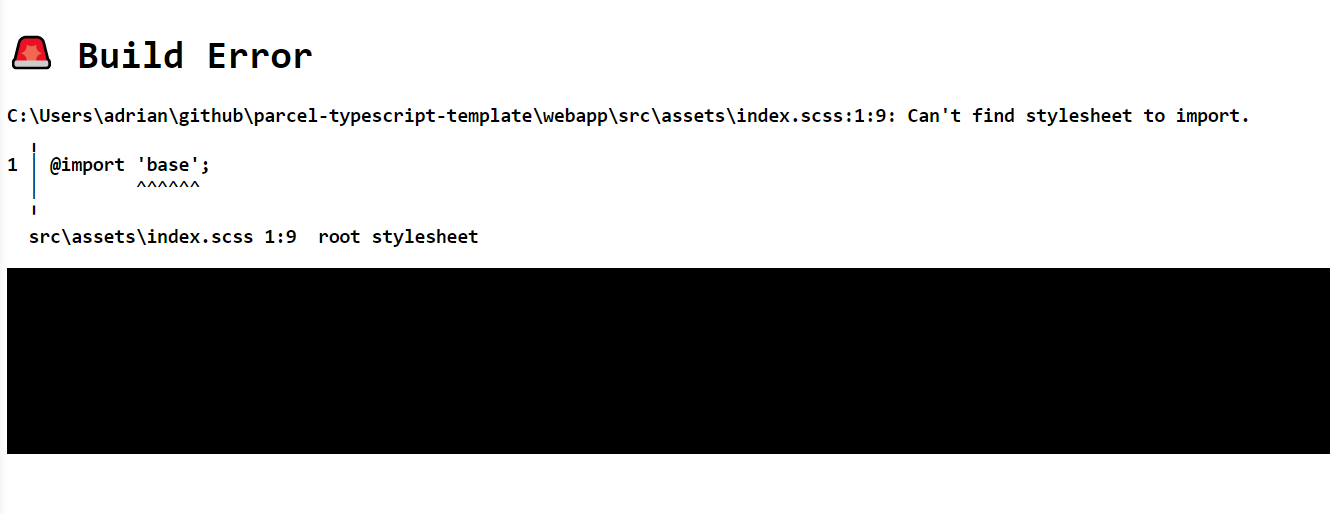
If you run the application now, you will get a build error - right in the browser (which is convenient):

This is a good indication of the error. The SASS processor doesn’t know to go looking in the src/assets/styles directory. To set this up, there is a convention - place the directory as the value for SASS_PATH in the .env file. Create a file called .env in the same place as your package.json file and add the following to it:
SASS_PATH="./src/assets/styles"
You will need to kill and re-run the npm start command to read this. Once you have re-opened your application, open up the browser developer tools and check that the CSS has been applied.
Linting with ESLint and Stylelint
My final step (for today, anyway) is to add linting to my application. CRA puts the eslint configuration in package.json. It convolutes the file and means other application (like Visual Studio Code, for instance) can’t take advantage of it. I like to place my configuration in a .eslintrc.js file so I can add comments to it.
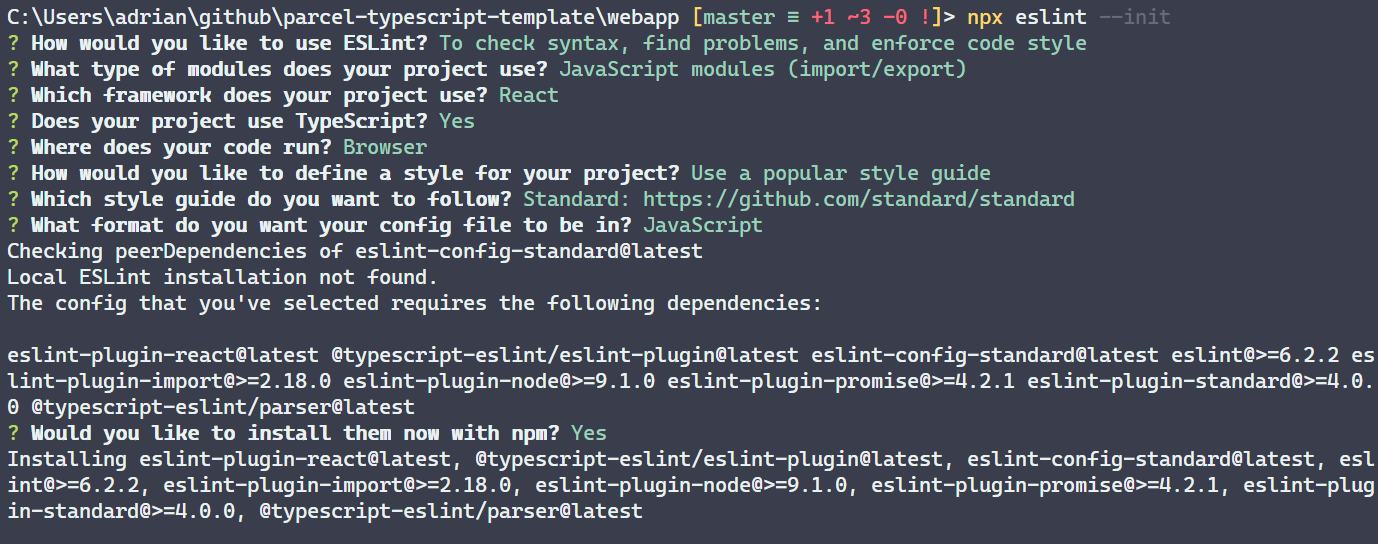
Start by running npx eslint --init:

This gives you a pretty good starting point for your own eslint configuration. I like to add to the default:
$> npm i -D @typescript-eslint/eslint-plugin eslint-plugin-react-hooks
The first library contains some defaults for TypeScript applications. The second provides some good rules for React Hooks. My .eslintrc.js file now looks like this:
module.exports = {
  env: {
    browser: true,
    es6: true
  },
  extends: [
    'eslint:recommended',
    'plugin:@typescript-eslint/eslint-recommended',
    'plugin:@typescript-eslint/recommended',
    'plugin:@typescript-eslint/recommended-requiring-type-checking',
    'plugin:react/recommended',
    'plugin:react-hooks/recommended',
    'standard'
  ],
  globals: {
    Atomics: 'readonly',
    SharedArrayBuffer: 'readonly'
  },
  parser: '@typescript-eslint/parser',
  parserOptions: {
    ecmaFeatures: {
      jsx: true
    },
    ecmaVersion: 2018,
    project: './tsconfig.json',
    sourceType: 'module'
  },
  plugins: [
    'react',
    'react-hooks',
    '@typescript-eslint'
  ],
  settings: {
    react: { version: 'detect' }
  },
  rules: {
  }
}
Now, add some more scripts to the package.json to run the linter:
"scripts": {
  "prebuild": "run-s clean lint",
  "build": "parcel build src/index.html --no-source-maps",
  "clean": "rimraf ./dist",
  "lint": "run-s lint:code",
  "lint:code": "eslint --ext ts,tsx src",
  "start": "parcel src/index.html --open"
},
The linter is placed in lint:code because I’m intending on having a stylelint configuration as well (left as an exercise for the reader - I’ve included it in my template though). The lint script will run all the linters, and the lint rule is triggered as part of the prebuild step.
Although I’ve used the “Javascript standard” style guide, I don’t actually use it verbatim since I don’t like some of the rules it enforces. It demands that you don’t use semi-colons, and I like semi-colons. However, it’s a good starting set and the rules are easy to adjust. Add a rule to the .eslintrc.js file:
  rules: {
    semi: [ 'error', 'always' ]
  }
This fixes up the errors in the lint output for me. I could also swap out eslint-config-standard for eslint-config-semistandard and get the same effect.
There are other good eslint plugins out there. Find the ones that help and include them. For the others? You don’t need them, so don’t use them. Keep your toolchain lean and to the point.
What’s next?
Is this any better than CRA? At this point, probably not. In fact, in many ways, it’s worse. For instance, there is no testing. However, I’ve made a good base on which to build. More to the point, I understand the toolchain because I’ve built it from the ground up and made decisions on what to include based on my needs. Given this good base, I can use the Github template features to mark this repository as a template and use it when creating new projects. More importantly, I don’t have to live with the CRA defaults because it’s inconvenient to change them.
You can find the repository on my GitHub repository. Feel free to clone it and modify to set up your own toolchain for your apps. If you clone it for yourself, don’t forget to mark your repository as a template (it’s at the top of Settings for the repository in GitHub).
In future articles, I’m going to extend the template with other features, including unit testing, storybooks, and infrastructure deployment. Stay tuned for those enhancements!

Leave a comment