
Azure Active Directory Authentication for Blazor WASM (Part 1: The Server)
Continuing my foray into Blazor WASM, I decided to tackle authentication. The Microsoft documentation has an excellent article on how to do this using the built-in tooling to create an AAD-enabled Blazor WASM application. However, I’m beyond the tooling at this point. My Blazor app is created. I need to augment the solution with the right code to enable authentication. I also want to make sure that I am not leaking secrets and the same code will work from development, through staging, to production. There is a little more to the story than the basic details provided by the documentation.
This article will be in three parts. This part will cover the the server code. The next part will cover the client code. Finally, I’ll take a look at what it takes to convert the basic code for flexible use across development to staging and production.
Jobs to be done
Integrating Azure Active Directory into an ASP.NET Core application is not hard. In fact, there is a recipe for it that has been repeated many times, and I’m going to repeat it again here.
- Create an app registration for the service in Azure Active Directory.
- Create a scope via Expose an API in Azure Active Directory.
- Copy the configuration of the Application Id into the application settings.
- Integrate the
Microsoft.Identity.Webpackage into the ASP.NET Core application. - Add the
IHttpContextAccessorservice into the ASP.NET Core application. - Set the controllers to use the
[Authorize]and[AllowAnonymous]attributes.
Step 1: Create an Application Id
Each service that wants to authenticate users needs to have a registration in the App Registrations section of Azure Active Directory. The application is then identified to Azure Active Directory via an Application Id that associates the service to the enterprise application that has been defined.
To create an App Registration:
- Sign in to the Azure portal, and navigate to Azure Active Directory.
- Select App registrations in the sidebar.
- Press the New registration button.
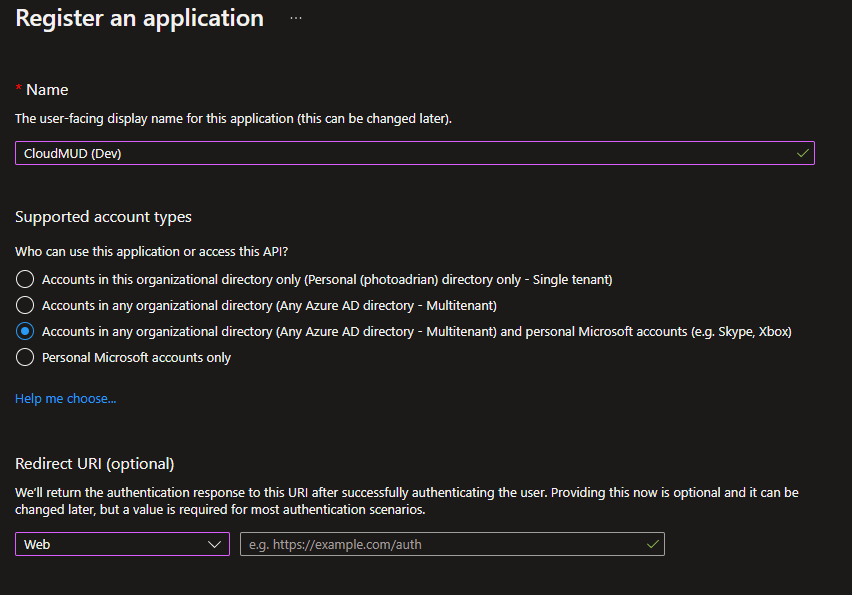
- Provide a name for the app (I used
CloudMUD (Dev)). - Choose a Supported account types. For this application, I’ve selected Accounts in any organizational directory (Any Azure AD Directory - Multitenant) and personal Microsoft accounts (e.g. Skype, Xbox) as this allows anyone who has either an AAD account or a Microsoft account to log into my app.
- The service does not require a Redirect URI, so leave the drop-down set to Web and don’t enter a redirect URI.
- Press the Register button at the bottom of the page.
You will now be shown the settings for the app registration. You can also get this information later. Navigate back to App registrations and select the app registration you created.
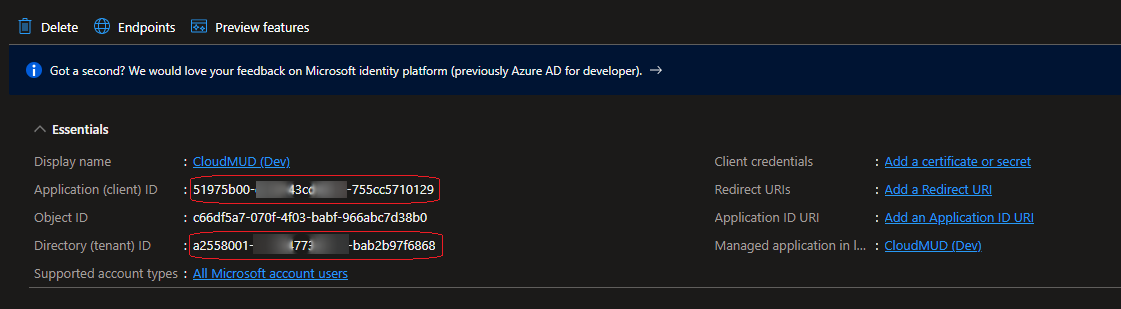
You will need three pieces of information:
- The Application (client) ID (the top highlighted and blurred value in the image above).
- The Directory (tenant) ID (the lower highlihgted and blurred value in the image above).
- The AAD Tenant domain. The domain is available as the Primary domain in the Overview blade for your AAD tenant.
I always open up a Notepad and just paste these in for later use.
Step 2: Expose an API with the app registration
Azure Active Directory uses OAuth2 underneath to handle authentication and authorization. In OAuth2, a client will request access to a scope. Exposing an API is really creating a scope that the client can request access to.
Back in the Azure portal:
- Navigate to the app registration you just created.
- Select Expose an API from the sidebar.
- Press Add a scope.
- You will see the Application ID URI is already filled in - press Save and continue.
- Fill in the form according to your requirements:
- The Scope name should be something like
API.Access- it’s appended to a URI, so make it small and descriptive. - Set Who can consent? to Admins and users.
- Fill in the rest of the form as you see fit. Note that each item here is displayed to users (or admins), so make sure you are descriptive.
- Ensure the State is set to Enabled.
- Press Add scope at the bottom of the page.
- The Scope name should be something like
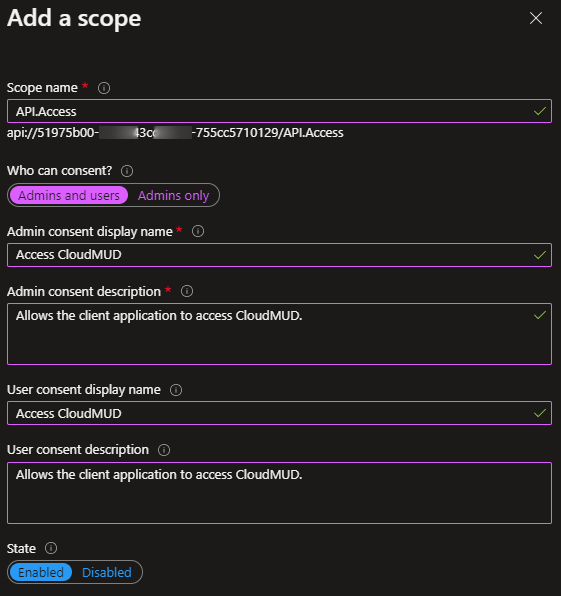
These consent form text boxes can be changed later on, so you can put whatever you like into them, then change them once you see how they are used. Add the Scope that you just added to the list of things in your notepad.
Step 3: Update appsettings.json
Now that I have the information I need to configure the service, let’s put it somewhere the service can read. Each ASP.NET Core application creates an IConfiguration object that is the combination of all the configuration sources. One of those sources is the appsettings.json file, and another is the appsettings.Development.json file - both are located in your project. If you place this information in either of those files, the information will get checked into source code and you will have “secret leakage” - a bad thing. Here is what I do.
First, update the appsettings.json file so that the form of the settings is recorded. This is the literal text of my appsettings.json file at this point:
{
  "AzureAd": {
    "Instance": "https://login.microsoftonline.com",
    "Domain": "{DOMAIN}",
    "TenantId": "{TENANT_ID}",
    "ClientId": "{APPLICATION_ID_FOR_SERVICE}",
    "CallbackPath": "/signin-oidc"
  },
  "Logging": {
    "LogLevel": {
      "Default": "Information",
      "Microsoft.AspNetCore": "Warning"
    }
  },
  "AllowedHosts": "*"
}
Note that I’ve included three fields that show what information I need in those fields. Those remind me to fill those in somewhere else. Now, where do I store the real values? There are two basic places - environment variables or the secrets manager.
If you choose environment variables, you set AzureAd__Domain, AzureAd__TenantId, and AzureAd__ClientId to the appropriate values. For example, with PowerShell (using the GUIDs in the documentation):
$env:AzureAd__Domain = "contoso.onmicrosoft.com"
$env:AzureAd__TenantId = "e86c78e2-8bb4-4c41-aefd-918e0565a45e"
$env:AzureAd__ClientId = "41451fa7-82d9-4673-8fa5-69eff5a761fd"
This is painful because you have to set these either through the launch profiles (which get checked in sometimes), or within your account. You can easily forget to set them or set them in the wrong place (for example, reset them in a PowerShell terminal, but then they aren’t passed into Visual Studio). For this reason, I prefer the secret manager, even if it does require a little more setup.
The secret manager tool hides implementation details, such as where and how the values are stored. On a Windows box, they are stored in %APPDATA%, which is outside of your repository. This is definitely a good thing. You can manage secrets right in Visual Studio. Right-click on the cloudmud.Server project and select Manage User Secrets. This will open a secrets.json file for you to edit. You can then set the values using a copy of the appsettings.json file:
{
  "AzureAd": {
    "Domain": "contoso.onmicrosoft.com",
    "TenantId": "e86c78e2-8bb4-4c41-aefd-918e0565a45e",
    "ClientId": "41451fa7-82d9-4673-8fa5-69eff5a761fd"
  }
}
The secrets overwrite the values in appsettings.json when the service is run (assuming the environment is development). When you press F5 in Visual Studio (or press the run button), you are running using the development environment.
Step 4: Integrate Microsoft.Identity.Web
The Azure Active Directory folks have made it super-easy to integrate the Microsoft Identity Platform into your ASP.NET Core app. Start by adding the Microsoft.Identity.Web NuGet package to your cloudmud.Server project. (I’m going to assume you know how to add NuGet packages to your projects).
To enable the platform, open the Program.cs file in your cloudmud.Server project. Add the following code right above the builder.Services.AddControllersWithViews() line:
builder.Services
    .AddAuthentication(JwtBearerDefaults.AuthenticationScheme)
    .AddMicrosoftIdentityWebApi(builder.Configuration.GetSection("AzureAd"));
This loads the AzureAd configuration (which is combined from the appsettings.json and the secrets manager) and then adds authentication services to the backend service. To actually use this, I need to add authentication and authorization support in the web request pipeline. Still in Program.cs, add the following right below the app.UseRouting() line:
app.UseAuthentication();
app.UseAuthorization();
Note that you must put the
UseAuthorization()line BELOWUseRouting().
Step 5: Add the IHttpContextAccessor service
While I have done enough to enable authentication and authorization, I won’t be able to see who is logged in when I create the controllers and the rest of the application. The “who” that is logged in is stored in the HttpContext. However, HttpContext is not thread-safe, so I need to inject a service that can provide the HttpContext in a thread-safe manner. This is the job of the HttpContextAccessor. The code is a one-liner. In Program.cs (right below the code you added builder.Services.AddAuthentication()... line), add the following:
builder.Services.AddHttpContextAccessor();
I normally simplify the Program.cs as much as possible with the use of extension methods. In this case, I would wrap all the authentication logic in two extension methods - one that operates on
IServiceCollection:builder.AddAuthenticationServices();Then another that adds the services to the request pipeline:
app.UseAuthenticationServices();This makes reading the Program.cs a lot easier when the code gets more complex.
Step 6: Update controllers to authorize users
There are two attributes that you can assign to controllers: [Authorize] and [AllowAnonymous]. Both provide for the processing of the authentication and authorization code. [Authorize] will return a 401 if the user does not submit a valid authorization token, whereas [AllowAnonymous] allows you to make a decision on what to return based on other information.
For now, I’m just going to add an [Authorize] attribute to my WeatherForecaseController:
[ApiController]
[Authorize]
[Route("[controller]")]
public class WeatherForecastController : ControllerBase
{
  // rest of the controller here...
}
Next steps
Actually, there isn’t a lot to do right now. I can’t test this out completely until I’ve completed the client side of things, which will allow me to sign in to the Blazor WASM app and pull authenticated information. However, I can run a Postman check to pull /WeatherForecast to ensure it returns a 401 Unauthorized error code.
The client piece is covered in the next blog post. Until then, happy coding!
Leave a comment