
Build a video processing pipeline with Cloudflare
Although most of the focus these days is on AI agents, they aren’t always the right choice. If what you want to do can be modelled by a flow chart, you probably want to do a workflow instead.
Let me take you through two examples:
- I have a set of topics - provide ongoing discovery of blogs and articles related to those topics, for each new article you find, make a determination of whether it will be interesting or not - if you think it will be interesting, then summarize it and send the summaries to me on a daily basis.
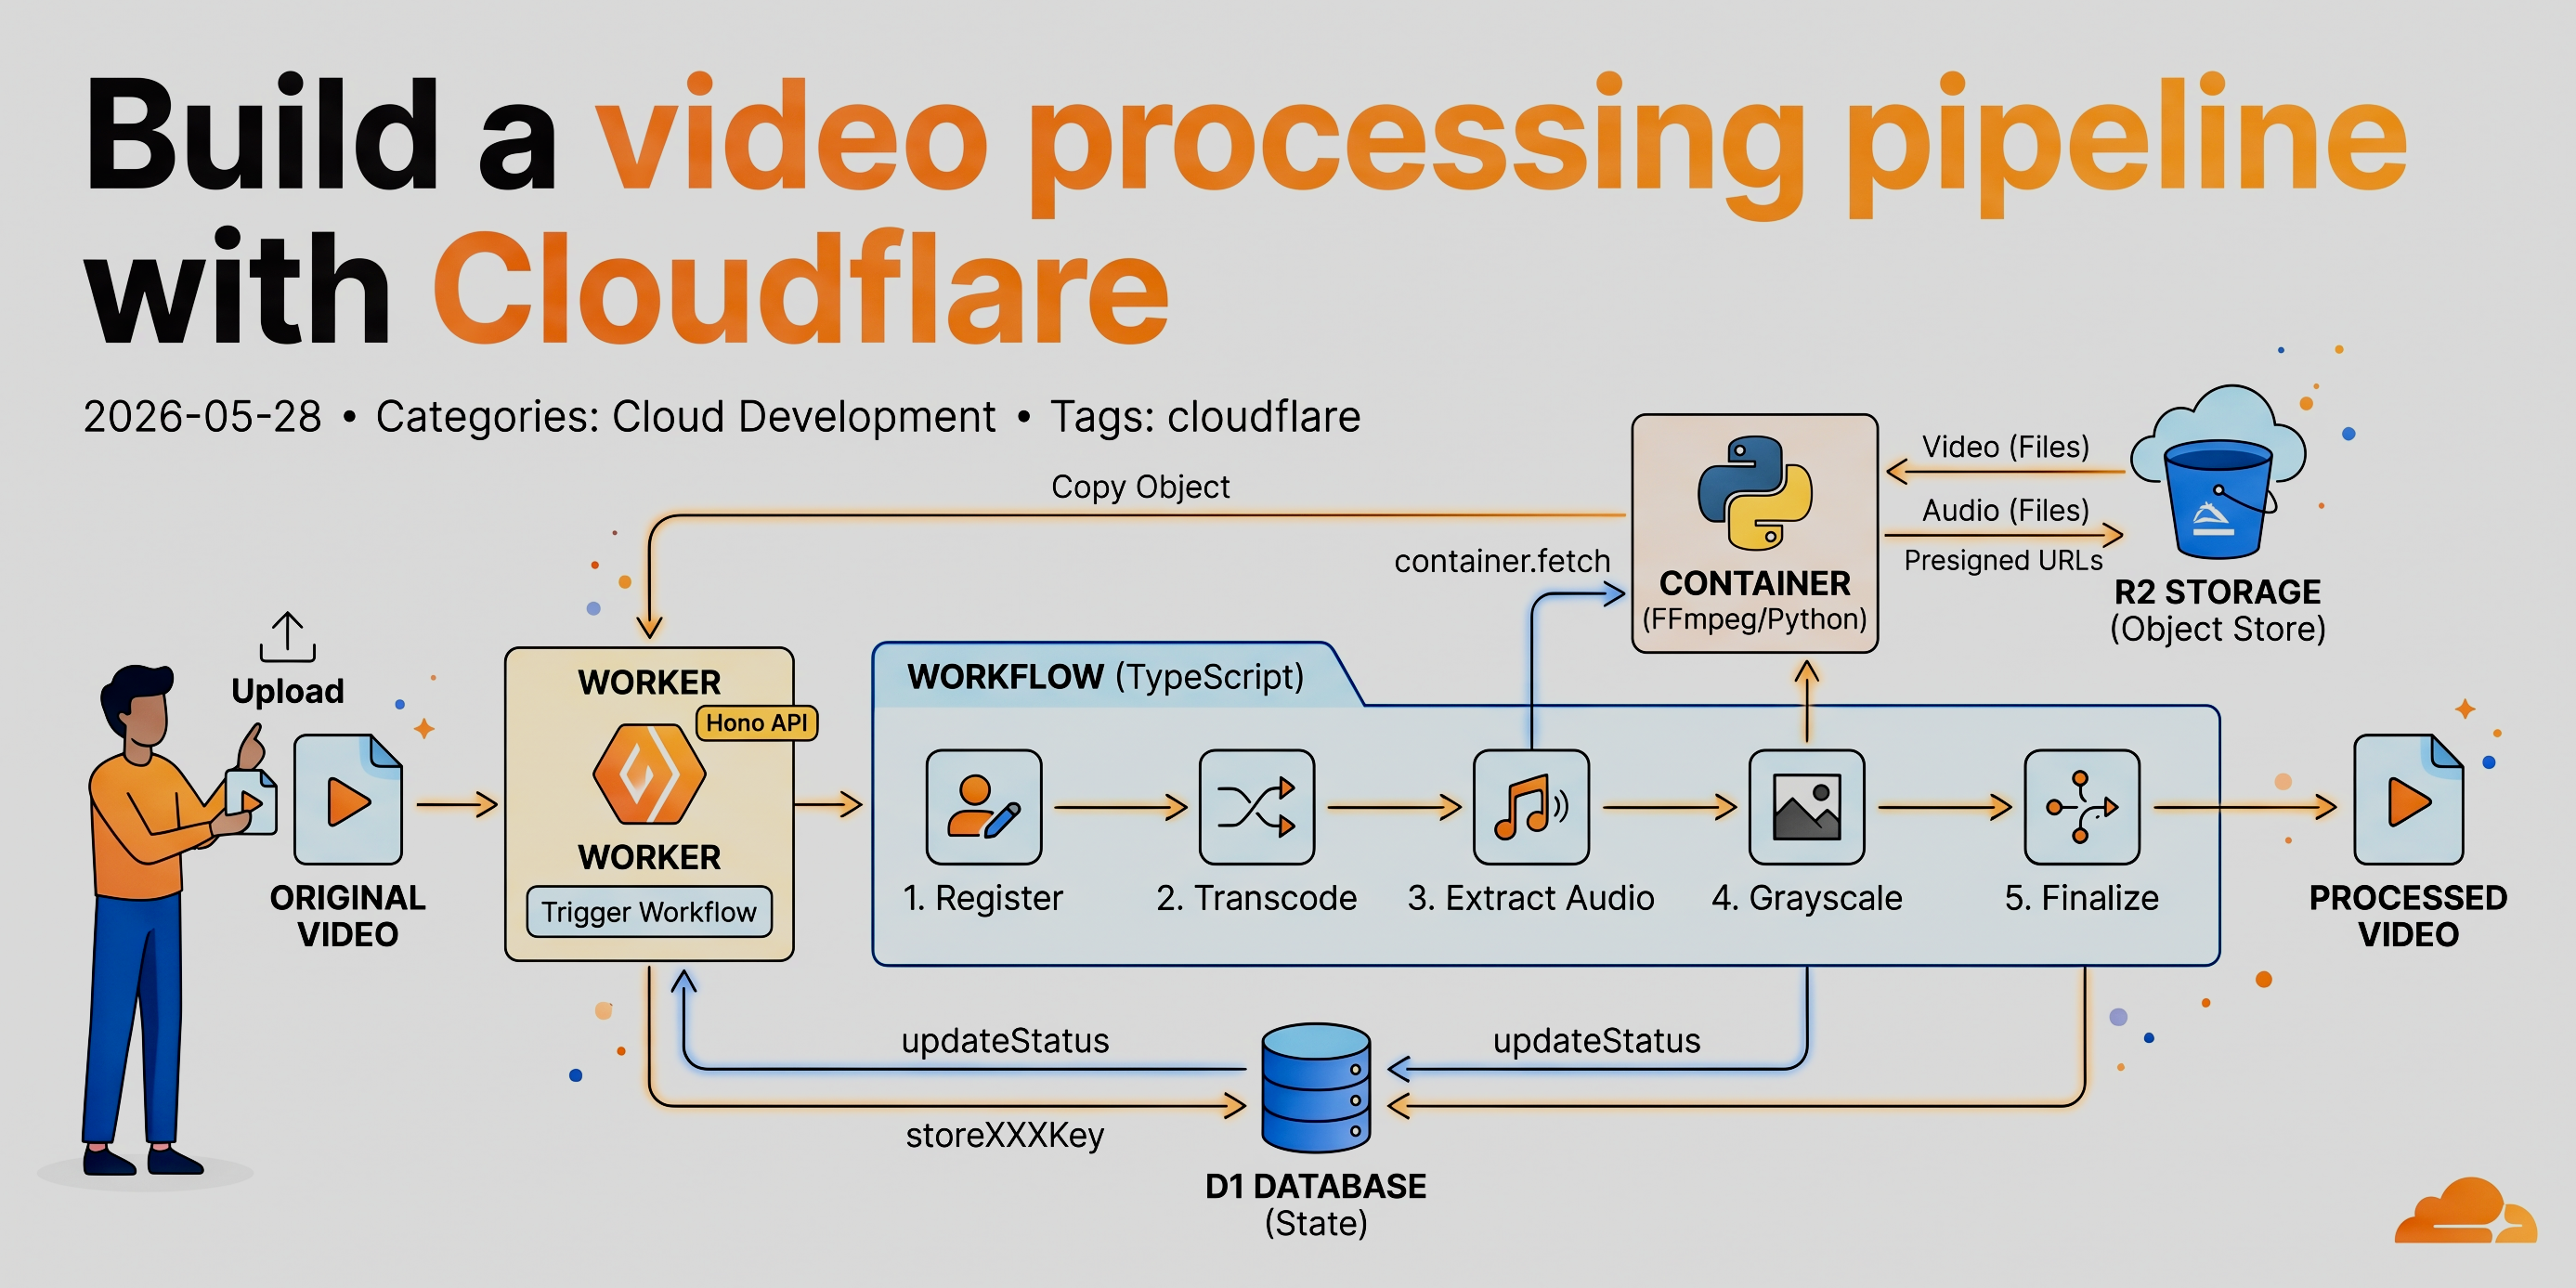
- When I upload a video, transcode it into my standard format, extract the audio, transcribe the audio and store as a text file, then grayscale the video and store it for playback.
Both of these use AI features - text summarization and audio transcription. But AI features alone don’t make it agentic. In the first example, AI is making decisions and acting autonomously. It’s deciding whether to send you the summary based on whether it thinks the article would be interesting to you. In the second example, the task is deterministic - the same set of actions are done every single time.
Example 1 is an AI agent. Example 2 is a workflow.
Anatomy of a Workflow
A workflow is a durable, stateful execution engine. The logic in a workflow is plain TypeScript code. Workflows implement deterministic flow charts with steps, checkpointing, and the ability to retry from any failed step.
If you are familiar with the other clouds, this is similar to AWS Step Functions or Azure Durable Functions, though there are architectural and operational differences. AWS Step Functions makes you define ASL or use the visual Workflow Studio. Workflows can also pick up from the last known good state. Azure Durable Functions, by contrast, use an event-sourcing replay model where the function re-executes from the start on every resume to rebuild state.
Workflows can be triggered via HTTP request, cron, and queues, among others. There is also a “wait for external event” capability that allows you, for example, to introduce human approvals in the middle of a workflow.
Since we are talking video processing, it’s worthwhile noting that Cloudflare does have a product (Stream) that is a media pipeline for live and on-demand video. I’m not going to use that, mostly because I want to work on workflows and containers - not premium services. I’m going to use a container to run ffmpeg for all my operations.
My architecture looks like this:
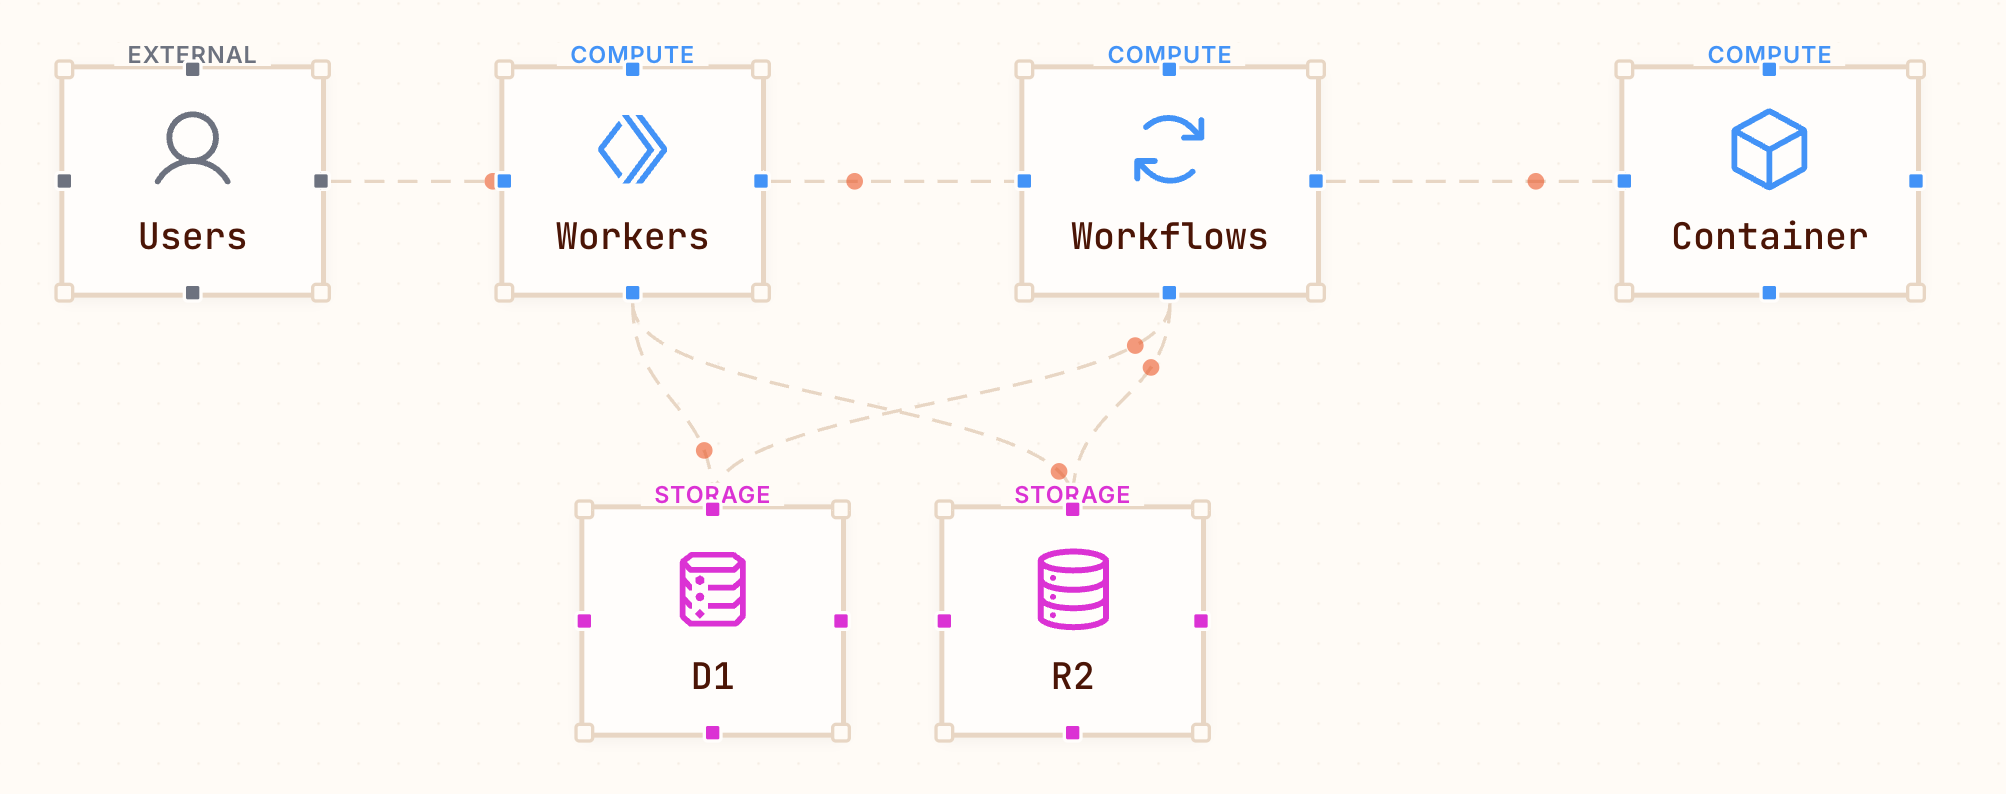
I have a web app served by a Worker from static assets; the same Worker hosts a Hono-based API. The Worker will trigger the workflow using a binding via an API call. The workflow then uses the container to fulfill the needed changes for videos. State is stored in D1 and the files are stored in R2.
Let’s look at my workflow:
export class VideoProcessingWorkflow extends WorkflowEntrypoint<Env, VideoWorkflowParams>
{
  async run(event: WorkflowEvent<VideoWorkflowParams>, step: WorkflowStep): Promise<void>
  {
    // Get the parameters for this run of the workflow
    const { videoId, originalFormat, r2IncomingKey } = event.payload;

    // Retry options
    const retryOpts = {
      retries: { limit: 3, delay: "10 seconds" }
    };

    try {
      // Step 1: Register
      await step.do("register", async () => {
        await this.updateStatus("processing", videoId);
      });

      // Step 2: Transcode
      await step.do("transcode", retryOpts, async () => {
        await this.updateStatus("transcoding", videoId);

        const outputKey = `video/${videoId}.mp4`;
        if (originalFormat === 'mp4') {
          await this.copyObject(r2IncomingKey, outputKey);
        } else {
          await this.callContainer("transcode", r2IncomingKey, outputKey, videoId);
        }

        await this.storeVideoKey(outputKey, videoId);
      });

      // Step 3: Extract Audio
      await step.do("extract_audio", retryOpts, async () => {
        await this.updateStatus("extracting_audio", videoId);

        const inputKey = `video/${videoId}.mp4`;
        const outputKey = `audio/${videoId}.mp3`;
        await this.callContainer("extract_audio", inputKey, outputKey, videoId);

        await this.storeAudioKey(outputKey, videoId);
      });

      // Step 4: Convert to grayscale
      await step.do("grayscale", retryOpts, async () => {
        await this.updateStatus("grayscale", videoId);

        const inputKey = `video/${videoId}.mp4`;
        const outputKey = `bwvideo/${videoId}.mp4`;
        await this.callContainer("grayscale", inputKey, outputKey, videoId);

        await this.storeFinalKey(outputKey, videoId);
      });

      // Step 5: Complete
      await step.do("finalize", async () => {
        await this.env.BUCKET.delete(r2IncomingKey);
        await this.updateStatus("complete", videoId);
      });
    }
    catch (err)
    {
      // Error handling
      await step.do("mark-error", async () => {
        await this.env.DB
          .prepare("UPDATE videos SET status = ?, error_message = ? WHERE id = ?")
          .bind("error", String(err), videoId)
          .run();
      });

      throw err;
    }
  }
}
The main flow is segmented by a series of steps. Each step is a “step.do()” call with an async callback that implements the step. You can put whatever you want in the step and it will be executed in one shot. Other step types include:
step.sleep()(sleep for a period of time)step.sleepUntil()(sleep until a particular date/time)step.waitForEvent()(wait for a specific event, like a webhook or human approval)
There are a lot of helpers here:
this.updateStatus()updates the status of the processing in the database.this.storeXXXKey()stores the result keys in the database.this.copyObject()does a standard GET then PUT to copy a blob in R2.
R2 is an “S3-compatible” blob storage service. That means I can throw around presigned URLs for access. I can even use the same AWS SDK for generating presigned URLs. I use this to transfer data around the system.
The main meat of the request, though, is in .callContainer():
private async callContainer(
  op: string,
  inputKey: string,
  outputKey: string,
  videoId: string): Promise<void>
{
  const inputUrl = await generatePresignedUrl(inputKey, "GET");
  const outputUrl = await generatePresignedUrl(outputKey, "PUT");
  const container = this.env.FFMPEG_CONTAINER.getByName(videoId);
  const requestOptions = {
    method: 'POST',
    headers: {
      'Content-Type': 'application/json'
    },
    body: JSON.stringify({
      input_url: inputUrl,
      output_url: outputUrl
    })
  }
  const resp = await container.fetch(`http://container/${op}`, requestOptions);
  if (!resp.ok) {
    throw new Error(`fetch of ${op} for ${videoId} failed: ${resp.statusText}`);
  }
}
Aside from using container.fetch instead of fetch, this is precisely the same code you would write if you were calling an HTTP endpoint.
Using presigned URLs causes problems when running locally
When you are running locally (with wrangler dev), the env.R2BUCKET (or whatever your binding is) points to the local miniflare version of storage. However, when you are generating pre-signed URLs, you’ll pass in environment variables for this purpose, which inevitably point to the remote R2 instance. If you are not careful, you can have your container reading and writing from one place (the remote service) and the rest of your service reading and writing from a different place (the local service).
Either use bindings throughout OR use environment variables and the S3 SDK throughout. Don’t mix and match, or you won’t be able to effectively run locally.
Setting up containers
Containers are super useful in Cloudflare because they allow you to run code that you would not be able to in the v8 isolate model that they use. You are limited to JavaScript-based runtimes (and, more recently, Python). With containers, I can run things like Python with native bindings, .NET, and Java, or even command lines like ffmpeg. Containers are ideal for running more long-running operations as well.
Since you inevitably call the container via HTTP, you will need a web service running. My code uses Python and Flask (why? Because the coding LLM I was using said so - no other reason than that. I’m not trying to prove a point!). Building the container is completely standard, but there are a couple of gotchas.
Gotcha 1: Signal processing
Cloudflare tells the container to stop by sending it SIGTERM, which gets delivered to PID 1. In a normal container, the ENTRYPOINT is PID 1. If you don’t have one, then the CMD is PID 1. Whatever that is needs to handle the SIGTERM signal or your container won’t sleep.
Node and Python don’t handle signals unless you explicitly tell them to. That is the gotcha.
The easiest answer is to use something that DOES handle signals as your ENTRYPOINT. My favorite go-to tool for this is tini. You can install it during the container build with apt-get or your favorite package manager. tini does more than just pass on signals properly, but that is the primary purpose for us.
Gotcha 2: Self-signed certificates
When running locally, wrangler starts a separate container in addition to the one you create. This is called cloudflare/proxy-everything and is used to intercept all outbound communication when running locally. Although I was talking to R2 directly, the traffic was going through the cloudflare/proxy-everything sidecar, which presented a self-signed certificate instead of the valid R2 certificate. So, even though I was talking to a service that provided a suitable certificate, I had to configure my fetch calls within the container to ignore self-signed certificate problems. This is actually NOT a problem because R2 presigned URLs are already authenticated.
Gotcha 3: Sizing
Containers have one of six sizes - lite (which is 1/16 vCPU and 256MiB memory) is the default size if you don’t specify one. This means your video processing tool is going to be severely constrained. The likelihood is you will see an “exit -9” or an “error code -9” when dealing with containers at some point. The -9 means your container got killed with an out-of-memory error. Move to a bigger size. For my purposes, I selected “standard-1”, which has half a vCPU and 4GiB of memory.
I also switched to streaming the video and processing each video in chunks. This was a significant change vs. reading the whole video and letting ffmpeg just deal with it. However, it moved the required memory from several GiB to around 200MiB immediately.
Gotcha 4: Startup
Each container has an associated class. If you don’t specify one, then the default one is used which probably isn’t what you want. The container class holds the lifecycle methods that are called when the container is started, stopped, evicted, etc. You can (and should) add logging here.
For my purposes, I wanted to see what was going on in fetch and I saw that even though the container was showing as “healthy”, it wasn’t ready to receive connections before I threw a fetch at it. I overrode the fetch in the container with my own one:
export class FFmpegContainer extends Container<Env> {
  override defaultPort = 8080;
  override sleepAfter = "5m";
  override pingEndpoint = "localhost/health";

  /**
   * Example of one of the lifecycle hooks
   */
  override onStart(): void {
    console.log("[FFmpegContainer] started...");
  }

  /**
   * The important one - fetch replacement
   */
  override async fetch(request: Request): Promise<Response> {
    // Wait for port 8080 to be available - 30 seconds is default timeout
    // This is a no-op if the container is already running
    await this.startAndWaitForPorts();

    // Do a health check
    const healthResp = await this.containerFetch("http://localhost/health");
    if (!healthResp.ok) {
      throw new Error('Container health check failed');
    }
    const healthContentType = healthResp.headers.get("content-type") ?? "";
    if (!healthContentType.includes('json')) {
      throw new Error('Container health check is not returning JSON');
    }

    // Proxy the actual request
    const resp = await this.containerFetch(request);
    if (!resp.ok) {
      // deal with the error - logging is good!
    }
    return resp;
  }
}
I used a two-step process - first, this.startAndWaitForPorts() waits until the defaultPort on the container is up and receiving connections. Secondly, I then check to see if it’s healthy by probing the health endpoint. If these two fail, throw an error. This, in turn, allows the workflow to back off and retry in a little bit when the service may be healthy again. It’s also an ideal time to do some logging. My original version of the container, for example, contained a bug where it returned an HTML diagnostics page. This was noticed because of this code (and a strategically placed console log).
Operational Gotchas
There were a few gotchas on the operations side that I should mention:
- Terraform can’t set up R2 CORS. You have to use
wrangler r2 bucket cors setinstead - it’s an extra step during deployment. - You can’t delete an R2 bucket if it’s not empty. I wrote a small script to delete the contents of the bucket during tear down that may be useful.
- Since Terraform doesn’t manage the container lifecycle (wrangler does), I also had to write a small script to clean up containers and container images.
- Generating API tokens for R2 operations in Terraform is possible, but needs post-processing before you can use them with the AWS SDK.
This last point deserves a little bit of explanation. When you use the AWS SDK to access any S3-compatible API (including R2), you need an access key and a secret key. To create these, you create an API token - I use Terraform to do this. However, the secret key that is returned cannot be used directly. You need to generate the sha256 of the secret key. I do this in my terraform outputs.tf file:
output "r2_token_id" {
  description = "R2 API token ID, used as the S3-compatible Access Key ID for presigned URL generation."
  value       = cloudflare_account_token.r2_token.id
  sensitive   = true
}

output "r2_token_value" {
  description = "SHA-256 hash of the R2 API token value, used as the S3-compatible Secret Access Key for presigned URL generation. R2's S3-compatible API requires the hash, not the raw token value — see https://developers.cloudflare.com/r2/api/tokens/"
  value       = sha256(cloudflare_account_token.r2_token.value)
  sensitive   = true
}
These are then injected into my service as environment variables. Yes - I should use secrets, but this is a demo, and I wanted to prioritize convenience over security.
Final thoughts
When you build enterprise applications, you tend to use the same core set of features: Static assets, APIs, database, object store, identity, workflows, notifications, and real-time. Without workflows, everything you do is request-response. Workflows allow you to do things in the background, so they are critical to enterprise apps. Pairing workflows with containers supercharges the capabilities, allowing you to run diverse workloads or tools, which really expands the types of apps you can deploy at the edge.
You can find my (vibe-)code on GitHub - it’s complete and can be easily deployed using npm run provision && npm run deploy after you have created a suitable API token.
Leave a comment