
Authentication with AWS Amplify and Android: Integrating TOTP
This will be an in-depth series on authentication with [AWS Amplify]. Here are the topics I am going to cover, and I will update each blog with the links as I complete the articles.
- The basics - a username/password system.
- Customizing the UI.
- Authenticating with Facebook.
- Authenticating with Google.
- Using third-party authentication providers.
- Using Time-based One-time passwords (TOTP).
- Using Biometric authentication.
- Doing fraud protection and analytics.
Over the last five articles, I’ve covered several methods of authenticating your users. With this article, I’m forgetting Facebook, Google, and OIDC exist and concentrating on a basic username / password system. Specifically, I’m going to start talking about security and how to ensure your users credentials are protected.
If you wish to start your backend from scratch (and I recommend you do as some settings in Amazon Cognito can only be set on initial configuration), use amplify delete to easily delete all the backend resources.
The service I am using for the username and password storage is Amazon Cognito user pools. This is an OIDC compliant provider that gives you sign-in capabilities together with self-service sign-up and forgot password flows. We integrated those into the app in the first and second articles. However, that isn’t enough. Most users want more security today, especially if the data you are storing is important to them. For that reason, it’s a good idea to think about multi-factor authentication.
There are three factors of authentication:
- Something you know (for example, a username and password)
- Something you have (for example, a hardware token, or your phone)
- Something you are (for example, your fingerprint)
Multi-factor authentication requires multiple factors to authenticate. For example, in this article, we are going to deal with “something you know” (the username and password) and combine it with “something you have” (an app on your phone). There is a technicality here - if we are on the phone doing the username and password, and that same phone receives the token, is it really multi-factor authentication? The jury is out on that and it’s up to you to decide for yourself.
Time-based One Time Passwords
The second factor could be a code that is sent via email or SMS (which is the “normal” multi-factor authentication mode). Recently, time-based one-time passwords (or TOTP) have become popular. If you have used the Facebook “Code Generator” or Google Authenticator, then you already have something that generates TOTP tokens. They are used in place of the code that is sent via email or SMS.
In this article, we are going to go back to our original username and password authentication system that we produced in the first two articles. We will then extend that system to configure and then use TOTP for the multi-factor authentication.
Configuring the backend
You can easily re-create the backend using the following:
$ amplify init
$ amplify add auth
$ amplify add analytics
$ amplify push
Setting up TOTP is easily accomplished when using amplify add auth with the following answers:
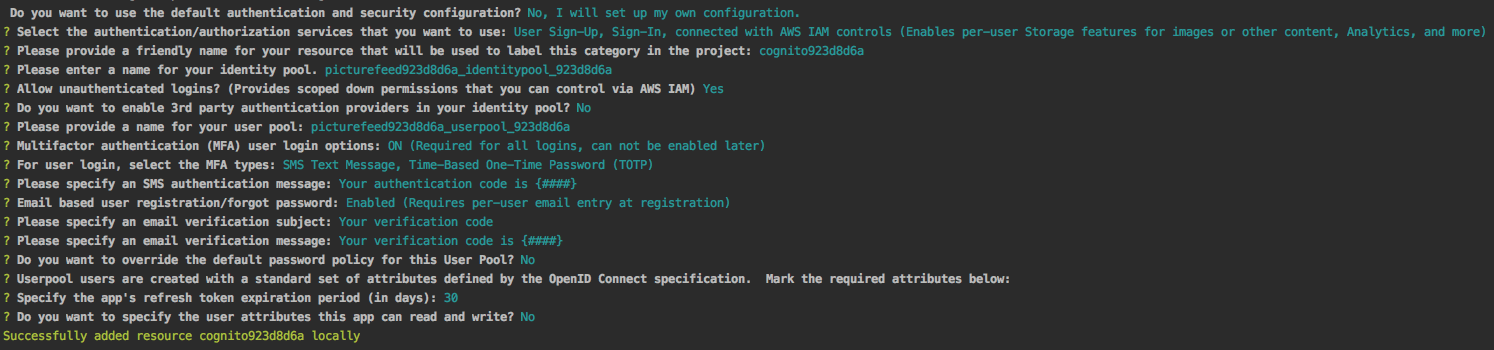
The important question here is “For user login, select the MFA types”. You can select SMS and TOTP. You can express a preference for the type on a per-user basis.
Front end – the process
There are two parts for the front end that we must consider. Firstly, some time after sign-in, we must configure TOTP within Amazon Cognito. This involves linking the TOTP application (e.g. Google Authenticator) with Amazon Cognito. The second thing is that we must use the authenticator when asked for the multi-factor authentication during the login process. The fortunate thing here is that asking for the TOTP is already done - we’ve integrated multi-factor authentication within our app already (as a dialog) and the request for the TOTP is delivered the same way.
That leaves us with configuring TOTP for an individual user. For this, I’m going to establish a new activity (called ConfigureTOTPActivity) that will do the work for me. This implements the following logic:
- The activity initiates the TOTP sign-up. This is another “authentication flow” that needs to be managed.
- The callback is called with a “Secret Code”. This is used to generate the QR Code and configure the TOTP generator.
- The user is prompted for a code from the TOTP generator. Once provided, the continuation is called.
- If the code matches, the callback is called with SUCCESS.
To implement this, I’ve added a new method to the IdentityRepository interface:
/**
 * Initiate registration for TOTP passwords
 */
fun initiateTOTPSignup(handler: IdentityHandler)
This has also been added to the AuthenticatorViewModel as a pass-thru, similar to the other flow initiation methods. I’ve also added an element into the nav_drawer_menu.xml file:
<item
    android:id="@+id/main_drawer_totp"
    android:icon="@drawable/ic_password_black_24dp"
    android:title="@string/nav_totp"
    android:enabled="false" />
I’ve updated the updateNavigationDrawer() method in the MainActivity to enable or disable the menu item based on the authentication:
private fun updateNavigationDrawer(isSignedIn: Boolean = false) {
    val loginItem = nav_view.menu.findItem(R.id.main_drawer_login)
    val totpItem = nav_view.menu.findItem(R.id.main_drawer_totp)
    if (!isSignedIn) {
        loginItem.title = resources.getString(R.string.nav_signin)
        totpItem.isEnabled = false
    } else {
        loginItem.title = resources.getString(R.string.nav_signout)
        totpItem.isEnabled = true
    }
}
Finally, I’ve added some code to the onNavigationItemSelected() method in the MainActivity to switch to the ConfigureTOTPActivity when the menu item is clicked:
override fun onNavigationItemSelected(item: MenuItem): Boolean {
    when (item.itemId) {
        R.id.main_drawer_login -> {
            if (authModel.currentUser.value != null) {
                authModel.signOut()
                toast("Successfully signed out")
            } else {
                startActivity<AuthenticatorActivity>()
            }
        }
        R.id.main_drawer_totp -> {
            startActivity<ConfigureTOTPActivity>()
        }
    }
    drawer_layout.closeDrawer(GravityCompat.START)
    return true
}
Now that the basics of switching to the new activity are covered, let’s take a look at implementation of the TOTP initialization process.
The IdentityRepository
We’ve already established that the initiation of the TOTP configuration flow will trigger the initiateTOTPSignup() method. This will call associateSoftwareTokenInBackground() to initiate the process on the backend. There are three callbacks:
onVerify()is called first. This contains the “secret key”. To progress, the user needs to configure their TOTP app with the secret key (more on how to do that in a little bit), then callsetVerificationResponse()with a TOTP that has been generated.onSuccess()is then called to indicate success. This isn’t the end of the process, as we will see.onFailure()is called if there are any problems with the process.
Once successful, you need to also set TOTP as the preferred method. This is done with setUserMfaSettingsInBackground() once the TOTP registration is successful.
Let’s turn this into code:
override fun initiateTOTPSignup(handler: IdentityHandler) {
  userPool.currentUser.associateSoftwareTokenInBackground(null, object : RegisterMfaHandler {
      override fun onSuccess(sessionToken: String?) {
          val mfaSettings = listOf(
                  CognitoMfaSettings(CognitoMfaSettings.SMS_MFA).apply {
                      isEnabled = true
                      isPreferred = false
                  },
                  CognitoMfaSettings(CognitoMfaSettings.TOTP_MFA).apply {
                      isEnabled = true
                      isPreferred = true
                  }
          )
          userPool.currentUser.setUserMfaSettingsInBackground(mfaSettings, object : GenericHandler {
              override fun onSuccess() = runOnUiThread { handler(IdentityRequest.SUCCESS, null) { /* Do Nothing */ } }
              override fun onFailure(exception: Exception?) = handleFailure(handler, exception?.message)
          })
      }

      override fun onFailure(exception: java.lang.Exception?) = handleFailure(handler, exception?.message)

      override fun onVerify(continuation: VerifyMfaContinuation?) {
          runOnUiThread {
              handler(IdentityRequest.NEED_MULTIFACTORCODE, continuation?.parameters) { response -> run {
                  with (continuation!!) {
                      thread(start = true) {
                          setVerificationResponse(response?.get("mfaCode"), "Android App")
                          continueTask()
                      }
                  }
              }}
          }
      }
  })
}
The ConfigureTOTPActivity
The activity uses the same AuthenticatorViewModel as all the other auth activities. In the onCreate() method, we initiate the TOTP signup:
override fun onCreate(savedInstanceState: Bundle?) {
    super.onCreate(savedInstanceState)
    setContentView(R.layout.activity_configure_totp)
    model.initiateTOTPSignup { i,p,c -> handler(i, p, c) }
}
The handler is where the main work happens. We need to deal with three callbacks (values of identityRequest):
NEED_MULTIFACTORCODEis called when theassociateSoftwareTokenneeds validating. We need to show the secret key to the user, allow them to configure their TOTP generator app and then gather one token.SUCCESSis called when the process is successful.FAILUREis called when the process fails.
The secret key can be generated in one of two ways. First, there is a very long and obnoxious random secret to enter manually into the TOTP generator. This is good if the user is using “copy-and-paste” to set up their TOTP generator app. The other method is to create a URI and turn that URI into a QR code. The URI must have the form:
otpauth://totp/Issuer:account?secret=secretKey&issuer=Issuer
The issuer and account are strings that you provide. So you might want to set the issuer to your app name and the account to the username of the user. The secretKey is provided by Amazon Cognito. To turn this into a QR code, I’m using the QRGen library that I found on Android Arsenal. This is an easy-to-use QR code generator that can generate bitmaps for an ImageView.
Let’s look at this in practice:
private fun handler(identityRequest: IdentityRequest, params: Map<String,String>?, callback: IdentityResponse) {
    when(identityRequest) {
        IdentityRequest.SUCCESS -> {
            Log.d(TAG, "handler: SUCCESS")
            this@ConfigureTOTPActivity.finish()
        }

        IdentityRequest.FAILURE -> {
            Log.d(TAG, "handler: FAILURE")
            alert(params!!.get("message")!!) {
                title = "TOTP Configuration Failed"
                positiveButton("Close") { this@ConfigureTOTPActivity.finish() }
            }.show()
        }

        IdentityRequest.NEED_MULTIFACTORCODE -> {
            try {
                if (params != null) {
                    val secretCode = params["secretKey"]
                    if (secretCode != null) {
                        totp_secretcode.text = secretCode
                        val uri = "otpauth://totp/Amazon%20Cognito:${model.currentUser.value?.id}?secret=$secretCode&issuer=Amazon%20Cognito"
                        val bitmap = QRCode.from(uri).bitmap()
                        totp_qrcode.imageBitmap = bitmap

                        // Set up the Validate button to validate the code
                        totp_validatecode.onClick {
                            val mfaDialog = layoutInflater.inflate(R.layout.dialog_multifactor_auth, null)
                            val mfaCodeInput = mfaDialog.find(R.id.dialog_mfa_code) as EditText
                            val mfaInstructions = mfaDialog.find(R.id.dialog_mfa_instructions) as TextView
                            mfaInstructions.text = resources.getString(R.string.totp_validate_instructions)
                            alert {
                                title = "Enter TOTP Code"
                                customView = mfaDialog
                                positiveButton("OK") { callback(mapOf("mfaCode" to mfaCodeInput.text.toString())) }
                            }.show()
                        }
                        totp_validatecode.isEnabled = true
                    } else {
                        throw IllegalArgumentException("No secretCode provided")
                    }
                } else {
                    throw IllegalArgumentException("No parameters provided")
                }
            } catch (error: Exception) {
                alert(error.localizedMessage) {
                    title = "Something went wrong!"
                    positiveButton("Close") { this@ConfigureTOTPActivity.finish() }
                }
            }
        }

        else -> {
            analyticsService.recordEvent("ERROR", mapOf("error" to "unexpected identity request"))
            alert("Unknown or unexpected identity request") {
                title = "Something went wrong!"
                positiveButton("Close") { /* Do Nothing */ }
            }.show()
        }
    }
}
Other concerns
What happens if you do not set TOTP as the default preferred multi-factor authentication provider? (Yes, I did this!)
When you sign-in, the authenticationChallenge() is called with a challengeName of SELECT_MFA_TYPE. The challenge parameters contain (among other things) a list of configured MFA types - most notably, they will be SMS_MFA and SOFTWARE_TOKEN_MFA. You have to respond to that challenge with an MFA_TYPE set to the appropriate value. The authentication process will then continue as before.
What about asking the appropriate question when asking for TOTP?
When getMFACode() is called, the challengeName will be set to SOFTWARE_TOKEN_MFA or SMS_MFA, depending on what sort of code it is expecting. You can use this to adjust the message that is provided to the user.
Wrap up
I’m not a big fan of TOTP for mobile apps. (I’m a big fan of TOTP for web apps, however). The TOTP is in another app, but on the same phone, so it’s hard to configure and requires you to swap apps to get the token. However, it’s unavoidable because of security requirements sometimes. Fortunately, Amazon Cognito supports this mode and can be adaptive in its requirements (as we shall see in the last article in this series). Also fortunately, it’s easy to configure and use within a mobile app, and the multi-factor authentication feature is flexible enough to accomodate whatever features you want.
Leave a comment